
CINE-101 · Lesson 12 of 12 · 24 min
A short production and critique
The final project of this course brings everything together: you will make a short film from idea to delivery, with a small crew, modest equipment and a real deadline. Short films are where nearly every filmmaker learns, because they force you to make every decision of a feature on a scale you can manage and finish. This lesson sets out the project, walks through an example production from idea to screening, including the problems it met, and explains how to give and receive critique so that each film teaches you something for the next.
The project brief
Make a finished short film of three to five minutes, either narrative (a scripted story with at least two characters and at least one dialogue scene) or documentary (a portrait of a person, place or activity with at least one interview and observational sequences). It must be shot by you and your crew during the course, with clean location sound, and delivered with a title, credits, captions and a mix at the specified loudness. You will submit:
- A one-paragraph logline and synopsis, and either a script (narrative) or a treatment and interview questions (documentary).
- Pre-production documents: a shot list or storyboard for at least one scene, a floor plan for one scene, a schedule, a location scouting report, signed releases, a simple budget and a call sheet for one day (Lesson 9).
- Production records: camera and sound reports for one day, and a data management log (Lesson 10).
- The finished film, exported as a master file and an online delivery file (Lesson 11).
- A reflection of about 800 words analyzing what worked, what did not, and what you would do differently.
Keep the story small. The best short films usually take place in one or two locations, with few characters, over a short span of time, built around a single change or revelation. A simple story told well is always better than an ambitious story told badly.
Example production: idea and script
The following example follows a student production through the process. The idea was a moment the filmmaker had observed: an older man waiting every evening at a bus stop for a bus that has stopped running. The logline read: "A retired bus driver keeps a nightly vigil at a stop on his old route until a young night-shift worker asks why." The script was four pages: an exterior night scene at the bus stop, a short dialogue between the two characters, and a final shot of the man boarding a different bus, beginning to accept the change.
Script feedback from classmates led to two improvements: cutting a line in which the man explained his feelings (the performance and images could carry them), and adding an early insert of an old route map in his hands, which the audience would later understand. Good feedback at the script stage costs nothing; the same changes discovered in the edit would have required reshoots.
Example production: pre-production
The breakdown revealed the main challenges: a night exterior, a real bus stop on a public street, a bus, and sound in traffic. The team responded:
- Location: they scouted three bus stops at night and chose one on a quiet side street with a street light and a lit shop window for practical light, with low traffic after 9 p.m.
- Permissions: they contacted the city film office about a small crew on a sidewalk, which allowed it with a simple permit since they were not blocking traffic, and the transit agency, which allowed filming a bus pulling away in service provided no one boarded on camera without arrangement. The final shot was rewritten so the man walks toward an arriving bus, cutting before he boards.
- Cast and releases: two actors from a local theater group signed talent releases; a release form was prepared for any identifiable passers-by.
- Lighting: an LED panel on a battery, a small tube light and a reflector, chosen to work with the street light and shop window without generator power.
- Sound: a shotgun microphone on a boom, a backup lavalier on each actor, and a plan to record wild lines and room tone.
- Schedule: one night, 20 setups planned, a call time of 7 p.m. to catch the end of dusk for the establishing shot, wrap by 1 a.m.
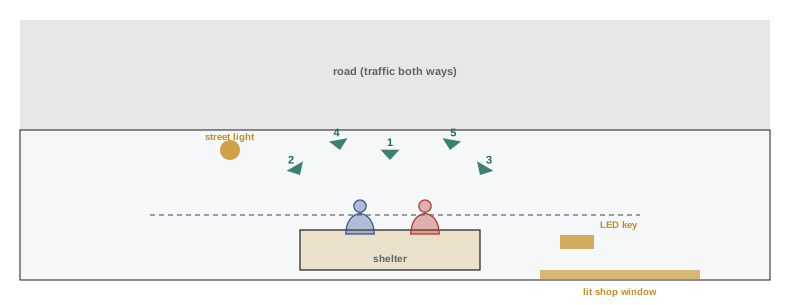
Example production: the shoot
The night went largely to plan, with three significant problems. First, the establishing wide shot at dusk took longer than expected to light, and the sky went dark before it was finished; the team shot it the following evening as a pickup, which the schedule buffer allowed. Second, a bar opened across the street with music audible in the boom microphone; the sound recordist switched to the lavaliers as the main track, the director changed the actors' positions so the shelter blocked some of the noise, and wild lines were recorded for the two worst moments. Third, the street light flickered on camera at 1/50 s; the camera operator changed the shutter to 1/60 s (a 144° shutter at 24 fps), which removed the flicker with only a slight, barely visible reduction in motion blur.
Data management worked as planned: each card was copied to two drives with verification during the shoot, and the producer took one drive home.
Example production: post-production
The assembly ran 7 minutes. The rough cut removed a whole exchange of dialogue that repeated an idea, tightened the opening and used L-cuts to let the young worker's question hang over the man's silent reaction. The editor found that the most moving moment was a reaction shot the director had nearly skipped: the man folding the route map. Picture was locked at 4 minutes 10 seconds. Sound editing replaced the two noisy lines with wild lines, filled gaps with room tone, and added the sound of distant buses; a local musician wrote a sparse score. Color correction matched the shots under mixed street and LED light, and a gentle grade warmed the shop window light. The film was mixed to −14 LUFS for online delivery, with a separate −24 LKFS version prepared for a broadcaster's student showcase, and captions were added.
Worked problem
Planning the post-production time
The team has three weeks between the shoot and the deadline, and each member also has other courses. Allocate the time across post-production tasks.
Show solution
- Days 1 to 2: ingest, sync, organize and watch all footage; note selects.
- Days 3 to 9: assembly and rough cut, with one feedback screening at the end of the week.
- Days 10 to 13: fine cut and picture lock; send the locked cut to the composer.
- Days 14 to 18: sound editing, music, color correction and titles in parallel.
- Days 19 to 20: mix, captions, export and quality check; day 21 as a buffer for problems.
Answer: Locking picture by about the middle of the period leaves time for sound, music and color, which beginners routinely underestimate. A screening for fresh viewers before lock is the single most valuable step, and the final day of buffer protects the deadline from export and upload problems.
Critique
Critique is how filmmakers learn from each other. A useful structure, similar to photographic critique (PHOT-101, Lesson 12), moves through four steps:
- Describe: what happens in the film, what we see and hear, without judging. This shows the filmmaker what actually came across.
- Analyze: how the film works: structure, shot choices, coverage, performance, lighting, sound, editing rhythm.
- Interpret: what the film means or makes us feel, and what it seems to be about.
- Evaluate: how well the choices serve the film's intentions, and what might make it stronger.
When giving critique, be specific ("the cut to the map felt early; I needed another beat on his face") rather than general ("it was good"), speak from your own experience as a viewer, and focus on the film rather than the person. When receiving critique, listen without defending, take notes, ask questions to understand, and remember that viewers' confusion is information, even when their suggested fixes are not right. You decide what to change.
Reflecting and moving on
The reflection is part of the project because the habit of honest analysis is what makes filmmakers improve. Compare the finished film with your intentions: where did the plan work, where did it fail, and why? Was a problem a matter of planning, technique, time, communication or luck? Which skills from this course would you practice before the next production? Many filmmakers keep a production notebook of lessons learned, technical settings that worked, and mistakes they do not want to repeat.
Finally, share the work. Festivals, online platforms and screenings in your community give films an audience, and audiences teach filmmakers in ways no instructor can. Check each festival's eligibility rules and technical requirements, keep releases and music licenses on file because festivals and broadcasters ask for them, and add the film to your portfolio or reel with credits for your collaborators.
Assessment of the project
The project is assessed on the finished film and on the process. For the film, assessors consider story clarity and emotional effect, the quality and consistency of the images (exposure, focus, framing, lighting), coverage and editing (whether scenes cut together smoothly and the pacing serves the story), the clarity and balance of sound, and technical delivery (titles, captions, loudness and file specifications). For the process, they look at the completeness and usefulness of the pre-production documents, the production records and data management, how problems on set were handled, and the honesty and insight of the reflection. A film with modest images but clear sound, good coverage and a story told with conviction will score well; a beautiful but confusing film with poor sound will not.
After the course
The skills from this course lead into the more specialized courses that follow: camera systems and sensors, exposure and image pipelines, lighting, camera movement, editing and sound. Keep shooting between courses. Short exercises, such as filming a one-minute portrait of a friend, covering a short scene with five setups, or recording an interview with good sound, build fluency faster than occasional large projects. Watch films actively, noting how scenes are covered and cut, and seek out other filmmakers to collaborate with, because filmmaking is learned most quickly by doing it with others.
Whatever happens with this first film, and however far it falls short of the version you imagined, finish it. Unfinished films teach far less than finished ones, because the final stages, sound, color, titles, delivery and showing the work to an audience, are where many of the most important lessons are learned.
Common mistakes
MistakeChoosing a story too big for the time and resources.
InsteadTell a small story in few locations with few characters, and tell it well.
MistakeSkipping script feedback.
InsteadGet feedback on the script, when changes cost nothing.
MistakeScheduling with no buffer for pickups.
InsteadLeave time for weather, overruns and pickups.
MistakeSpending most of post-production on the picture edit.
InsteadLock picture early enough to finish sound, music and color properly.
MistakeDefending your film during critique.
InsteadListen, take notes and decide afterward what to change.
Summary and key terms
- The project is a finished three-to-five-minute narrative or documentary with full documentation.
- Small stories in few locations make the best short films.
- Script feedback, scouting, permissions and a realistic schedule prevent most problems.
- On set, problems are solved with planning buffers, alternative microphones, wild lines and settings changes.
- Post-production should lock picture early and include a fresh-viewer screening.
- Critique moves through description, analysis, interpretation and evaluation.
- Reflect honestly, keep notes, and share the finished work.
- Logline
- A one-sentence summary of a film's story.
- Synopsis
- A short summary of the plot.
- Pickup
- A shot filmed after the main shoot to complete coverage.
- Selects
- The best takes chosen from the footage.
- Score
- Original music written for a film.
- Critique
- Structured discussion of a work's strengths and weaknesses.
- Reflection
- The filmmaker's analysis of their own process and result.
- Reel
- A short compilation of a filmmaker's best work.
- Eligibility rules
- A festival's requirements for submitted films.
- Deliverables
- The files and documents required at the end of a project.
Practice problems
Work each problem on paper first, then reveal the answer to check.
What length and forms does the final project allow?
Show answer
Three to five minutes, narrative or documentary.
Why are small stories recommended for short films?
Show answer
They can be executed well with limited time and resources.
In the example, why was a line of explanation cut from the script?
Show answer
The performance and images could carry the feeling.
How did the team handle music from a nearby bar?
Show answer
Switched to lavaliers, repositioned actors and recorded wild lines.
What shutter change fixed the street light flicker?
Show answer
From 1/50 s to 1/60 s.
What shutter angle is 1/60 s at 24 fps?
Show answer
360 × 24 / 60 = 144°.
What editing technique let a question hang over a silent reaction?
Show answer
An L-cut.
Why lock picture by the middle of post-production?
Show answer
To leave time for sound, music, color and finishing.
Name the four steps of critique.
Show answer
Describe, analyze, interpret, evaluate.
What documents should be kept on file for festivals?
Show answer
Releases and music licenses.
Lesson quiz · 5 questions
Score 60% or more to complete this lesson.
Create a free account to save your progress, take quizzes and earn a certificate.