
PHOT-211 · Lesson 8 of 12 · 25 min
Still life fundamentals
Still life photography, the photography of objects, is one of the oldest genres, dating back to the earliest days of the medium when long exposures made people difficult subjects. Today it ranges from fine art arrangements inspired by Dutch painting to product photography for advertising and e-commerce, editorial illustrations and food. Still life offers complete control: the photographer chooses every object, surface, angle and light, and can work for hours on a single image. That control is also its challenge, because nothing happens by accident, and every reflection, shadow and edge must be considered. This lesson covers the tabletop studio, sets and surfaces, camera position and lens choice, lighting form, texture and material, small sources and precision tools, cards, mirrors and flags, composition and styling, and an efficient working method.
The tabletop studio
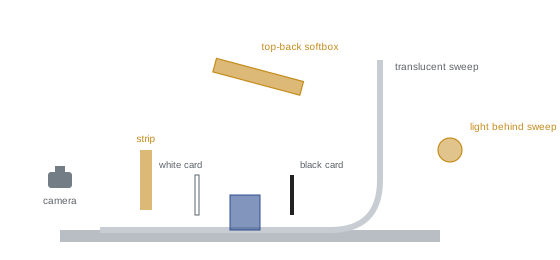
Most still life work takes place on a shooting table: a sturdy table, often with a sweep of translucent acrylic or paper curving from the tabletop up a vertical support, creating a seamless background. Translucent sweeps can be lit from behind or below for glowing, shadowless backgrounds. Many photographers use dedicated still life tables with adjustable frames, clamps and arms, which allow lights, cards and flags to be positioned precisely around a small subject. Essential accessories include a sturdy tripod or camera stand that allows fine adjustments; a geared head for precise framing; small light stands, boom arms and articulating arms with clamps; a collection of white, silver, black and colored cards; small mirrors; clips, putty, wax, pins and museum gel for positioning objects; and gloves and cleaning tools. A tethered computer with a large screen is almost indispensable, since small details matter.
Sets and surfaces
Surfaces and backgrounds set the context of a still life. Options include seamless paper and acrylic for clean commercial looks; painted boards and textured backdrops, such as plaster, concrete, wood, marble and metal, for editorial and lifestyle images; fabrics, such as linen, velvet and silk, which add softness and color; and constructed sets with props suggesting a place or time. The surface's tone and reflectivity affect lighting: glossy acrylic creates reflections beneath objects, matte surfaces show shadows clearly, and dark velvet absorbs light for dramatic, low-key arrangements. Building a library of surfaces, often inexpensive boards painted in several colors and textures, gives flexibility. Scale matters: textures that look natural at full size may look coarse or fine when photographed close up.
Camera position and lens choice
Camera height and angle change how objects appear. A camera at the same height as the object, looking straight on, shows its profile and suits bottles, glasses and tall items. A camera looking down at about 30 to 45 degrees shows both the front and top, suiting most products and arrangements on a table. Overhead views, looking straight down, suit flat lays and arrangements on a surface. Longer focal lengths, such as 85 to 120 mm on full frame, or macro lenses, are usually preferred for still life: they allow working at a comfortable distance, minimize perspective distortion so that verticals remain parallel and shapes look correct, and give control over background coverage. Wide lenses close to objects exaggerate shapes and are used only for deliberate effect. Tilt-shift lenses help keep vertical lines parallel and control the plane of focus. Depth of field is often shallow at close distances, so small apertures, careful focus placement or focus stacking are needed (PHOT-202).
Lighting form
Light reveals the three-dimensional shape of objects through gradations from highlight to shadow. A single soft source to one side and slightly behind or above the object, sometimes called top-back light, is a classic still life approach: it creates a highlight on the top and side of the object, a gradual transition across its form, and a shadow falling toward the camera, giving depth. Light from directly in front flattens objects; light from directly behind creates silhouettes or rim effects. Round objects such as fruit benefit from large, soft sources that create smooth gradients; angular objects such as boxes are often lit so that each visible face has a different brightness, typically a bright top, a medium side and a darker front, which clearly shows the shape. This "three planes" approach is fundamental to product and packaging photography.
Worked problem
Lighting a box to show its shape
A photographer must photograph a cardboard product box at a three-quarter angle, so that the top, front and one side are visible. With a single softbox overhead, the top is bright, but the front and side are similar in brightness and the box looks flat. How should the lighting be adjusted?
Show solution
- Keep the overhead softbox as the main light, making the top the brightest face.
- Add a strip box or gridded light to one side to make that side moderately bright.
- Leave the front face slightly darker, controlling it with a white card for detail.
- Aim for roughly a full stop of difference between each visible face, checking with the histogram or a spot reading.
Answer: Give the three visible faces different brightness, typically top brightest, side medium and front darker, about a stop apart.
Texture and material
Texture appears when light skims across a surface at a low angle, creating tiny highlights and shadows. Raking light from the side reveals the grain of wood, the weave of fabric, the crust of bread and the surface of paper, while frontal light hides texture. The hardness of the source matters: hard light exaggerates texture, soft light gentles it. Different materials need different approaches: matte materials such as paper, wood and fabric show light falling on them; glossy materials such as plastic, ceramics and lacquer show reflections of sources; metals are almost entirely reflective; and transparent materials such as glass and liquids show what is behind them and their edges (Lesson 9). Identifying the material and how it reacts to light is the first step in lighting any object.
| Material | Shows | Typical approach |
|---|---|---|
| Matte (paper, wood, fabric) | Light falling on it, texture | Directional soft light, raking for texture |
| Glossy (plastic, ceramic) | Reflections of sources | Large sources placed to reflect smoothly |
| Metal | Its surroundings almost entirely | Large diffused sources, cards for definition |
| Glass and liquids | Background and edges | Bright-field or dark-field lighting |
| Food | Texture, moisture, color | Back or side light with fill |
Small sources and precision tools
Still life often calls for light that is precisely shaped and placed. Small softboxes, strip boxes and lights with grids, snoots and optical spot attachments, which project sharp-edged shapes using lenses and shutters, allow light to be placed on a single label, a highlight, or a small area of the background. Fresnel and LED spotlights with focusing lenses give controllable beams. Fiber-optic and small LED pen lights can add tiny accents. Light painting, moving a small continuous light across the subject during a long exposure, or combining several flash exposures each lit from a different position, offers further control, discussed in PHOT-202 and Lesson 11. With small subjects, a source that is large relative to the subject can still be physically small, so a 30 cm softbox close to a ring behaves like a very large, soft source.
Cards, mirrors and flags
In still life, cards and flags are as important as lights. White cards bounce light into shadows and create soft reflections on glossy surfaces; silver cards bounce stronger, more specular light; black cards absorb light, deepen shadows and create dark reflections that define the edges of shiny and transparent objects; small mirrors bounce precise spots of light onto labels, into the interior of glasses or onto details. Cards can be cut to shape to control exactly where light falls or where reflections appear. Flags and gobos placed between the light and the set create shadows and patterns, such as the soft shadow of a window frame or leaves. The ability to place a small card exactly where it is needed, using clamps and articulated arms, is a core still life skill.
Composition and styling
Still life composition follows general principles of design: a clear focal point, balance, rhythm, a limited palette, and the use of negative space. Odd numbers of objects often look more natural than even ones; varying heights and sizes adds interest; overlapping objects create depth; and leading lines guide the eye. Styling, arranging objects, props, surfaces and details, often involves a stylist in commercial work. Small adjustments, such as turning an object a few degrees, adding a crumb or a drop of water, or straightening a label, make large differences at close range. Consistency in styling across a series, such as the same surface and prop palette, builds a recognizable look for a brand or project. Cleanliness is vital: dust, fingerprints and scratches are highly visible in still life and should be removed before shooting rather than in retouching.
An efficient working method
Still life benefits from a systematic method. Begin with the composition and camera position, using a stand-in object if the product is precious or perishable. Set the background and surfaces. Add the key light and refine it until the main form looks right. Add secondary lights, cards and flags one at a time, reviewing each change tethered. Clean and style the actual product, place it, and make final adjustments. Shoot a range of exposures or separate passes if compositing is planned (Lesson 11). Record the setup with diagrams and photographs. Because still life sets can take hours, protect them from bumps: mark positions with tape, secure stands, and keep people away from the table during shooting.
Lighting flowers and organic objects
Flowers, leaves, fruit and other organic objects have translucent and delicate surfaces. Backlight or back-side light reveals the glow of petals and leaves and the structure of veins; side light shows texture and shape; and soft fill keeps shadows open. Water droplets sprayed onto petals or fruit add freshness and catch highlights. Organic objects wilt and change under hot lights, so work quickly, keep them cool and refreshed, and have spares ready. Painters' still lifes, with their fruit, flowers and vessels, offer endless inspiration for composition and light.
Scale and miniature sets
Still life often involves tiny objects or miniature sets, which require lights, cards and flags at a correspondingly small scale. Small softboxes, LED panels and mirrors, articulated arms and tiny cards cut from paper allow precise control. Depth of field becomes extremely shallow at high magnifications, and focus stacking is often essential. Miniature sets, such as dioramas or model landscapes, can be lit to look full-sized by using small, hard sources at a distance to imitate the sun, and by placing the camera at the eye level of an imaginary person within the scene.
Still life as fine art
Beyond commercial uses, still life is a vital fine art genre, from the vanitas paintings of the seventeenth century, with their symbolic skulls, candles and flowers, to contemporary photographers who use objects to explore memory, consumption and identity. Light in fine art still life is often slow and contemplative, with single sources and long exposures, and the arrangement carries meaning. Students are encouraged to develop still life projects that explore personal themes, using the technical skills of this lesson as a foundation.
Shadows as design elements
In still life, shadows can be as important as the objects. Hard light from a small source casts crisp, graphic shadows that can extend across a surface and create composition; soft light gives subtle, grounding shadows. Moving the light changes the length and direction of shadows, and adding a second shadow-casting object outside the frame can introduce shapes such as window frames or foliage. Considering shadows deliberately, rather than as by-products, adds a layer of design to still life images.
Common mistakes
MistakeLighting all faces of a box equally.
InsteadGive visible faces different brightness to show shape.
MistakeFrontal light on textured objects.
InsteadUse raking side light to reveal texture.
MistakeWide lenses close to products.
InsteadUse longer focal lengths or macro lenses.
MistakeRelying on retouching for dust.
InsteadClean and style objects before shooting.
MistakeIgnoring cards and flags.
InsteadUse white, black and silver cards to shape light and reflections.
Summary and key terms
- Still life offers complete control and demands attention to every detail.
- Shooting tables, sweeps, arms and tethering support precise work.
- Surfaces and backgrounds set context and affect reflections and shadows.
- Camera height, angle and longer lenses control shape and perspective.
- Top-back light and three-plane lighting reveal form.
- Raking light shows texture; materials determine the approach.
- Cards, mirrors, flags, styling and a systematic method finish the image.
- Still life
- Photography of arranged objects.
- Shooting table
- Table with a sweep for still life.
- Sweep
- Curved background without a visible horizon.
- Top-back light
- Light from above and behind the object.
- Three planes
- Different brightness on each visible face.
- Raking light
- Light skimming a surface at a low angle.
- Optical spot
- Projection attachment for shaped beams.
- Light painting
- Moving a light during a long exposure.
- Museum gel
- Removable adhesive for positioning objects.
- Stylist
- Specialist who arranges objects and props.
Practice problems
Work each problem on paper first, then reveal the answer to check.
Why do still life photographers shoot tethered?
Show answer
Small details are visible on a large screen.
What does a translucent sweep allow?
Show answer
Lighting from behind or below for a glowing background.
Which camera angle suits most table products?
Show answer
About 30 to 45 degrees from above.
Why prefer longer focal lengths?
Show answer
Less distortion and comfortable working distance.
What is top-back light?
Show answer
Light from above and behind the object.
How should the three faces of a box be lit?
Show answer
Top brightest, side medium, front darker.
What reveals texture?
Show answer
Raking light.
What do black cards do on shiny objects?
Show answer
Create dark reflections that define edges.
Name two composition principles.
Show answer
Focal point, odd numbers, varied heights, negative space.
Why mark positions with tape?
Show answer
To protect and rebuild the set.
Lesson quiz · 5 questions
Score 60% or more to complete this lesson.
Create a free account to save your progress, take quizzes and earn a certificate.