
ROB-400 · Lesson 12 of 12 · 32 min
Capstone: designing a bin-picking cell
This capstone pulls the course together in the design of a complete bin-picking cell, the most common application of the ideas in this course and one of the hardest to get right in production. You will work through the design the way an integration team does: start from requirements, choose an end effector, design perception, define the grasping and placing logic, size forces, budget cycle time and errors, plan for failures and complete the safety assessment. The worked numbers use a fictional but realistic scenario; the method applies to any cell.
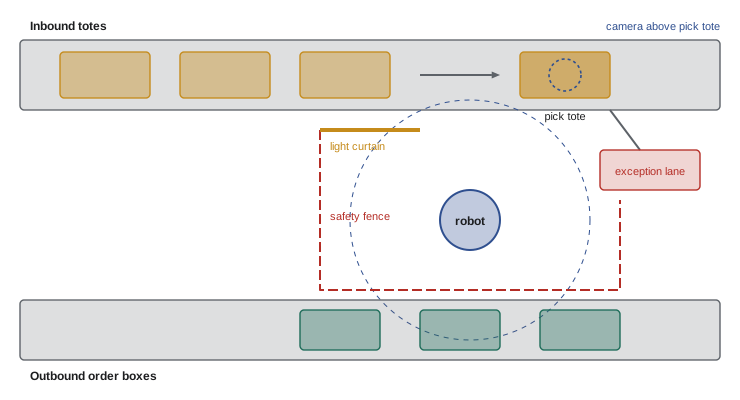
The scenario: an e-commerce distribution center wants a robot cell that picks individual items from totes of mixed products and places them into outbound order boxes. The totes arrive on a conveyor, each holding 10 to 40 items of up to 30 different products. Items range from small boxed goods to polybagged clothing, bottles and blister packs, weighing 20 g to 1.8 kg. The client needs 700 picks per hour per cell on average, with at least 99 % of items handled without human help, and no damage to products.
Step 1: Requirements
Good cells start with written, measurable requirements, agreed with the client before hardware is ordered. Each requirement should say how it will be verified. For this cell, the key requirements are throughput (700 picks per hour sustained over a shift), automatic handling rate (at least 99 % of items without human intervention), damage rate (below 1 in 10,000 items), item range (the product mix above, with a list of excluded item types such as items over 1.8 kg or longer than 400 mm), availability (above 98 % of scheduled time), and safety (compliance with the applicable robot standards and workplace law).
Requirements also define what the cell does when it cannot pick an item: here, it moves the tote to an exception lane for a person, rather than trying indefinitely. Writing that down early prevents the most common integration argument, which is about what counts as success.
Step 2: End effector
Lesson 2's selection matrix applies directly. The product mix favors suction: most items have a flat or gently curved surface, and suction reaches items in the middle of a tote without fingers needing clearance. Polybags and blister packs seal well with soft bellows cups at moderate vacuum. Some bottles and irregular items are better held by fingers. The team chooses a combined head: a bellows suction cup on a short extendable stem, with two compliant fingers that can close around the item after suction lifts it, and a tool changer for a second, larger cup head used on heavy boxes.
Worked problem
Sizing the main suction cup
The heaviest item that the main cup must handle from above is 1.2 kg (heavier items use the large cup head). Peak vertical acceleration is 8 m/s², the generator achieves 55 kPa on sealed packaging, and the team uses a safety factor of 2.5 with 75 % effective area. What cup diameter is needed?
Show solution
- Load: \( 1.2 \times (9.81 + 8) = 21.4 \) N.
- Required pressure force: \( 21.4 \times 2.5 = 53.4 \) N.
- Effective area needed: \( 53.4 / 55{,}000 = 9.7 \times 10^{-4} \) m²; nominal area \( 9.7 \times 10^{-4} / 0.75 = 1.29 \times 10^{-3} \) m².
- Diameter: \( \sqrt{4 \times 1.29 \times 10^{-3} / \pi} \approx 0.041 \) m.
Answer: About 40 mm, so a 40 mm bellows cup is marginal and a 45 or 50 mm cup is a better choice. The fingers that close after lifting add margin for swinging items.
Step 3: Perception
Following lesson 6, the cell uses an overhead active-stereo RGB-D camera about 0.9 m above the tote, which gives about 2 to 3 mm depth precision at the tote bottom. A learned instance segmentation model, fine-tuned on images of the client's products, separates items; a model-free grasp detector proposes suction points and finger grasps with scores. A plane fit around each suction candidate checks flatness, as in lesson 6. Transparent and highly reflective items, identified from the product catalog, trigger a second exposure with a polarizing filter and a more conservative grasp. The camera images the tote while the arm is placing the previous item, so perception overlaps with motion.
Step 4: Grasping and placing logic
The grasp logic ranks candidates by predicted success, height in the pile (topmost first, to avoid disturbing the pile), distance from tote walls, and a preference for item centers. Before execution, each candidate passes collision and reachability checks. The pick sequence is the one from lesson 8: pre-grasp 50 mm above the item, slow approach, suction on, lift 30 mm, check vacuum above threshold, close fingers if needed, retreat, move to the box, place, release with a blow-off pulse, verify with a quick image of the box. Each failure branch is specified: a vacuum failure triggers a retry on the next-best candidate, a second failure triggers re-imaging, and a third sends the tote to the exception lane.
Worked problem
Cycle time budget
Estimated times per pick: move from box to tote 0.9 s, approach and grasp 0.5 s, lift and verify 0.3 s, move to box 0.9 s, place and release 0.4 s. Perception (1.0 s) overlaps with the move to box and placing. Does the cell meet 700 picks per hour before retries?
Show solution
- Motion-only cycle: \( 0.9 + 0.5 + 0.3 + 0.9 + 0.4 = 3.0 \) s.
- Perception overlaps the 1.3 s of moving to the box and placing, so it adds nothing if it finishes within that window.
- Ideal throughput: \( 3600 / 3.0 = 1{,}200 \) picks per hour.
- Target cycle at 700 picks per hour: \( 3600 / 700 = 5.1 \) s, so there is about 2.1 s of margin per pick for retries, tote exchanges and slow-downs.
Answer: Yes, with a healthy margin before retries; the next step checks whether retries and tote changes consume it.
# Throughput and automatic handling rate with retries, tote exchanges and exceptions (Monte Carlo)
import numpy as np
rng = np.random.default_rng(12)
items = 200000
p_first, p_retry, p_reimage = 0.93, 0.70, 0.60     # success on 1st try, retry and after re-imaging
t_cycle, t_fail, t_reimage = 3.0, 1.8, 1.2          # seconds: good pick, failed attempt, extra imaging
tote_items, t_tote = 25, 6.0                        # items per tote and seconds to exchange a tote
time = 0.0; auto = 0; exceptions = 0
for _ in range(items):
    if rng.random() < p_first:
        time += t_cycle; auto += 1
    elif rng.random() < p_retry:
        time += t_fail + t_cycle; auto += 1
    elif rng.random() < p_reimage:
        time += 2 * t_fail + t_reimage + t_cycle; auto += 1
    else:
        time += 3 * t_fail + t_reimage; exceptions += 1
time += (items / tote_items) * t_tote
print(f"automatic handling rate: {100 * auto / items:.2f} %")
print(f"exceptions per 1,000 items: {1000 * exceptions / items:.1f}")
print(f"sustained throughput: {3600 * auto / time:.0f} picks per hour")automatic handling rate: 99.16 % exceptions per 1,000 items: 8.4 sustained throughput: 1044 picks per hour
The simulation shows how the failure branches shape performance. A first-attempt success of 93 % alone would miss the 99 % automatic handling requirement, but one retry and one re-image lift it to about 99.2 %, and the sustained throughput stays well above 700 picks per hour even after tote exchanges. If first-attempt success fell to 88 %, the automatic rate would drop below 99 %; the requirement therefore translates into a concrete target for the perception and grasp team, which the acceptance test must confirm on the client's real product mix.
Step 5: Error budget
The fixed cell avoids mobile-base errors, but the error budget from lesson 10 still applies. Contributions are camera depth and lateral error at the tote bottom (about 2 to 3 mm), hand-eye calibration (about 1 mm after a careful calibration), robot repeatability (well under 0.1 mm for this class of arm, though absolute accuracy is worse) and the item shifting during approach. Bellows cups tolerate several millimeters of lateral error and about 10 to 15 degrees of tilt, so the budget is comfortable for suction; finger grasps on bottles need closer attention and benefit from the fingers' compliance.
Worked problem
Lateral error against suction tolerance
Independent lateral errors (one standard deviation) are: camera 2.5 mm, hand-eye calibration 1.0 mm, robot 0.1 mm, item motion during approach 1.5 mm. The 45 mm cup seals reliably if it lands within 8 mm of the chosen point on a flat patch. What fraction of picks land within tolerance, assuming a normal distribution?
Show solution
- Root sum of squares: \( \sqrt{2.5^2 + 1.0^2 + 0.1^2 + 1.5^2} \approx 3.1 \) mm.
- Tolerance in standard deviations: \( 8 / 3.1 \approx 2.6 \).
- For one axis, about 99 % of a normal distribution lies within \( \pm 2.6\sigma \); in two dimensions the fraction within a circle of radius \( 2.6\sigma \) is \( 1 - e^{-2.6^2/2} \approx 0.966 \).
Answer: About 97 % of picks land within the 8 mm circle, consistent with a 93 % first-attempt success once other failure causes are included. Improving calibration and reducing item motion would raise it further.
Step 6: Failure modes and recovery
A failure modes and effects analysis lists what can go wrong, how it would be detected and what the cell does. Typical entries for this cell: double pick (two items lifted together), detected by weight on a wrist force-torque sensor or by the box camera, handled by returning one item; dropped item during transfer, detected by vacuum loss, handled by stopping and re-imaging the drop area; item placed outside the box, detected by the box camera, handled by re-picking; damaged packaging, detected by vision or by the vacuum signature of a torn bag, routed to the exception lane; camera blinded by glare, detected by depth image quality metrics, handled by retrying with a second exposure. Each entry has an owner and a test in the acceptance plan.
Step 7: Safety
In the United States, robot cells are governed by OSHA's general duty clause and machinery standards, with ANSI/A3 R15.06-2025, the US adoption of ISO 10218-1 and -2 (2025), as the recognized consensus standard. OSHA has no robot-specific standard, so compliance is judged against R15.06 and related standards such as ANSI B11.19 for safeguarding. The cell needs a documented risk assessment, safeguarding (here a perimeter fence with an interlocked access gate and a light curtain at the tote opening, monitored by a safety controller to the required performance level of ISO 13849-1), lockout procedures under 29 CFR 1910.147 for maintenance and training for operators and technicians.
If the client later wants people to work beside the robot without a fence, for example to clear exceptions, the risk assessment must be redone for collaborative operation, with speed and separation monitoring or power and force limiting, and the light curtain must stop the robot before a person can reach it. The safety distance formula from machine guarding (HSE-215) gives the minimum distance between the light curtain and the hazard.
Step 8: Acceptance testing
The design is proven by a site acceptance test, run on the client's real products under production conditions: for example, an 8-hour run with the full product mix, measuring throughput, automatic handling rate, damage and availability against the requirements in Step 1, with every exception logged and categorized. The test plan, written at the start of the project, defines the sample sizes needed for statistically meaningful results, as lesson 11 showed for learned policies. A cell that achieves about 99.2 % in simulation must demonstrate its rate over enough picks, typically several thousand, for the measured confidence interval to clear 99 %; the closer the true rate is to the requirement, the more picks are needed, which is a strong reason to design in margin.
Worked problem
How many picks to prove 99 %?
The client wants evidence that the automatic handling rate is at least 99 %. If the true rate is 99.4 %, roughly how many picks are needed so that the lower end of an approximate 95 % interval is above 99 %?
Show solution
- Standard error with \( n \) picks: \( \sqrt{0.994 \times 0.006 / n} \).
- Require \( 0.994 - 1.96 \times \sqrt{0.994 \times 0.006 / n} > 0.990 \), so \( \sqrt{0.005964/n} < 0.00204 \).
- Solve: \( n > 0.005964 / 0.00204^2 \approx 1{,}430 \).
- With margin for the rate being slightly lower in practice, plan for several thousand picks, which an 8-hour run at 700 per hour provides (about 5,600).
Answer: At least about 1,400 picks, and in practice a full shift of about 5,600, which also exposes rare failure modes. At a true rate of 99.2 % the same calculation needs about 7,600 picks, more than one shift, which is why the team should raise first-attempt success to build margin.
Common mistakes
MistakeOrdering hardware before agreeing measurable requirements
InsteadWrite requirements with verification methods, including what happens to items the cell cannot pick.
MistakeSizing the cup at its nominal area
InsteadUse 70–80 % effective area, peak acceleration and a safety factor, then choose the next size up.
MistakeDesigning only the successful pick path
InsteadSpecify retries, re-imaging and exception routing, and simulate their effect on throughput.
MistakeAccepting a cell after a short demonstration
InsteadRun a full-shift acceptance test on real products with enough picks to bound the rates.
MistakeTreating safety as a final add-on
InsteadComplete the risk assessment early under CSA Z434 or R15.06 and design safeguarding into the layout.
Summary and key terms
- Start with measurable requirements for throughput, automatic handling, damage, item range, availability and safety.
- Choose the end effector with a selection matrix; mixed items favor suction with compliant fingers as a supplement.
- Perception overlaps with motion; plane fits and catalog data handle flatness and difficult materials.
- Retry and re-imaging branches turn a 93 % first-attempt success into a 99 % automatic handling rate.
- Error budgets compare combined position error with the end effector's tolerance.
- A failure modes analysis defines detection and recovery for each failure, each with an acceptance test.
- Safety follows CSA Z434 and provincial law in Canada or R15.06 and OSHA in the United States, proven with a full acceptance test.
- Bin picking
- Picking items from a container in which they lie in arbitrary poses.
- Automatic handling rate
- The fraction of items handled without human intervention.
- Exception lane
- A route for items or totes the cell cannot handle, for a person to resolve.
- Double pick
- Accidentally lifting two items at once.
- Failure modes and effects analysis
- A structured list of possible failures, their detection, effects and responses.
- Site acceptance test
- A test at the client site proving the cell meets its requirements.
- Availability
- The fraction of scheduled time the cell is able to operate.
- Tool changer
- A device that lets the robot swap end effectors automatically.
- Pre-start health and safety review
- An Ontario requirement to review certain new or modified machinery before use.
- Risk assessment
- A documented identification of hazards and the controls that reduce risk.
Practice problems
Work each problem on paper first, then reveal the answer to check.
What cycle time is needed for 700 picks per hour?
Show answer
About 5.1 s.
A 50 mm cup at 55 kPa, 75 % effective area. Holding force before safety factor?
Show answer
About 81 N.
Name two ways the cell detects a double pick.
Show answer
Wrist force-torque weight and the box camera.
Combine lateral errors of 2, 2 and 1 mm.
Show answer
About 3 mm.
Why image the tote while placing the previous item?
Show answer
To overlap perception with motion and shorten the cycle.
First-attempt success 90 %, retry 70 %. Rate after one retry?
Show answer
97 %.
What standard adopts ISO 10218 in Canada?
Show answer
CSA Z434.
What standard adopts ISO 10218 in the United States?
Show answer
ANSI/A3 R15.06.
Why run a full-shift acceptance test?
Show answer
To get enough picks for tight confidence intervals and to expose rare failures.
What should the cell do with an item it cannot pick after three tries?
Show answer
Send the tote to the exception lane.
Lesson quiz · 5 questions
Score 60% or more to complete this lesson.
Create a free account to save your progress, take quizzes and earn a certificate.