
CINE-401 · Lesson 6 of 12 · 27 min
Lighting plans for dramatic scenes
Course CINE-301 taught the craft of lighting: sources, quality, direction, contrast and colour. This lesson applies that craft to planning whole scenes for a narrative film. A lighting plan describes how a scene will be lit from every camera position the shot list requires, what fixtures and rigging that needs, how much power it draws and how long it takes. It begins with the story and the look, works through motivation and the logic of light in the space, and ends with numbers: illuminance levels, contrast ratios and fixture choices that the gaffer can order and rig. This lesson covers lighting philosophy for scenes, motivated light and practicals, typical approaches to day interiors, night interiors and night exteriors, and the arithmetic that turns a plan into a fixture list.
From story to light
Every lighting plan starts with three questions from the breakdown and the look book.
- What should the audience feel in this scene? Safe, uneasy, intimate, exposed?
- Where is the light coming from in the story world? Windows, lamps, a television, the moon, a passing car?
- How does this scene fit the film's lighting arc? Is it brighter or darker, softer or harder, warmer or cooler than the scenes around it?
The answers produce a short lighting idea for the scene, for example: "Late afternoon in the kitchen, low warm sun raking through the window, the room falling into shadow as the argument grows." That sentence guides every fixture choice.
Motivation and the logic of light
Most narrative lighting is motivated: each light on set appears to come from a source the audience accepts, even if that source is off screen. Motivation keeps light believable and gives it a consistent direction across coverage.
- Primary sources: windows, doors, skylights and the sun or moon. These usually set the key direction.
- Practicals: lamps, sconces, screens and signs visible in frame. They add depth, colour and a reason for light on faces.
- Bounce and ambience: light reflected from walls, floors and ceilings, which fills shadows naturally.
- Cheats: on most sets, the light that falls on an actor's face is not really from the practical beside them but from a hidden fixture placed to imitate it. The cheat must match the practical's direction, colour and quality.
Keep the key direction consistent within a scene. If the window is camera left in the master, faces in close-ups should still be keyed from the window side, even when the camera has turned around and the window is now behind the camera.
Lighting for coverage in both directions
A plan must work for every camera position. Common approaches include:
- Lighting from the far side: keying faces from the side away from the camera (often called short-side or downstage keying) produces modelling and shadow on the side of the face nearest the lens. In a two-person dialogue, this usually means each actor's key comes from behind the other actor.
- Overhead and top light: soft sources rigged above the set light the space evenly so cameras can turn around quickly, with smaller units added for faces.
- Pre-lit set: much of the light is built into the set or location (practicals, rigged softboxes, window units) so coverage in any direction needs only small adjustments.
- Two-camera compromise: when cameras shoot both directions at once, keys may move to a more frontal position, and the plan accepts a slightly flatter image for speed and performance.
Day interiors
In a day interior, the window is usually the key. The challenges are matching the outside light level and keeping it consistent while the sun moves.
- Large units outside the windows (HMIs or high-output LEDs), often on lifts or scaffolding, create a controlled sun or sky that does not change through the day.
- Diffusion on the windows (for example, frames of diffusion fabric or treated gels) softens hard sun and hides the outside world when needed.
- Neutral density gel on windows reduces the outside brightness so the interior exposure can hold detail in the view.
- Inside, bounce boards and soft sources lift the far side of the room and faces turned away from the window.
- Shooting toward windows needs careful balancing: the view outside may sit two to four stops above faces, or be allowed to burn out deliberately.
Night interiors
Night interiors are usually motivated by practicals and, sometimes, by moonlight or street light through windows.
- Use dimmable practicals with bulbs chosen for colour and output; many productions use LED bulbs with adjustable colour temperature controlled through DMX.
- Hide small soft sources near practicals to put light on faces in the practical's direction.
- Let the edges of the room fall off into darkness to suggest night, but give the camera enough ambience to see the space at the intended exposure.
- Add a cool ambience through windows to motivate a colour contrast with the warm interior, if it fits the look.
Night exteriors
Night exteriors are usually the most expensive scenes to light. Large spaces must read as night while showing the audience enough to follow the story.
- Moonlight convention: a large soft or hard source rigged high, often on a condor or crane, gives a single, consistent direction and cool colour to a wide area. Many DPs keep "moonlight" only slightly cool, because very blue light can look artificial.
- Practical sources: street lights, shop windows, car headlights and lit windows give depth and motivation. Productions often replace existing street light bulbs or add their own lamps.
- Wet-down: wetting streets makes them reflect light, adding sparkle and separating the ground from the sky.
- Ambience: a soft overall level lets the camera see into shadows; the DP decides how much detail the darkness should show.
- Safety: night work at heights and in traffic needs the planning described in Course CINE-340.
The lighting plot
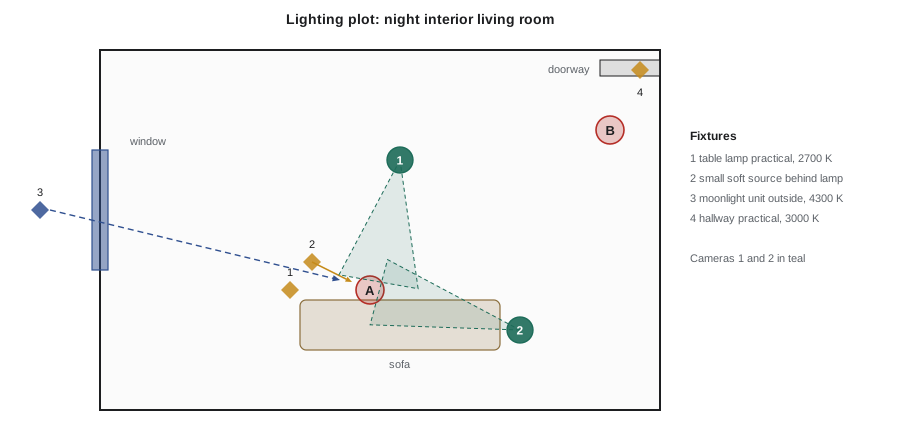
A lighting plot is the overhead diagram for lighting. The gaffer often draws it from the DP's notes. It shows fixture positions and types, aiming, colour (in kelvin or gel names), diffusion and control, dimmer or DMX channels, and the power distribution. Plots let the gaffer and key grip plan rigging and pre-rigs (Lesson 7) and give the best boy a fixture list for the rental order.
Contrast in stops
Contrast between key and fill, or between faces and backgrounds, is easiest to think about in stops, because every stop is a doubling or halving of light. The relationship between a brightness ratio and stops is:
| Brightness ratio | Difference in stops | Typical feel |
|---|---|---|
| 2:1 | 1 stop | Soft, open, comedic or naturalistic day |
| 4:1 | 2 stops | Modelled, dramatic but gentle |
| 8:1 | 3 stops | Strong contrast, noir, tension |
| 16:1 | 4 stops | Very low key; much of the face in shadow |
Contrast also depends on the camera and LUT: a soft LUT compresses contrast and a punchy one expands it. Judge final contrast through the LUT on a calibrated monitor.
Worked problem
Exposure level for a stop
The DP wants to shoot a night interior at T2.8, at 24 frames per second with a 180-degree shutter (exposure time 1/48 s), with the camera rated at EI 800. What incident light level on the key side of the face gives a normal exposure, using an incident meter calibration constant of about 250?
Show solution
- Incident meters use the relationship \( E = \frac{C N^2}{t S} \), where E is illuminance in lux, N the T-stop, t the exposure time in seconds and S the exposure index.
- \( E = \frac{250 \times 2.8^2}{(1/48) \times 800} = \frac{250 \times 7.84}{16.7} \approx 118 \) lux.
- In foot-candles, divide by about 10.76: about 11 fc.
- For a two-stop key-to-fill difference, the fill side receives about a quarter as much light: about 30 lux, or about 3 fc.
Answer: About 120 lux (roughly 11 fc) on the key side gives normal exposure at T2.8 and EI 800; a two-stop ratio puts the fill side near 30 lux. The DP may then underexpose the key slightly, or lower the LUT's brightness, for a darker night feel.
Fixture photometrics and distance
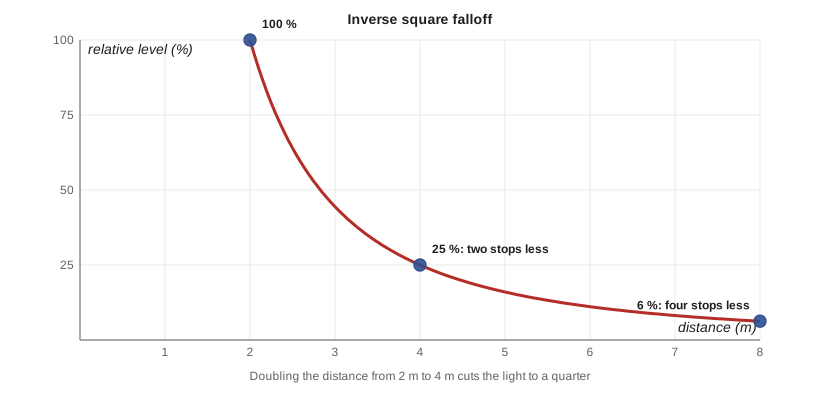
Manufacturers publish photometric data: the illuminance a fixture produces at set distances, in a given beam setting. Illuminance from a source that behaves like a point falls with the square of distance (the inverse square law), so doubling the distance gives a quarter of the light, two stops less. Large soft sources close to the subject do not follow the law exactly but approach it at greater distances.
Worked problem
Will this fixture do the job?
A fixture's photometric chart gives 2,000 lux at 5 m in spot mode. The gaffer needs to place it 8 m from the actor, behind a frame of diffusion that costs about one stop. The target key level is about 120 lux. Is the fixture suitable, and how much must it be reduced?
Show solution
- Inverse square: \( E_2 = E_1 \left(\frac{d_1}{d_2}\right)^2 = 2000 \times \left(\frac{5}{8}\right)^2 \approx 781 \) lux.
- One stop of diffusion halves it: about 390 lux.
- Excess over target: \( \log_2(390/120) \approx 1.7 \) stops.
Answer: The fixture is more than bright enough, by about 1.7 stops. The gaffer can dim it, flood it, add more diffusion or a scrim, or move it further away. Having headroom is useful: it allows a deeper stop or heavier diffusion if the DP changes the plan.
Colour temperature and mixing
The look book sets a colour strategy. Mixed colour temperatures add depth and meaning, but only when planned.
- Choose a base white balance for the scene, such as 3200 K for tungsten-motivated nights or 5600 K for daylight.
- Decide which sources are allowed to be warmer or cooler than the base, and by how much. Small differences read as natural; large differences read as stylized.
- Correct unwanted sources (for example, green fluorescent tubes in a location) with gels or by replacing bulbs.
- Modern LED fixtures with adjustable colour make mixing easy, but test their skin rendering; some LEDs reproduce skin less faithfully than tungsten or high-quality daylight sources.
Planning time
Lighting time is the largest part of the shooting day (Lesson 1). Estimate it honestly.
- A complex night exterior may need a full pre-rig day and an hour or more for each new direction on the shooting night.
- A simple day interior with a pre-rigged window may take 20 to 40 minutes for the first set-up and 10 to 20 for each additional set-up.
- Every change of plan on the day costs time. Agree the plan in prep and walk it with the gaffer and key grip at the technical scout.
Common mistakes
MistakeLighting each shot independently with no consistent source logic
InsteadKeep a consistent motivated key direction across all coverage in a scene
MistakeMaking moonlight very blue by default
InsteadChoose a moonlight colour that fits the look, often only slightly cool
MistakeThinking a fixture halves its light when distance doubles
InsteadInverse square means doubling distance cuts light to a quarter, two stops
MistakeJudging contrast by eye on set without the LUT
InsteadJudge contrast through the show LUT on a calibrated monitor
MistakeMixing colour temperatures without a plan
InsteadChoose a base and decide which sources deviate and by how much
Summary and key terms
- A lighting plan starts with what the audience should feel, where the light comes from and the scene's place in the lighting arc.
- Motivated light keeps lighting believable and consistent across coverage; cheats must match practicals.
- Day interiors control window light; night interiors use practicals and cheats; night exteriors need big, high sources and practicals.
- The lighting plot shows fixtures, aiming, colour, control and power for the gaffer and key grip.
- Contrast is easiest in stops: stops = log₂ of the brightness ratio.
- Incident levels for an exposure follow \( E = CN^2/(tS) \); photometric data and the inverse square law size fixtures.
- Colour mixing works when a base white balance and allowed deviations are planned.
- Motivated light
- Light that appears to come from a source the audience accepts in the story world
- Practical
- A light source visible in the frame, such as a lamp or sign
- Cheat
- A hidden fixture that imitates the light from a practical or window
- Short-side key
- Keying the side of the face away from the camera for modelling
- Lighting plot
- An overhead plan of fixtures, aiming, colour and power for a scene
- Inverse square law
- Illuminance from a point source falls with the square of distance
- Photometric data
- Published illuminance values for a fixture at set distances and beam settings
- Lighting ratio
- The ratio of light on the key side to the fill side of a subject
- Wet-down
- Wetting a street so it reflects light at night
- Ambience
- A soft overall light level that fills shadows and reveals the space
Practice problems
Work each problem on paper first, then reveal the answer to check.
A key is 480 lux and the fill 60 lux. What is the difference in stops?
Show answer
log₂(480 ÷ 60) = log₂ 8 = 3 stops
What illuminance gives normal exposure at T4, 1/48 s and EI 800 with C = 250?
Show answer
250 × 16 ÷ (800 ÷ 48) ≈ 240 lux
A fixture gives 1,000 lux at 4 m. What does it give at 8 m?
Show answer
1000 × (4/8)² = 250 lux
Why do productions put large units outside windows for day interiors?
Show answer
To create controlled, consistent window light that does not change as the sun moves
What is a cheat?
Show answer
A hidden fixture placed to imitate the light from a practical or window
Why wet down a street at night?
Show answer
So it reflects light, adding sparkle and separating ground from sky
Give the stops for a 4:1 ratio and a 16:1 ratio.
Show answer
2 stops and 4 stops
Why should key direction stay consistent across coverage?
Show answer
So shots cut together and the light appears to come from the same source
Name two ways to reduce a fixture that is 1.5 stops too bright.
Show answer
Any two of dimming, flooding, adding diffusion or a scrim, or moving it further away
Why test LED fixtures on skin?
Show answer
Some LEDs render skin less faithfully than tungsten or high-quality daylight sources
Lesson quiz · 5 questions
Score 60% or more to complete this lesson.
Create a free account to save your progress, take quizzes and earn a certificate.