
PHOT-430 · Lesson 11 of 12 · 38 min
Installation, lighting and the visitor experience
Installation week is when planning meets reality. Crates arrive, walls are measured again, works go up, lights are aimed, labels are placed and the room becomes an exhibition. This lesson covers how to plan and run an installation, the tools and sequence installers use, lighting design for photographs including fixture choice, colour quality, aiming geometry and illuminance, conservation limits on light exposure, accessibility requirements and inclusive design in Canada and the United States, the wider visitor experience from wayfinding to digital companions, opening logistics, documentation, deinstallation and evaluation. PHOT-401 introduced basic lighting choices; here we work through the numbers and procedures that make an installation safe, legible and beautiful.
Planning installation week
Installation usually takes from one day for a small pop-up to several weeks for a museum exhibition. Agree the dates with the venue well in advance, and plan each day.
| Day | Tasks |
|---|---|
| Day 1 | Walls patched and painted; deliveries received; crates acclimatized |
| Day 2 | Unpacking; condition checks against reports; works placed against walls in layout positions |
| Day 3 | Measuring and marking; hanging works; levelling |
| Day 4 | Vitrines, screens and text panels installed; vinyl applied |
| Day 5 | Lighting aimed and focused; labels placed; cleaning; final walkthrough |
| Day 6 | Documentation photographs; press preview; opening in the evening |
Allow crates that have travelled in cold or hot vehicles to rest unopened in the gallery for several hours, ideally overnight, so their contents adjust gradually to the room's temperature and humidity; this reduces the risk of condensation and stress on prints. Open crates in the order of the installation plan and check each work against its condition report before handling it further.
The installer's kit
A well-stocked kit saves time and prevents damage.
- Measuring: tape measures, a long level or laser level, a story pole (a stick marked with standard heights), a pencil and low-tack tape for marks.
- Hanging: hammers, a drill and driver, bits, wall anchors, screws, picture hooks, D-rings, wire, cleats, security fittings and their tools.
- Handling: clean cotton or nitrile gloves, padded blocks, a table covered with clean blankets, a dolly.
- Finishing: bumpers for frame corners, a microfibre cloth and suitable cleaner for glazing, spackle and touch-up paint.
- Safety: ladders or scaffolds rated for the task, a first-aid kit, protective eyewear for drilling.
Wear gloves when handling unframed prints; clean, dry hands are often preferred for framed works and glazing to maintain grip. Two people should carry large framed works. Never lean frames against each other face to face without padding.
The hanging sequence
A typical sequence reduces rework. Hang the anchor works first, usually the largest or most important on each wall, then the works around them. Measure from fixed reference points, such as the corners of walls, using the elevations from lesson 10. After each wall is hung, step back to check alignment, then level each frame and fit bumpers. Install vitrines and text panels after the walls are hung so they can be placed in relation to the works. Lighting is aimed after everything is in place, because the position of each work determines where light falls. Labels go up last, once lighting confirms that their positions are readable and free of shadows.
Light sources for photographs
Most galleries now use LED track lighting, which produces little heat and almost no ultraviolet radiation, uses far less energy than halogen, and is available in a range of beam angles and colour temperatures. Key specifications include:
- Beam angle: narrow spots of about 10 to 25 degrees concentrate light on individual works; floods of 30 to 60 degrees wash larger areas or whole walls.
- Colour temperature: around 3,000 to 4,000 kelvin is common in galleries. Warmer light feels intimate; cooler light looks crisper and closer to daylight. Keep colour temperature consistent within a room.
- Colour rendering: the colour rendering index (CRI) indicates how faithfully a light renders colours compared with a reference; CRI above 90, with a good R9 value for saturated reds, is a common requirement for art lighting. The newer TM-30 method reports fidelity (Rf) and gamut (Rg) and gives a fuller picture.
- Dimming: dimmable fixtures let you set exact light levels and balance works of different sensitivity.
- Accessories: framing projectors shape light precisely to a rectangle; snoots and louvres reduce glare; diffusion lenses soften edges.
Ask the venue for a list of available fixtures, their beam angles and wattages, and whether they are dimmable. If the gallery has only a few fixtures, prioritize key works and use floods for the rest.
Aiming lights to avoid glare
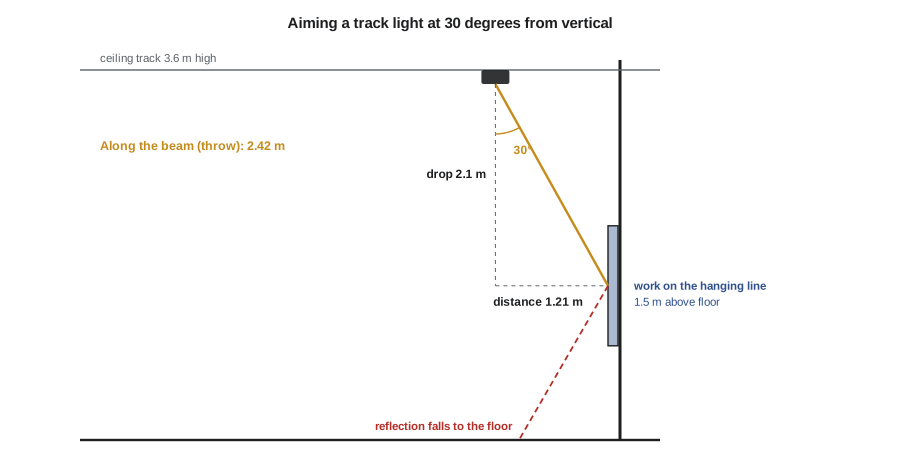
Glare and reflections are a constant problem with glazed photographs. A common rule is to aim lights at about 30 degrees from vertical toward the centre of the work. At this angle, reflections from the glazing fall toward the floor rather than into viewers' eyes, and frame shadows remain short. Steeper angles create long shadows from the top of the frame; shallower angles bounce reflections toward visitors.
Here \( x \) is the horizontal distance from the wall to the light track for a 30-degree aim, \( h_{\text{ceiling}} \) is the height of the track and \( h_{\text{centre}} \) is the centre-line height. The distance along the beam, the throw, is the vertical drop divided by \( \cos 30^\circ \).
Worked problem
Positioning a track for a 30-degree aim
A gallery's light track is 3.6 m above the floor, and the centre line is 1.5 m. How far from the wall should the track be for a 30-degree aim, and what is the throw distance?
Show solution
- Vertical drop: \( 3.6 - 1.5 = 2.1 \) m.
- Horizontal distance: \( 2.1 \times 0.577 \approx 1.21 \) m.
- Throw: \( 2.1 / \cos 30^\circ = 2.1 / 0.866 \approx 2.42 \) m.
Answer: The track should be about 1.2 m from the wall, with a throw of about 2.4 m. If the existing track is 2 m from the wall, the angle is shallower and reflections may reach viewers; use fixtures on the nearest track or add a short extension.
How much light reaches the work
Illuminance, the amount of light falling on a surface, is measured in lux (lumens per square metre) in Canada and most of the world, and sometimes in footcandles in the United States, where one footcandle is about 10.76 lux. For a spotlight, illuminance falls with the square of the distance and with the angle at which light strikes the surface.
Here \( I \) is the luminous intensity of the fixture toward the work in candelas, \( d \) is the throw distance in metres and \( \theta \) is the angle between the light ray and the perpendicular to the wall. For a 30-degree aim from vertical onto a vertical wall, the ray is 60 degrees from the wall's perpendicular, so \( \cos\theta = 0.5 \). Manufacturers publish intensity values, often as a centre-beam candlepower, for each beam angle.
Worked problem
Dimming to a target light level
A spotlight has a centre-beam intensity of 1,000 candelas. It is aimed at 30 degrees from vertical with a throw of 2.42 m. What illuminance does it produce on the work, and to what percentage should it be dimmed for a target of 50 lux?
Show solution
- Angle factor: \( \cos 60^\circ = 0.5 \).
- Illuminance: \( E = 1000 \times 0.5 / 2.42^2 = 500 / 5.86 \approx 85 \) lux.
- Dimming: \( 50 / 85 \approx 0.59 \), about 59 per cent of full output (assuming light output scales linearly with dimming).
Answer: About 85 lux at full output; dim to roughly 60 per cent for 50 lux. Always confirm with a light meter at the surface of the work, because reflections from walls and other fixtures add light.
Conservation and light exposure
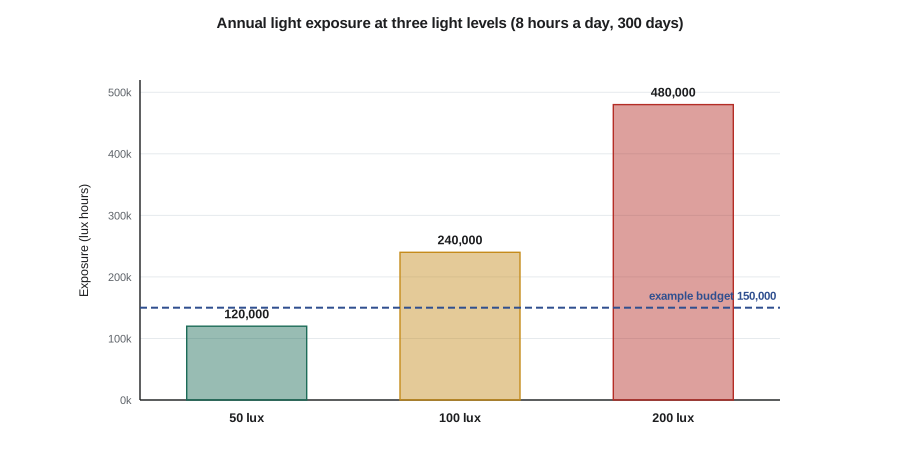
Light causes cumulative, irreversible fading and discolouration in photographs and papers. The amount of damage depends on the total exposure (illuminance multiplied by time), the spectrum of the light, especially ultraviolet, and the sensitivity of the materials. Chromogenic colour prints, some inkjet prints on certain papers, hand-coloured prints and many historical processes are particularly sensitive; modern pigment inks on archival papers are more stable, as PHOT-301 discussed, but no print is immune.
Conservation guidance, including that published by the Canadian Conservation Institute, commonly recommends about 50 lux for light-sensitive works on paper and photographs, with higher levels acceptable for less sensitive materials. Many institutions also set annual exposure budgets in lux hours, and limit ultraviolet radiation, which LED sources largely eliminate. For contemporary exhibition prints that can be reprinted, artists sometimes accept higher light levels for better viewing; for vintage or unique prints, follow the lender's or institution's requirements strictly.
Worked problem
Calculating annual light exposure
A print is displayed at 50 lux, 8 hours a day, 6 days a week, for a 10-week exhibition. What is the total exposure? What would it be at 150 lux, and how does each compare with an example annual budget of 50,000 lux hours for highly sensitive material?
Show solution
- Hours: \( 8 \times 6 \times 10 = 480 \) hours.
- At 50 lux: \( 50 \times 480 = 24\,000 \) lux hours.
- At 150 lux: \( 150 \times 480 = 72\,000 \) lux hours.
Answer: 24,000 lux hours at 50 lux, about half the example budget; 72,000 lux hours at 150 lux, which exceeds it. If the print is irreplaceable, the lower level is required; a reprintable exhibition copy could tolerate more.
Daylight
Windows and skylights bring beautiful but uncontrolled light: illuminance can reach thousands of lux near a sunny window, and daylight includes ultraviolet radiation. Keep light-sensitive works away from direct sun, use blinds, UV-filtering film or diffusing panels, and measure light at different times of day. Daylight also changes colour temperature and intensity constantly, which affects how prints look; many photographers prefer to control or exclude it.
Accessibility requirements
Exhibitions should be usable and enjoyable by people with a wide range of abilities, including people who use wheelchairs or mobility aids, people who are blind or have low vision, people who are deaf or hard of hearing, people with cognitive or sensory processing differences, and older visitors. Accessibility is both a legal obligation in many settings and good practice.
In Canada, accessibility obligations depend on jurisdiction. The Accessible Canada Act applies to federally regulated organizations, including national museums. Several provinces have their own accessibility laws, such as the Accessibility for Ontarians with Disabilities Act (AODA), whose standards include customer service, information and communications and, for some new public spaces, design requirements; Manitoba, Nova Scotia, British Columbia and Newfoundland and Labrador have accessibility legislation as well. Human rights codes in every province prohibit discrimination in services. Building codes and the CSA B651 standard set technical requirements for accessible built environments, which many venues use for exhibition design.
In practice, keep routes generously wide, with turning space for wheelchairs at ends and corners, using the dimensions in the applicable building code and CSA B651 rather than rules of thumb; avoid objects protruding into routes at heights a cane might miss; place wall labels within a comfortable reading range for standing and seated visitors; and provide information in multiple formats.
Inclusive design in practice
Beyond minimum requirements, inclusive design makes the exhibition better for everyone.
- Labels in large, high-contrast type, with a large-print booklet available at the entrance.
- Audio descriptions of key works, delivered by phone or audio guide, and tactile elements where appropriate, such as raised-line diagrams or handling samples of paper and prints.
- Captions and transcripts for any video or sound, and sign language interpretation at major events.
- Seating at intervals so visitors can rest and look longer.
- Quiet or relaxed hours with lower sound and light levels for visitors with sensory sensitivities.
- Clear wayfinding and a simple floor plan showing the route, washrooms and exits.
- Plain-language texts, avoiding jargon, as PHOT-401 advised for statements.
Ask disabled people to review plans and test the exhibition before opening if possible. Disability organizations and accessibility consultants can advise; their input is especially valuable for large or publicly funded shows.
Worked problem
Checking label placement for standing and seated visitors
A venue's guideline places wall labels with their text between 1,100 mm and 1,700 mm above the floor. The designer proposes labels whose centre is at 1,450 mm, with text 120 mm tall. Is the text within the range?
Show solution
- Text top: \( 1450 + 60 = 1510 \) mm; text bottom: \( 1450 - 60 = 1390 \) mm.
- Both are within 1,100 to 1,700 mm.
Answer: Yes. The proposed position also sits close to the centre line of the works, linking labels visually to the prints while remaining readable by seated visitors.
The visitor experience
Think through the visit from start to finish. How do visitors find the venue and the entrance? What do they see first? Is there an introductory text or a person to welcome them? Where do they leave coats and bags? Is the route obvious? Where can they sit? What can they take away, such as a room sheet, a postcard or a link to an online companion? How do they buy a book or ask about prints? Small details, such as a clear price list available on request or a visible copy of the photobook to browse, can transform engagement.
Digital companions, accessed by a short link or QR code, can offer extended texts, audio, video interviews, the photographer's statement and translations without cluttering the walls. Keep them light enough to load on mobile data, accessible to screen readers, and optional, so visitors who prefer to simply look are not pressured to use a phone. VIS-410 covered online portfolios; the companion can link to yours.
Openings and events
Openings are social and promotional events, and they need planning. Confirm the venue's maximum occupancy under its fire code and plan for crowd flow, especially near fragile works and vitrines. Arrange staff or volunteers to welcome guests, watch the works and manage any bar. Check whether alcohol service requires a permit or licensed server under provincial, state or local rules. Make sure the space remains accessible during busy events, with clear routes and seating. Prepare a short welcome by the curator or artist, and have books and price lists ready.
Worked problem
Planning for occupancy
A gallery's posted maximum occupancy is 120 people. The photographer expects 300 guests over a three-hour opening, and estimates that each guest stays an average of 50 minutes. Will the room exceed its limit if arrivals are spread evenly?
Show solution
- Arrival rate: \( 300 / 180 \approx 1.67 \) guests per minute.
- Average number present: arrival rate times stay, \( 1.67 \times 50 \approx 83 \) people.
- Peaks are likely above average, perhaps 30 to 50 per cent higher in the first hour.
Answer: On average about 83 people, below 120, but a peak 40 per cent above average would reach about 117, close to the limit. Staff should monitor numbers at the door and the photographer could add a second event, such as an artist talk the next day, to spread attendance.
Documentation
Photograph the installation before the opening, when walls are clean and no visitors are present. Installation views show how the work exists in space and are essential for future proposals, grant reports, portfolios and press. Photograph each wall straight on, wide views of each room, angled views that show relationships between works, and details of labels and vitrines. Use consistent, accurate colour and correct perspective. Record a short video walkthrough if possible. Ask the venue whether it will commission professional documentation and agree how images may be used and credited.
Deinstallation and return
Deinstallation reverses installation but brings its own risks, because crews are often tired and rushed. Plan it with the same care: check condition reports before packing, use the original crates and packing materials, label crates clearly, and keep the checklist updated with locations. Patch and paint walls as agreed. Confirm return shipping and insurance, and check each work on arrival back at the studio against its report. File installation photographs, final checklists, press clippings and visitor figures in your project archive.
Evaluating the exhibition
After closing, evaluate what worked. Useful measures include visitor numbers, time spent in the exhibition if the venue tracks it, comments in a visitor book or survey, press coverage, social media engagement, sales of prints and books, invitations that followed, and the experience of collaborators. Compare the final budget with the plan and note where estimates were wrong. Write a short report for yourself and, where required, for funders. These lessons shape your next proposal and help you negotiate better terms.
Common mistakes
MistakeOpening crates immediately after cold transport
InsteadLet crates acclimatize in the gallery for several hours before unpacking.
MistakeAiming lights steeply or from far away without checking reflections
InsteadAim near 30 degrees from vertical and check reflections from viewing positions.
MistakeSetting light levels by eye
InsteadMeasure illuminance with a light meter and dim to the target.
MistakeTreating accessibility as an afterthought
InsteadPlan routes, label heights, formats and programmes for accessibility from the start.
MistakeForgetting installation photographs before the opening
InsteadDocument the empty, finished installation before visitors arrive.
Summary and key terms
- Installation follows a sequence: prepare walls, unpack and check, hang anchors first, level, add panels, aim lights, place labels.
- Gallery LEDs offer controllable beam angles, colour temperatures of about 3,000 to 4,000 K and high colour rendering.
- Aiming about 30 degrees from vertical reduces glare and frame shadows.
- Illuminance from a spotlight is intensity times the cosine of the angle divided by the distance squared.
- About 50 lux is commonly recommended for light-sensitive photographs, and total exposure accumulates over time.
- Accessibility law and guidelines differ by jurisdiction but share practical requirements for routes, labels and formats.
- Documentation, careful deinstallation and evaluation complete the exhibition.
- Acclimatization
- Allowing crated works to adjust gradually to room conditions before unpacking.
- Beam angle
- The spread of light from a fixture, in degrees.
- Colour temperature
- The warmth or coolness of white light, in kelvin.
- Colour rendering index
- A measure of how faithfully a light source renders colours.
- Illuminance
- The amount of light falling on a surface, in lux.
- Lux hour
- A unit of light exposure: one lux for one hour.
- Throw distance
- The distance along the beam from a fixture to the surface.
- Framing projector
- A fixture that shapes light precisely to a rectangle.
- Installation view
- A photograph showing how works appear in the exhibition space.
- Occupancy limit
- The maximum number of people permitted in a space.
Practice problems
Work each problem on paper first, then reveal the answer to check.
A track is 3.2 m high and the centre line is 1.5 m. How far from the wall for a 30-degree aim?
Show answer
\( 1.7 \times 0.577 \approx 0.98 \) m.
A 1,500 cd spot with a 60-degree incidence angle at 3 m: what illuminance?
Show answer
\( 1500 \times 0.5 / 9 \approx 83 \) lux.
A print at 50 lux for 600 hours receives how much exposure?
Show answer
30,000 lux hours.
Convert 10 footcandles to lux.
Show answer
About 108 lux.
Why is 30 degrees a common aiming angle?
Show answer
It sends reflections toward the floor and keeps frame shadows short.
Name two Canadian accessibility laws.
Show answer
The Accessible Canada Act and the AODA (also provincial acts in Manitoba, Nova Scotia, BC, Newfoundland and Labrador).
Under US guidance, how far may a wall-mounted object protrude into a route?
Show answer
No more than 4 in between 27 and 80 in above the floor.
Give three inclusive design measures.
Show answer
Large-print labels, audio description, captions, seating, relaxed hours, clear wayfinding.
200 guests over 2 hours, staying 40 minutes on average: average number present?
Show answer
\( 200/120 \times 40 \approx 67 \).
What should installation photographs include?
Show answer
Straight-on walls, wide room views, angled views, label and vitrine details.
Lesson quiz · 5 questions
Score 60% or more to complete this lesson.
Create a free account to save your progress, take quizzes and earn a certificate.