
CINE-320 · Lesson 6 of 12 · 25 min
Shooting interviews
The sit-down interview is the backbone of many documentaries. It lets people tell their own stories, explain what the audience cannot see and reflect on events after they happen. Interviews are also where the documentary cinematographer has the most control: there is time to choose a location, compose a frame, light and test. Because interviews may run for hours and be intercut throughout a film, decisions made in the first ten minutes of setup affect the entire production. This lesson covers interview styles, eyeline, framing and backgrounds, single-camera and two-camera setups, the Interrotron, continuity across multiple sessions and the practical rhythm of an interview day. Lighting principles come from CINE-221; we focus here on documentary-specific choices.
Interview styles
Interviews vary with the film's mode (Lesson 1) and the relationship between filmmaker and subject.
- Formal sit-down interview: the subject sits in a chosen location, lit and framed carefully, answering questions from an interviewer who is usually off camera. This is standard in expository and many participatory films.
- Informal or walk-and-talk interview: the subject talks while doing something, walking, driving or working, with the camera handheld. It feels more spontaneous and can reveal character through action.
- Conversation on the fly: in observational films, brief exchanges captured during events, sometimes with the filmmaker asking a question from behind the camera.
- Direct-to-lens testimony: the subject looks into the lens and addresses the audience directly, creating intensity and intimacy, often with an Interrotron.
- Group or two-person interviews: couples, families or colleagues speaking together, requiring multiple cameras or careful framing.
Eyeline
Eyeline is where the subject looks. In the classic documentary interview, the interviewer sits very close to the side of the lens, at the same height, so that the subject looks just off camera. This creates the impression that the subject is speaking to someone the audience cannot see, while keeping their eyes visible and connected. The closer the interviewer sits to the lens, the more intimate the eyeline; if the interviewer sits far to the side, the subject appears in profile and the interview feels distant.
Consistency matters. Many productions decide that all interviews will have subjects looking to the same side of frame, or alternate sides deliberately, so that when two people who disagree are intercut they appear to face each other. Height matters too: the camera lens is usually at or slightly below the subject's eye level, which feels respectful and natural. A camera far above eye level diminishes a subject; far below can make them look imposing.
Framing and backgrounds
Interview framing usually follows conventions adapted to the film's style. A medium close-up, from the chest or mid-torso up, is common, with headroom kept modest and generous lead room on the side the subject faces. Close-ups from the shoulders up give intensity for emotional moments. Wider frames reveal the environment and can establish context, especially in the first appearance of a character. Some films use unconventional framing, such as subjects placed at the edge of a wide frame with negative space, to create a distinctive look. Whatever the choice, it should be consistent across the film.
The background tells the audience about the subject. A scientist in a laboratory, a farmer in a barn or a musician among instruments gives context without words. Backgrounds should be chosen and dressed with care: remove clutter, distracting logos and anything that might date the film unintentionally; add depth by placing the subject away from walls; and use practical lights to create pools of interest. Separation between subject and background comes from distance, focus, contrast and color. A shallow depth of field softens the background, but if it is too shallow, the subject drifts out of focus when they lean forward. Apertures around f/2.8 to f/4 on Super 35 are common for interviews.
Single-camera interviews
With one camera, the operator chooses a frame and may reframe between questions, for example from a medium close-up to a close-up during an emotional passage. Reframing during answers is distracting; it is better to wait for a pause or the next question, unless the movement is slow and motivated. Editors appreciate when the frame changes between questions, because it gives them cutting points within the same interview. Single-camera interviews are simpler, cheaper and less intimidating, which can help subjects relax.
Two-camera interviews
Two cameras give editors the flexibility to cut between angles, compress answers and hide edits without jump cuts. Common configurations include:
- A main camera on a medium close-up and a second camera on a tighter close-up from a similar angle, both on the same side of the eyeline.
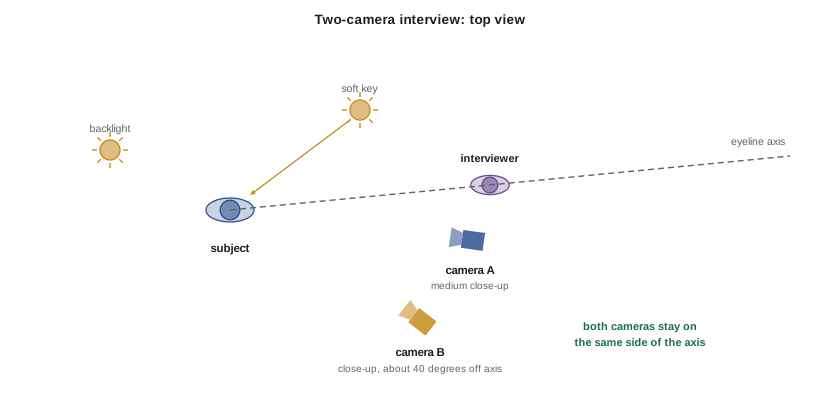
- A main camera near the interviewer's eyeline and a second camera at a wider angle, often 30 to 45 degrees off axis, showing the subject in profile or three-quarter view with more environment.
- For two-person interviews, one camera on each subject, plus a wide shot if possible.
The cameras must match: same frame rate, codec, color settings and timecode, and ideally the same model or carefully matched picture profiles. Lighting must work for both angles, which often means the second camera sees more of the shadow side. Keep both cameras on the same side of the axis created by the subject's eyeline to avoid confusing screen direction.
Calculating framing
Choosing lenses and distances for a two-camera setup is easier with a simple calculation. The width of the frame at the subject depends on the sensor width \( w \), the focal length \( f \) and the camera-to-subject distance \( d \):
Worked problem
Choosing lenses for a two-camera interview
Both cameras have Super 35 sensors about 24.9 mm wide. Camera A sits 2.0 m (about 6.5 ft) from the subject with a 50 mm lens. Camera B sits 2.5 m (about 8.2 ft) away. What frame width does camera A give, and what focal length should camera B use for a close-up about 0.6 m wide?
Show solution
- Camera A: \( W = 2.0 \times 24.9 \div 50 \approx 1.0 \) m, roughly a medium close-up from the chest up.
- Camera B: rearrange to \( f = d \times w \div W = 2.5 \times 24.9 \div 0.6 \approx 104 \) mm.
- A 100 mm lens or a zoom set near 100 mm gives a close-up about 0.62 m wide.
Answer: Camera A frames about 1.0 m wide; camera B needs about 100 mm for a 0.6 m close-up.
The horizontal angle of view, useful for checking whether a background will fit in a wide shot, is \( \theta = 2 \arctan\left(\frac{w}{2f}\right) \). For a 24.9 mm sensor and a 50 mm lens, \( \theta \approx 28^\circ \); with a 24 mm lens it is about 55°.
The Interrotron and direct address
Filmmaker Errol Morris popularized a device he called the Interrotron, built on teleprompter technology. A beam-splitter glass in front of the lens shows the subject a live image of the interviewer's face, while the interviewer sees the subject on a similar screen. The subject looks directly into the lens while feeling that they are talking to a person, producing direct-to-camera testimony with natural eye contact. Commercial systems based on the same principle, often called direct-to-lens or eye-direct systems, are widely used.
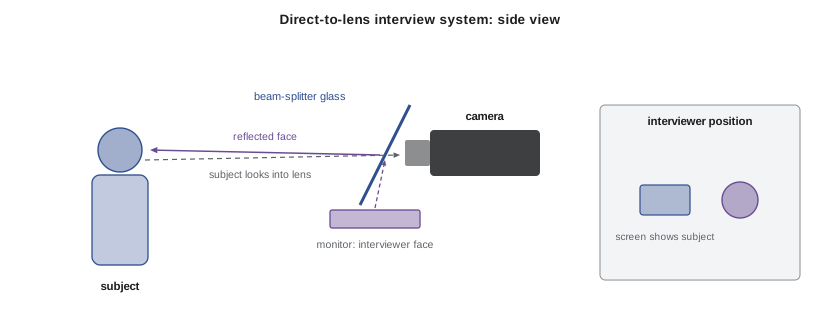
Direct address changes the relationship between subject and audience. It can be powerful, confrontational or intimate, but it can also feel like a deposition. It suits films about testimony, accountability and personal experience. Because the interviewer is in another space or behind a screen, some subjects find it alienating; the setup needs patience and a skilled interviewer who keeps the connection alive through the screen.
Running an interview day
Interviews are long, and the camera team's preparation determines how relaxed the subject feels. Arrive early, set up and test before the subject sits down, using a stand-in for framing and lighting. Minimize the time the subject waits under lights. Microphones are discussed in Lesson 8: interviews usually use a lavalier and a boom together for redundancy. Before rolling, check focus, exposure, white balance, audio levels, timecode and that both cameras are recording. Note the room's environmental sounds: refrigerators, air conditioning, clocks and traffic may need to be switched off or managed, with permission, and switched back on afterward.
During the interview, the camera operator watches for changes: the subject moving out of focus, hair falling across the face, light changing through windows, a microphone visible in frame or a reflection in glasses. Small adjustments are made between questions. Card and battery changes should be planned so they never interrupt a crucial answer; start long interviews with fresh media and batteries and keep spares within reach.
Continuity across sessions
Many documentary subjects are interviewed several times over months or years. Decide whether each interview should match previous ones, in which case record camera height, lens, distance, light positions and settings with photographs and notes, or whether changes in setting should reflect the passage of time. Clothing and appearance change naturally, but matched framing and lighting help audiences recognize characters and follow their journeys.
Helping the subject relax
Many people have never been interviewed on camera, and the setup can be intimidating: lights, microphones, strangers and a lens staring at them. The camera operator can do much to reduce that pressure. Keep the setup as quiet and quick as possible, avoid loud technical discussion near the subject, and explain briefly what the equipment does if they are curious. Some operators start recording before the formal interview begins, with the subject's knowledge, so that the transition into the interview feels natural. Once the interview starts, stay still and quiet behind the camera; the subject should forget the operator and focus on the interviewer. Offer water, regular breaks and a chance to stretch during long interviews, and watch for signs of fatigue, which can show on camera as slumping posture or flat delivery.
Interviews in difficult conditions
Not every interview happens in a quiet room with time to light. Interviews in vehicles, outdoors in wind, in noisy workplaces or in places where the subject can stay only a few minutes require quick decisions. Choose the position that gives the best background and light within seconds, use a lavalier for clean sound, and accept imperfection where the content is important. A slightly noisy interview with a powerful answer is more valuable than a perfect frame with nothing to say.
Recording technical notes
For every interview, record the essential technical details: camera positions and heights, lenses and focal lengths, aperture, ISO and ND settings, white balance, light positions and power, microphone types and placement, and the room's layout. Photographs of the setup from several angles take only a minute and make it far easier to match a pick-up interview months later, or to explain to an editor why two cameras look slightly different.
Small details such as a reflection in a picture frame or a clock that shows the time will reveal edits, so check the background through both cameras before every session begins.
Common mistakes
MistakeSeating the interviewer far from the lens.
InsteadPlace the interviewer close to the lens at eye level for an intimate eyeline.
MistakeReframing during answers.
InsteadChange frame size between questions or with slow, motivated moves.
MistakeCrossing the eyeline axis with the second camera.
InsteadKeep both cameras on the same side of the subject's eyeline.
MistakeUsing such shallow focus that subjects drift soft.
InsteadUse moderate apertures that allow for movement.
MistakeLeaving noisy appliances running.
InsteadSwitch off noise sources with permission and restore them afterward.
Summary and key terms
- Interview styles range from formal sit-downs to walk-and-talks and direct address.
- The interviewer sits beside the lens at eye level to create a natural eyeline.
- Framing and backgrounds should be consistent and tell the audience about the subject.
- Two-camera interviews give editors cutting options; cameras must match and stay on one side of the axis.
- Frame width equals distance times sensor width divided by focal length.
- The Interrotron lets subjects look into the lens while seeing the interviewer.
- Careful preparation, monitoring and continuity notes make long interviews smooth.
- Eyeline
- The direction in which a subject looks relative to the lens.
- Lead room
- Space in front of a subject on the side they face.
- Medium close-up
- A frame from about mid-chest up.
- Axis
- An imaginary line along the subject's eyeline that cameras should not cross.
- Off-axis camera
- A second camera placed at an angle from the main eyeline.
- Interrotron
- Errol Morris's beam-splitter system for direct-to-lens interviews.
- Direct address
- A subject speaking directly into the lens.
- Stand-in
- A person who sits in for the subject during setup.
- Walk-and-talk
- An interview conducted while the subject moves.
- Angle of view
- The angle of the scene captured by a lens on a given sensor.
Practice problems
Work each problem on paper first, then reveal the answer to check.
Where does the interviewer usually sit?
Show answer
Close beside the lens at the subject's eye level.
Why keep subjects facing consistent sides?
Show answer
So intercut subjects relate coherently on screen.
Frame width at 3 m with a 75 mm lens on a 24.9 mm sensor?
Show answer
About 1.0 m.
Focal length for a 0.5 m frame at 2 m on 24.9 mm?
Show answer
About 100 mm.
Angle of view with 35 mm on 24.9 mm?
Show answer
About 39 degrees.
Why do editors like frame changes between questions?
Show answer
They provide cutting points.
What must match between two interview cameras?
Show answer
Frame rate, codec, color settings, timecode.
Who popularized the Interrotron?
Show answer
Errol Morris.
Why use a stand-in?
Show answer
To set frame and light without tiring the subject.
What should you record for continuity?
Show answer
Camera height, lens, distance, light positions and settings.
Lesson quiz · 5 questions
Score 60% or more to complete this lesson.
Create a free account to save your progress, take quizzes and earn a certificate.