
PHOT-101 · Lesson 9 of 12 · 24 min
Seeing photographically: viewpoint, timing and light
The first eight lessons covered the camera's controls. Knowing them is necessary but not sufficient: technically perfect photographs of uninteresting subjects in flat light, taken from the first spot the photographer stood, are common. The difference between a record and a photograph lies in decisions made before the shutter is pressed: where to stand, what to include and leave out, when to press the button, and what the light is doing. VIS-101 covered the principles of composition in detail. This lesson is about applying them in the field as a photographer: working a scene, choosing viewpoint and background, layering, anticipating the decisive moment, and above all seeing and using light, its direction, quality, color and timing, with practical exercises to build the habit.
Working the scene
Experienced photographers rarely take one picture of a subject. They work the scene: they arrive, look, take an initial picture, then move, change lenses, wait, and refine, often making dozens of frames of which one is the keeper. Contact sheets of famous photographers show this process: the celebrated image is usually the culmination of a sequence, not a lucky single shot.
A useful routine when you find a promising subject:
- Take the obvious picture first, so you have it.
- Walk around the subject and look from every side.
- Change height: crouch, lie down, climb steps, hold the camera high.
- Move closer, then closer again. The war photographer Robert Capa's advice, "If your pictures aren't good enough, you're not close enough", applies far beyond war.
- Change the focal length and step back or forward to change perspective (Lesson 2).
- Simplify: remove everything that does not help, by moving, cropping in camera or using depth of field.
- Wait: for the light to change, a person to walk into the frame, a cloud to move, an expression to happen.
Viewpoint and background
Camera position decides the relationships between everything in the frame (Lesson 2). A step to the left can separate a head from a tree that seemed to grow out of it; dropping half a meter can put a subject against the sky instead of a cluttered street. Most people photograph from standing eye height, so pictures from other heights immediately look different: a low viewpoint makes children, pets and flowers look like the subjects of their own world and can make a person look powerful; a high viewpoint maps a scene and shows patterns.
The background is half of most photographs. Before pressing the shutter, scan the edges and the background deliberately: poles and branches growing from heads, bright patches that pull the eye, horizons cutting through necks, signs with readable text, bins and parked cars. Fixing them usually takes a small move rather than editing. Ask whether the background supports the subject, by giving context or a clean field, or competes with it.
Layering and depth
Pictures with something interesting in the foreground, middle ground and background draw the viewer into the frame, creating depth on a flat surface (VIS-101). Street and documentary photographers build complex layered images in which several subjects at different distances each contribute, which requires patience and careful positioning. Landscape photographers often place a strong foreground element, a rock, a flower or a line in the sand, close to a wide lens, leading toward the distant subject, and use the hyperfocal distance (Lesson 3) to keep all layers sharp. Frames within the frame, such as doorways and arches, add another layer.
Timing and the decisive moment
The French photographer Henri Cartier-Bresson described "the decisive moment": the instant when the elements of a scene, its shapes, gestures and expressions, come together in a meaningful arrangement. A fraction of a second earlier or later, the picture is ordinary. Capturing such moments depends less on fast reactions than on anticipation:
- Find a good stage, a place with interesting light and background, and wait for the actors to enter it.
- Watch for the build-up to a peak: the top of a jump, the moment before a ball is struck, the laugh after a joke, the glance between two people.
- Know your camera well enough that settings never get in the way: pre-set exposure and focus (zone focusing, Lesson 7), and keep the camera ready.
- Use burst mode as a supplement to timing, not a replacement (Lesson 4).
Timing applies to still subjects too: the moment a cloud's shadow lifts off a field, when a street light comes on at dusk, when the tide reaches a rock.
Seeing light
Photography means "drawing with light", and light is often what turns an ordinary subject into a memorable picture. Learning to see light, before thinking about the subject, is the most important habit a photographer can develop. Look at light in terms of four qualities:
- Direction: where the light comes from relative to the camera.
- Quality: hard (from a small or distant source, with crisp, dark shadows) or soft (from a large source, with gentle, gradual shadows).
- Color: warm or cool, and how it changes through the day (Lesson 8).
- Intensity and contrast: how bright, and how much difference between lit and shadowed areas.
Direction of light
Front light, from behind the camera, illuminates the subject evenly and shows color well, but casts shadows behind the subject where the camera cannot see them, so it flattens shape and texture. Side light, from 45° to 90° to one side, creates shadows across the subject that reveal form and texture: the best light for showing the shape of a face, the texture of bark or the relief of a landscape. Back light, from behind the subject toward the camera, outlines subjects with a glowing rim, makes translucent things such as leaves and hair glow, and creates silhouettes and atmosphere, but needs care with exposure (Lesson 6) and flare (Lesson 2). Top light, the high midday sun, creates short, deep shadows, dark eye sockets on faces, and flat landscapes; it is usually the least flattering, though strong graphic shadows can make it work.
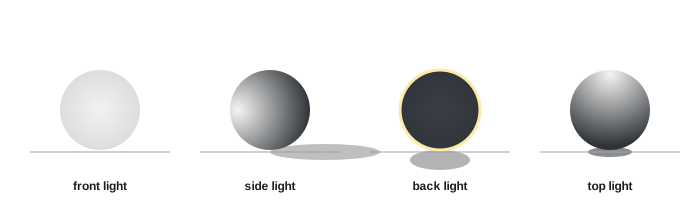
Quality of light
The quality of light depends on the apparent size of the source as seen from the subject. The sun is huge, but so far away that it looks small, so direct sun is hard light. An overcast sky is a vast source covering the whole sky, so it gives soft, shadowless light. Light from a window is soft when the subject is close to the window and becomes harder farther away. Soft light flatters faces and suits product and nature details; hard light suits dramatic portraits, graphic architecture and strong textures. PHOT-102 shows how to create and modify both with diffusers, reflectors and flash.
Time of day and weather
The sun's height changes everything about outdoor light. Shadow length depends on the sun's elevation angle: a vertical object of height h casts a shadow of length h/tan(elevation).
Worked problem
Shadows through the day
Compare the shadow cast by a 1.8 m person when the sun is 60° above the horizon (summer midday at mid-latitudes) and 10° above it (about an hour after sunrise).
Show solution
- At 60°: shadow = 1.8/tan 60° = 1.8/1.73 = 1.0 m.
- At 10°: shadow = 1.8/tan 10° = 1.8/0.176 = 10.2 m.
Answer: About 1 m at midday and 10 m early in the morning. Low sun stretches shadows across the land, revealing texture and shape, warms the color and comes from the side, which is why landscape photographers prefer the hours near sunrise and sunset.
Photographers speak of the golden hour, roughly the time when the sun is less than about 6° above the horizon, shortly after sunrise and before sunset, when light is warm, directional and soft-edged; and the blue hour, the period of twilight when the sun is a few degrees below the horizon and the sky glows deep blue, balancing beautifully with city lights. The length of these periods depends on latitude and season: near the equator the sun rises and sets steeply and golden hour is brief; at high latitudes in summer it can last for hours. Apps that show the sun's position and times for any place and date make planning easy.
Weather is an ally. Overcast days give soft light for portraits, forests and waterfalls; mist and fog simplify backgrounds and add depth through aerial perspective; storms bring dramatic skies and spots of light breaking through; rain adds reflections and color on city streets at night; snow simplifies and brightens. The worst photographic light is often a clear, cloudless midday sky.
Light indoors
Indoors, the most useful light is often a window. Placing a subject beside a window, facing slightly toward it, gives soft side light, the light of countless classic portraits and still-life paintings. Turning off mixed room lights avoids color casts (Lesson 8). Moving the subject closer to the window softens the light and brightens it; moving away darkens and hardens it and increases contrast. A white card or wall opposite the window fills the shadows (PHOT-102).
Each genre has its favorite light. Portrait photographers seek soft, directional light, such as open shade, overcast days and windows. Landscape photographers chase the low sun, storms and mist. Architectural photographers study when the sun strikes each facade, and often photograph interiors at dusk when interior and exterior light balance. Street photographers use hard light and long shadows to build graphic compositions, and reflections at night. Food and product photographers favor soft side or back light that reveals texture and makes liquids glow. Knowing the light your genre needs tells you when to be in the field.
Practice: building the habit
Seeing improves with deliberate practice. Exercises used in photography courses include:
- One subject, twenty pictures: photograph one ordinary object or scene in twenty genuinely different ways, by viewpoint, distance, focal length, light and timing.
- One focal length for a week: use only a single prime (or tape your zoom) to learn its view and to move your feet.
- Light diary: photograph the same place at different times of day and in different weather, and compare.
- Waiting for the actor: find a stage with good light and background, and wait until someone enters it at the right moment.
- Self-critique: at the end of each shoot, select your best three images and write one sentence about why each works and what you would change (Lesson 12).
Common mistakes
MistakeTaking one picture from the first place you stand.
InsteadWork the scene: move, change height and focal length, wait.
MistakeIgnoring the background.
InsteadScan the edges and background, and move to simplify them.
MistakeReacting to action instead of anticipating it.
InsteadFind the stage, pre-set the camera and anticipate the peak.
MistakePhotographing everything at midday in harsh light.
InsteadWork in the hours near sunrise and sunset, in shade, or in soft overcast light.
MistakeNoticing the subject but not the light.
InsteadLook at direction, quality, color and contrast first.
Summary and key terms
- Strong photographs come from decisions about position, content, timing and light.
- Work a scene: move, change height and focal length, get closer, simplify, wait.
- Camera position controls the background; scan it before shooting.
- Layering foreground, middle and background builds depth.
- The decisive moment is captured by anticipation and a well-prepared camera.
- Light has direction, quality, color and contrast; side and back light reveal form and atmosphere.
- Low sun lengthens shadows (h/tan elevation); golden and blue hours and weather create memorable light.
- Working the scene
- Making many variations of a picture to find the strongest.
- Viewpoint
- The position and height from which a photograph is taken.
- Layering
- Arranging subjects at several distances within the frame.
- Decisive moment
- The instant when a scene's elements come together meaningfully.
- Front light
- Light from behind the camera toward the subject.
- Side light
- Light from one side, revealing form and texture.
- Back light
- Light from behind the subject toward the camera.
- Hard light
- Light from a small source, giving crisp shadows.
- Soft light
- Light from a large source, giving gradual shadows.
- Golden hour
- The period of low, warm sunlight near sunrise and sunset.
Practice problems
Work each problem on paper first, then reveal the answer to check.
List four ways to vary a picture while working a scene.
Show answer
For example: move around it, change height, get closer, change focal length, wait for a moment.
A pole appears to grow from a person's head. How do you fix it?
Show answer
Move the camera or the subject sideways so the pole no longer aligns with the head.
What does Cartier-Bresson's decisive moment depend on most?
Show answer
Anticipation and preparation, more than reaction speed.
Which light direction best reveals texture?
Show answer
Side light, especially low and raking.
Why is an overcast sky a soft light source?
Show answer
It is very large relative to the subject.
Find the shadow of a 10 m tree when the sun is 20° high.
Show answer
10/tan 20° ≈ 27 m.
At what sun elevation does a shadow equal the object's height?
Show answer
45°.
How would you light a portrait indoors without equipment?
Show answer
Place the subject beside a window, facing slightly toward it, with other lights off.
Name two kinds of weather that help photography.
Show answer
For example: overcast, fog, storm light, rain at night, snow.
Why practice with a single focal length for a week?
Show answer
To learn its view and to compose by moving your feet.
Lesson quiz · 5 questions
Score 60% or more to complete this lesson.
Create a free account to save your progress, take quizzes and earn a certificate.