
PHOT-202 · Lesson 7 of 12 · 25 min
Layers, masks, selections and blend modes
Raw processors handle most photographic adjustments, but some work requires a pixel editor: removing complex distractions, detailed skin retouching, combining several images, adding text and graphics, and precise control over every pixel. Photoshop and similar editors work with layers, masks and selections, which together allow complex, non-destructive editing. This lesson introduces moving images between a raw processor and Photoshop, layers and layer types, adjustment layers, layer masks, selection tools, refining edges, blend modes, smart objects and smart filters, and organizing layered files.
From the raw processor to Photoshop
The usual workflow is to complete global raw adjustments first, then open the image in Photoshop from the raw processor using an "edit in" command. Lightroom Classic and Capture One render the raw file with its adjustments and create a new TIFF or PSD file, usually with a suffix such as "-Edit", which is added to the catalogue beside the original. Choose 16-bit depth, to preserve smooth tones through heavy editing, and a wide colour space such as Adobe RGB or ProPhoto RGB, matching the colour settings in Photoshop. Alternatively, open the raw file as a smart object, which embeds the raw data in the Photoshop file so that raw settings can be changed later. After saving in Photoshop, the edited file appears in the catalogue for organization and output. Keep files layered while working, and save flattened copies only for output.
Layers
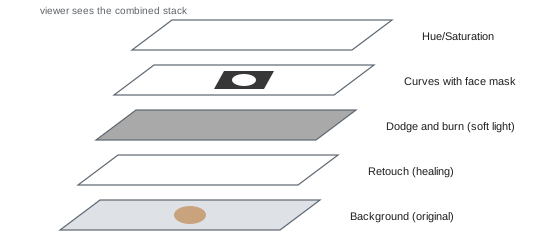
Layers are like transparent sheets stacked on top of each other. Each layer can contain pixels, adjustments, text, shapes or smart objects, and the visible image is the combination of all layers from top to bottom. Layers allow you to work on parts of an image separately, try alternatives, and change or remove work later. Key layer properties include opacity, which controls how strongly a layer shows; fill, which affects layer content but not layer styles; blend mode, which controls how the layer combines with those beneath (discussed below); and visibility, toggled with the eye icon. The background layer, the original image, is best left untouched, with all retouching done on separate layers above it. Common layer types include pixel layers, adjustment layers, fill layers, text layers, shape layers, smart objects and groups.
Adjustment layers
Adjustment layers apply tonal and colour changes, such as curves, levels, hue and saturation, colour balance, selective colour, black and white, gradient maps and photo filters, without changing pixels. They affect all layers below them, can be edited at any time by double-clicking, and come with a layer mask that limits where they apply. Clipping an adjustment layer to the layer directly below it, using a clipping mask, limits its effect to that layer only, essential in compositing. Because adjustment layers are non-destructive and maskable, they have largely replaced direct adjustments to pixels. Curves adjustment layers are particularly versatile for brightening, darkening, adding contrast and correcting colour in specific areas.
Layer masks
A layer mask controls which parts of a layer are visible: white reveals, black conceals, and shades of grey partially reveal. Painting on a mask with a soft brush in black or white hides or shows parts of the layer without erasing anything, so mistakes can be corrected by painting with the opposite colour. Masks can be created from selections, refined with feathering and density controls, and painted with gradients for smooth transitions. Masks are the foundation of non-destructive editing in Photoshop: they let you apply a curves adjustment only to a face, blend two exposures together, or combine elements from different images seamlessly. Viewing the mask on its own, by holding a modifier key and clicking it, helps check for missed areas or stray marks.
Worked problem
Brightening a face with a masked curves layer
In a portrait, the subject's face is slightly darker than the rest of the image. How can it be brightened non-destructively in Photoshop?
Show solution
- Add a curves adjustment layer and raise the midtones until the face looks right, ignoring the effect on the rest of the image.
- Invert the layer mask to black, hiding the adjustment everywhere.
- Paint with a soft white brush at low opacity (about 10–20 %) over the face, building up the effect gradually.
- View the mask alone to check coverage, and lower layer opacity if the effect is too strong.
Answer: A curves adjustment layer with an inverted mask painted white over the face, at low brush opacity, brightens it non-destructively.
Selection tools
Selections define areas for editing, masking and compositing. Photoshop offers many selection tools:
- Marquee tools select rectangles and ellipses.
- Lasso tools select freehand, polygonal or edge-snapping areas.
- The quick selection and object selection tools find edges automatically as you brush or draw a rough box.
- Select Subject and Select Sky use machine learning to select the main subject or sky in one click.
- Colour range selects pixels of similar colour or tone, including skin tones and highlights or shadows.
- Luminosity masks, created from the image's own brightness, select highlights, midtones or shadows with smooth, natural transitions, popular in landscape processing.
- The pen tool draws precise vector paths, the standard for product cut-outs with clean, hard edges (Lesson 9).
Selections can be added to, subtracted from and intersected, saved as channels, and converted into masks. Most professional work combines several tools: an AI selection for a quick start, refined with manual tools.
| Tool | Best for |
|---|---|
| Select Subject / Object Selection | Quick selection of people and objects |
| Select Sky | Skies behind complex edges |
| Quick Selection | Brushing selections along clear edges |
| Colour Range | Similar colours or tonal ranges |
| Luminosity masks | Smooth selections by brightness |
| Pen tool | Precise, hard-edged product outlines |
Refining edges
Hair, fur, foliage and semi-transparent edges are difficult to select. Photoshop's Select and Mask workspace offers tools to refine selections: the refine edge brush, which detects fine detail such as hair strands along the boundary; edge detection radius and smart radius settings; smooth, feather, contrast and shift edge controls; and decontaminate colours, which removes colour fringing from the old background around the edge. AI-powered refinement has made hair selections much easier, though complex cases still need manual work. Viewing the selection against different backgrounds, such as black, white and overlay, reveals halos and missed areas. Outputting refined selections as layer masks keeps the process non-destructive.
Blend modes
Blend modes control how a layer's pixels combine with the pixels below. They are grouped by effect:
- Darken modes (darken, multiply, colour burn) keep darker pixels; multiply darkens everything except white, useful for shadows and texture overlays.
- Lighten modes (lighten, screen, colour dodge) keep lighter pixels; screen brightens everything except black, useful for light effects and combining light trails.
- Contrast modes (overlay, soft light, hard light) darken dark areas and brighten light ones; soft light and overlay with a 50 % grey layer are the basis of dodge and burn layers.
- Comparative modes (difference, exclusion) are used for aligning layers and checking differences.
- Component modes (hue, saturation, colour, luminosity) apply only one property: luminosity mode applies a curves adjustment to brightness without changing saturation; colour mode is used for tinting.
Blend modes combined with opacity and masks are essential for retouching, compositing and creative effects.
Smart objects and smart filters
Converting a layer to a smart object preserves its original data inside the Photoshop file. Smart objects can be scaled, rotated and warped repeatedly without losing quality, because each transformation is recalculated from the original. Filters applied to smart objects become smart filters, which can be edited, masked, reordered or removed at any time, such as a sharpening filter applied only to the eyes, or a blur whose amount can be changed later. Raw files opened as smart objects allow raw settings to be revised inside Photoshop. Smart objects increase file size and some tools, such as the healing brush, cannot paint directly on them, so retouching is usually done on separate pixel layers.
Organizing layered files
Complex retouching and compositing files can contain dozens of layers. Good organization makes them understandable to you later and to collaborators: name layers descriptively ("skin healing", "dodge and burn", "background replacement"); group related layers into folders; colour-code groups; delete unused layers; and keep the order logical, typically with the original at the bottom, retouching layers above, then global adjustments and output effects at the top. Save master files as PSD or layered TIFF in 16-bit, with large file support (PSB) for very large documents. Keep the master separate from flattened output files, and record important steps for complex jobs.
Generative and AI tools
Photoshop and other editors now include generative AI tools, such as Generative Fill, Generative Expand and AI-based removal tools, which create new pixel content from text prompts or the surrounding image, extend canvases, and remove objects with plausible fill. These tools can save hours, for example removing a crowd from a background or extending a frame for a different aspect ratio, but they also raise questions of authenticity, licensing and disclosure (Lesson 12). Generated content may contain artefacts or details inconsistent with the scene, and some clients and publications prohibit generative content. Photoshop attaches content credentials to images edited with some generative features. Check results carefully and understand the policies of your clients and publications before using them.
Luminosity masks in practice
Luminosity masks are selections based on the brightness of the image itself. A "lights 1" mask selects the brightest tones with a smooth fall-off into the midtones; "lights 2" and "lights 3" are progressively narrower, selecting only the brightest areas; "darks" masks do the same for shadows; and "midtones" masks select the middle range. Because they are derived from the image, their edges follow the content naturally, without the halos of hand-painted masks. Landscape photographers use them to darken bright skies, add contrast to highlights, brighten shadows without affecting highlights, and blend exposures. Luminosity masks can be created with channel calculations in Photoshop or with dedicated panels and plug-ins.
Actions and automation
Photoshop actions record a series of steps, such as creating a frequency separation setup, adding dodge and burn layers, resizing and sharpening for the web, or saving in a specific format, and replay them with a single click. Actions can be applied to many files with batch processing. Image processor scripts convert batches of images to different formats and sizes. Retouchers build libraries of actions for repetitive tasks, saving hours each week and ensuring consistency. Panels and plug-ins from third-party developers add more advanced automation, such as luminosity mask generation, retouching helpers and export routines.
Non-destructive editing in Photoshop
The principles of non-destructive editing apply throughout Photoshop work. Use adjustment layers rather than direct adjustments; masks rather than erasing; smart objects for transforms and filters; separate empty layers for healing and cloning, set to sample all layers; and layer groups to organize work. Keep the original background layer intact. When a destructive step is necessary, such as applying a filter that does not work on smart objects, duplicate the layer first. A well-built non-destructive file allows any change to be revisited, which is invaluable when clients request revisions.
Keyboard shortcuts and efficiency
Professional retouchers rely heavily on keyboard shortcuts: switching tools, changing brush size and hardness, toggling masks, zooming and panning, and swapping foreground and background colours for painting masks. Customizing shortcuts for frequently used commands, using a pen tablet with programmable buttons, and arranging workspace panels for each task save considerable time. Learning a small set of shortcuts thoroughly is more valuable than knowing many superficially.
Common mistakes
MistakeRetouching directly on the background layer.
InsteadWork on separate layers above it.
MistakeErasing pixels to hide parts of a layer.
InsteadUse layer masks.
MistakeEditing 8-bit files with heavy adjustments.
InsteadWork in 16-bit for smooth tones.
MistakeAccepting rough AI selections around hair.
InsteadRefine edges in Select and Mask.
MistakeUnnamed, disorganized layers.
InsteadName, group and order layers logically.
Summary and key terms
- Open images in Photoshop from the raw processor as 16-bit files or smart objects.
- Layers stack transparent sheets with opacity and blend modes.
- Adjustment layers apply editable, maskable tonal and colour changes.
- Layer masks reveal with white and conceal with black, non-destructively.
- Selection tools range from AI selections to the precise pen tool.
- Select and Mask refines difficult edges such as hair.
- Blend modes, smart objects and organized files support complex editing.
- Layer
- Transparent sheet in a layered image.
- Opacity
- Strength with which a layer shows.
- Adjustment layer
- Editable tonal or colour adjustment layer.
- Clipping mask
- Limits a layer to the content of the layer below.
- Layer mask
- Greyscale mask controlling layer visibility.
- Selection
- Defined area for editing or masking.
- Luminosity mask
- Selection based on image brightness.
- Blend mode
- How a layer combines with layers below.
- Smart object
- Layer preserving original data for non-destructive transforms.
- Smart filter
- Editable filter applied to a smart object.
Practice problems
Work each problem on paper first, then reveal the answer to check.
What bit depth should images be sent to Photoshop in?
Show answer
16-bit.
Why leave the background layer untouched?
Show answer
To preserve the original.
What does a clipping mask do?
Show answer
Limits an adjustment to the layer below.
What do white and black do on a mask?
Show answer
White reveals, black conceals.
Which tool gives precise product outlines?
Show answer
The pen tool.
What are luminosity masks?
Show answer
Selections based on brightness.
What does decontaminate colours do?
Show answer
Removes background colour fringes from edges.
Which blend mode brightens everything except black?
Show answer
Screen.
What blend mode applies curves to brightness only?
Show answer
Luminosity.
Why use smart objects?
Show answer
Lossless transforms and editable smart filters.
Lesson quiz · 5 questions
Score 60% or more to complete this lesson.
Create a free account to save your progress, take quizzes and earn a certificate.