
PHOT-240 · Lesson 11 of 12 · 25 min
Colour film, processing and hybrid workflows
Black-and-white photography is the heart of the traditional darkroom, but colour film remains popular, and many analog photographers work in hybrid workflows that combine film capture with digital scanning and editing. Colour film uses a multilayer structure and dye images rather than silver, and its processes, C-41 for colour negatives and E-6 for slides, demand precise temperature control. This lesson explains how colour film works, colour negative and slide films, motion picture film adapted for stills, C-41 and E-6 processing at home and in labs, colour darkroom printing with RA-4, scanning methods, converting negatives digitally, and the strengths and ethics of hybrid work.
How colour film works
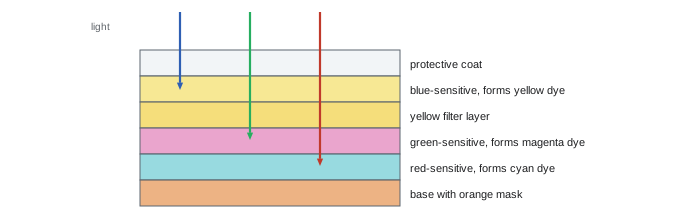
Colour film contains three main light-sensitive layers, each sensitive to one part of the spectrum: a blue-sensitive layer on top, then a yellow filter layer that blocks blue light from reaching the layers beneath, a green-sensitive layer, and a red-sensitive layer at the bottom. Each layer also contains colour couplers. During colour development, the developer forms a silver image in each layer, and its oxidation products react with the couplers to form dyes: yellow in the blue-sensitive layer, magenta in the green-sensitive layer and cyan in the red-sensitive layer, the complementary colours of the light each layer recorded. A bleach then converts the silver back to halide, and the fixer removes all silver, leaving only the dye images. In colour negatives, the result is a negative image in complementary colours; in slide films, a reversal process produces a positive image.
Colour negative films
Colour negative films are processed in the C-41 process and are recognizable by their orange base colour, which comes from coloured couplers that act as an integral mask, correcting imperfections in the dyes and improving colour reproduction in printing. Colour negative films have very wide exposure latitude, especially toward overexposure, and are designed to be printed or scanned with colour correction, so they are forgiving of different light sources. They range from fine-grained films around ISO 100 to versatile ISO 400 films and faster films for low light. Kodak Portra films, known for natural skin tones, and Kodak Ektar 100, known for saturated colour and fine grain, are widely used professional films; consumer films and those from other makers vary in availability and price. Colour films are balanced for daylight; under tungsten light, they render scenes orange unless corrected with filters or in printing and scanning.
Slide films
Colour reversal or slide films, processed in E-6, produce positive transparencies that can be viewed directly on a light box or projected. They have vivid colour and high contrast but narrow latitude, about plus or minus half a stop, so exposure must be precise and highlights protected, more like digital capture. Slide films are less widely available than colour negatives; Fujifilm Velvia and Provia and Kodak Ektachrome are examples. Kodachrome, a unique process with dyes added during development, was discontinued in 2009 and can no longer be processed in colour.
Motion picture film for stills
Some photographers use motion picture colour negative film, such as Kodak Vision3 stocks, in still cameras. These films are designed for the ECN-2 process and carry a remjet backing, a black carbon layer that prevents halation and static in cinema cameras and must be removed during processing. Some suppliers sell motion picture stocks for still cameras with the remjet removed, which can be processed in C-41 with some colour shifts, or in ECN-2 kits for the intended result. Processing remjet film in a C-41 lab without removing the backing contaminates the lab's chemistry, so labs must be told what the film is.
C-41 and E-6 processing
Colour processes run at high temperatures and require precise control, because each layer's development must be balanced. C-41 typically develops for 3 minutes and 15 seconds at 37.8 °C (100 °F), with a tolerance of only about ±0.15 °C for the developer in the professional process, followed by bleach, fix (or a combined blix in home kits), wash and stabilizer. E-6 involves a first developer that forms a black-and-white negative image, a reversal step, a colour developer that forms positive dyes, and then bleaching, fixing and stabilizing, at about 38 °C. Home kits make both processes possible with sous vide water baths or temperature-controlled processors, and some kits allow a wider temperature range with adjusted times. Many photographers still prefer labs for colour work, since labs maintain chemistry with careful process control.
| Process | Film type | Key temperature | Main steps |
|---|---|---|---|
| Black and white | B&W negative | About 20 °C | Develop, stop, fix, wash |
| C-41 | Colour negative | 37.8 °C (100 °F) | Colour develop, bleach, fix (or blix), wash, stabilize |
| E-6 | Colour slide | About 38 °C | First develop, reversal, colour develop, bleach, fix, stabilize |
| ECN-2 | Motion picture negative | About 41 °C | Remjet removal, colour develop, bleach, fix, stabilize |
| RA-4 | Colour paper | About 35 °C | Colour develop, blix, wash |
Colour darkroom printing
Colour negatives can be printed in a colour darkroom on RA-4 chromogenic paper, such as Kodak Endura or Fujifilm Crystal Archive papers, using an enlarger with a colour head to filter the light with yellow, magenta and cyan dials. Unlike black-and-white printing, colour paper is sensitive to all colours, so it must be handled in total darkness or under very dim specialized safelights, and processing is usually done in drums or roller-transport processors at about 35 °C. Printing involves test strips for exposure and filter packs for colour balance, adjusted by evaluating prints under standard viewing light: a print that is too magenta needs more magenta filtration, and so on, because adding a filter removes its complementary colour from the light. Colour darkroom printing is less common today than scanning, but some community darkrooms and enthusiasts maintain it, and it produces prints with a distinctive character.
Scanning methods
Scanning converts negatives and slides to digital files for editing, sharing and inkjet printing. Methods include:
- Lab scans: convenient and fast, often provided with development, at various resolutions; quality depends on the lab's scanners, such as Fujifilm Frontier and Noritsu systems, and the operator's colour correction.
- Flatbed scanners with film holders: affordable and suitable for medium and large format, though 35 mm results are limited by scanner resolution and optics.
- Dedicated film scanners: high resolution for 35 mm; many older high-end models are no longer made but remain in use.
- Camera scanning: photographing negatives with a digital camera and macro lens over a high-quality light source, using a film holder and copy stand. This is fast and can produce excellent results, especially with high-resolution cameras, and has become very popular.
- Drum scanning: the highest quality, used for exhibition prints, by specialist services.
Good scanning requires clean, flat negatives, a light source with high colour rendering for camera scanning, accurate focus, and careful exposure that captures the full density range without clipping.
Worked problem
Resolution for camera scanning
A photographer camera-scans 35 mm negatives with a 45-megapixel full-frame camera at 1:1 magnification, filling the frame. What is the effective scanning resolution in pixels per inch, and how large could a print be at 300 ppi?
Show solution
- A 45 MP sensor is about 8,256 pixels wide across 36 mm.
- At 1:1, 36 mm of film maps to 8,256 pixels: 8,256 / (36 / 25.4) ≈ 5,825 ppi.
- At 300 ppi, the print could be 8,256 / 300 ≈ 27.5 inches wide, about 70 cm, though film grain and lens sharpness usually limit useful size earlier.
Answer: About 5,800 ppi effective resolution, giving files suitable for prints up to roughly 70 cm wide at 300 ppi.
Converting negatives digitally
A scanned negative must be inverted and its colours corrected. For black-and-white negatives, inversion with tone curve adjustments is straightforward. For colour negatives, the orange mask must be removed, and each colour channel balanced, because simple inversion produces a blue cast and incorrect colours. Dedicated software and plug-ins, such as Negative Lab Pro for Lightroom, and the tools built into scanning software, analyze the film base and image to produce accurate conversions. Shooting a frame of unexposed film base helps set the mask colour. After conversion, edit as with any digital image (PHOT-202), preserving the film's character rather than processing it to look digital. Dust and scratch removal, with infrared cleaning on some scanners for colour film or manual healing, is often the most time-consuming step.
Hybrid workflows
Hybrid workflows combine the strengths of film capture with digital flexibility. A photographer might shoot medium format black-and-white film, develop it by hand, scan it and make inkjet prints, or shoot colour negative film and deliver scans to clients for social media and publication. Hybrid work allows film to be used in commercial contexts with digital deadlines, makes archiving and sharing easy, and allows corrections that would be difficult in the darkroom. Some photographers make digital negatives from scans for alternative processes such as platinum or cyanotype printing. The ethics of hybrid work follow those of digital editing: when presenting work as a straight analog photograph or a darkroom print, be honest about the process, and follow competition and exhibition rules that may specify processes.
Exposing colour film under different light
Colour films are balanced for daylight, about 5,500 K, and record other light sources with casts: tungsten bulbs appear orange, fluorescent lights green, and shade blue. With colour negative film, most casts can be corrected in printing or scanning, although extreme casts reduce colour quality because one dye layer is underexposed. With slide film, casts remain in the image unless corrected with filters during shooting, such as an 80A blue filter for tungsten light, which costs about two stops, or an 81 series warming filter for shade. Mixed lighting is challenging on any colour film; many photographers embrace the warm glow of tungsten in night scenes rather than correcting it fully.
Storing and archiving colour film
Colour dyes are less permanent than black-and-white silver images. Colour negatives and slides fade over decades, particularly in heat, light and humidity; dyes fade at different rates, so faded images also shift in colour. Cool, dark, dry storage, ideally refrigerated or frozen in sealed packages for important collections, greatly extends their life. Scanning colour originals at high quality creates digital copies that preserve their appearance even as the originals age, a practical reason for hybrid workflows in archives and family collections.
Working with labs
Professional and specialist labs remain essential for many film photographers, particularly for colour processing, high-quality scans and large prints. When sending film, label each roll with any push or pull instructions, the film type and your contact details; specify scan resolution, file format and whether you want flat or corrected scans; and ask how negatives will be returned and how long scans are stored. Good labs offer consistent chemistry, careful handling and skilled scanning operators, and building a relationship with one lab helps achieve consistent results.
Choosing analog or hybrid output
Deciding whether to print in the darkroom or digitally depends on the work and its audience. Darkroom prints offer unique physical qualities and are valued by collectors and exhibitions; digital prints from scans offer precise control, easy reproduction and access to papers and sizes beyond the darkroom. Many photographers make darkroom prints for exhibition and scans for publication and online sharing, choosing the best path for each use.
Scanning black-and-white negatives
Black-and-white negatives scan best as greyscale or as colour files converted to greyscale, at 16 bits per channel to preserve smooth tones. Infrared dust removal, which works for colour films, does not work on traditional silver black-and-white films, because silver blocks infrared light; dust must be cleaned physically and removed by retouching. Some chromogenic black-and-white films, processed in C-41, can use infrared cleaning. Scan with a little headroom at both ends of the histogram and set black and white points during editing.
Instant film and hybrid
Instant prints are unique originals and cannot be reprinted from a negative, so many photographers scan or rephotograph them for sharing and archiving. Keep instant prints out of strong sunlight and heat, since their dyes are sensitive, and store them flat with interleaving paper.
Common mistakes
MistakeUnderexposing colour slide film by habit.
InsteadExpose precisely; protect highlights.
MistakeSending remjet film to a C-41 lab unannounced.
InsteadTell the lab or use remjet-free stock.
MistakeIgnoring C-41 temperature control.
InsteadHold 37.8 °C precisely or use lab processing.
MistakeSimply inverting colour negatives.
InsteadRemove the orange mask and balance channels.
MistakeScanning dusty negatives.
InsteadClean negatives and use a dust-free workflow.
Summary and key terms
- Colour film has blue, green and red layers forming yellow, magenta and cyan dyes.
- Colour negatives (C-41) have an orange mask and wide latitude.
- Slide films (E-6) have vivid colour and narrow latitude.
- Motion picture films use ECN-2 and remjet backing.
- Colour processes need precise high temperatures.
- RA-4 paper prints colour negatives with filter packs in darkness.
- Scanning and digital conversion enable hybrid workflows; be honest about process.
- Colour coupler
- Chemical forming dye during development.
- Orange mask
- Coloured coupler mask in colour negatives.
- C-41
- Colour negative process.
- E-6
- Colour reversal process for slides.
- ECN-2
- Motion picture colour negative process.
- Remjet
- Carbon backing on motion picture film.
- RA-4
- Colour paper process.
- Blix
- Combined bleach and fix.
- Camera scanning
- Digitizing film with a digital camera.
- Hybrid workflow
- Film capture with digital processing.
Practice problems
Work each problem on paper first, then reveal the answer to check.
Which dye forms in the red-sensitive layer?
Show answer
Cyan.
Why is colour negative film orange?
Show answer
Coloured couplers form an integral mask.
Latitude of slide film?
Show answer
About ±½ stop.
When was Kodachrome discontinued?
Show answer
2009.
What must be removed from ECN-2 film?
Show answer
The remjet backing.
C-41 developer temperature?
Show answer
37.8 °C (100 °F).
Name three scanning methods.
Show answer
Lab, flatbed, dedicated scanner, camera, drum.
Effective ppi for a 6,000-pixel-wide camera scan of 36 mm at 1:1?
Show answer
About 4,230 ppi.
Why not simply invert a colour negative scan?
Show answer
The orange mask causes casts.
Name one hybrid use.
Show answer
Scans for inkjet prints, client delivery, digital negatives.
Lesson quiz · 5 questions
Score 60% or more to complete this lesson.
Create a free account to save your progress, take quizzes and earn a certificate.