
PHOT-240 · Lesson 4 of 12 · 27 min
Metering and exposing negative film
Exposure on film is decided once, at the moment the shutter fires, and cannot be changed frame by frame later. Getting it right is the foundation of good negatives and good prints. Negative films behave differently from digital sensors: they tolerate generous exposure but punish underexposure, so the guiding principle is to expose for the shadows. This lesson covers exposure latitude, reflected and incident metering for film, metering without a meter, exposing for the shadows, coloured filters for black-and-white film and their filter factors, reciprocity failure in long exposures, pushing and pulling film, bracketing, and keeping exposure records.
Exposure latitude of negative film
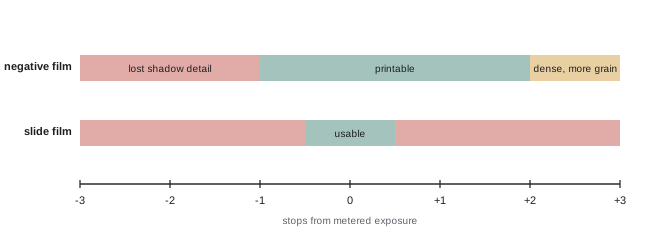
Black-and-white and colour negative films have generous latitude, especially toward overexposure. A typical film can be overexposed by two or three stops and still produce a printable negative, denser and slightly grainier but with full detail; colour negative films are even more tolerant of overexposure, often five stops or more. Underexposure is far less forgiving: one stop of underexposure can lose detail in the shadows, and two stops typically produces thin, empty shadows that no printing technique can recover, because there is no silver image there to print. Slide (reversal) films, by contrast, have narrow latitude of about plus or minus half a stop to one stop and must be exposed precisely, protecting highlights like digital capture.
Reflected and incident metering for film
A reflected light meter, including a camera's built-in meter, measures light coming from the subject and suggests an exposure that would render the metered area as a middle grey. It works well for average scenes, but is misled by predominantly light or dark subjects: snow and white walls are rendered grey and underexposed, black clothing and dark forests are rendered grey and overexposed. An incident meter, held at the subject and pointed toward the camera, measures the light falling on the subject and is unaffected by its reflectance, making it reliable for portraits, product work and scenes with unusual tones. A spot meter, a reflected meter with a narrow angle of about 1 degree, measures specific areas precisely and is the basis of the zone system (Lesson 5). Older cameras often use centre-weighted averaging meters; know how your camera's meter weights the frame and compensate for unusual scenes.
Metering without a meter: sunny 16
The sunny 16 rule gives a correct exposure in bright, direct sunlight without a meter: at f/16, use a shutter speed of about 1 divided by the film speed. For ISO 400 film, that means f/16 at 1/400 s, or the nearest available speed, 1/500 s, or equivalent exposures such as f/8 at 1/2000 s. The rule is adjusted for other conditions:
| Light condition | Aperture at 1/ISO shutter speed | Shadow appearance |
|---|---|---|
| Bright sun on snow or sand | f/22 | Very dark, distinct shadows |
| Bright sun | f/16 | Sharp, distinct shadows |
| Slight overcast | f/11 | Soft-edged shadows |
| Overcast | f/8 | Barely visible shadows |
| Heavy overcast or open shade | f/5.6 | No shadows |
| Sunset or deep shade | f/4 | Low, dim light |
Because negative film tolerates overexposure, erring toward one stop more exposure than the rule suggests is a common practice. Phone light meter apps also work well when calibrated against a known meter.
Expose for the shadows
The classic principle of negative exposure, often summarized as "expose for the shadows, develop for the highlights", says that exposure determines shadow detail, while development determines highlight density and contrast (Lesson 6). To apply it, decide which shadow area must retain detail, meter it with a spot meter or carefully with the camera meter, and give enough exposure that it falls about two stops below middle grey, where it will show texture. In practice, for general photography with a camera meter, giving about one-third to two-thirds of a stop more exposure than the meter suggests, or rating the film at a lower exposure index, protects shadows. In high-contrast scenes, where shadows and highlights are far apart, the photographer exposes for the shadows and reduces development to keep highlights printable, as Lesson 5 explains.
Worked problem
Placing a shadow with a spot meter
Using ISO 400 film, a photographer spot-meters a dark doorway where she wants texture, getting f/2.8 at 1/60 s. Placed two stops below middle grey, what exposure should she use?
Show solution
- The meter reading would render the doorway as middle grey.
- To place it two stops darker, give two stops less exposure than the reading.
- Two stops less than f/2.8 at 1/60 s is f/5.6 at 1/60 s, or f/2.8 at 1/250 s.
- Check that bright areas in the scene will not exceed what development can control (Lesson 5).
Answer: f/5.6 at 1/60 s (or an equivalent), placing the doorway two stops below middle grey with detail.
Coloured filters for black-and-white film
Panchromatic black-and-white film records colours as shades of grey, and coloured filters on the lens change how colours translate into tones: a filter lightens objects of its own colour and darkens complementary colours. Common filters include:
- Yellow (such as Wratten 8 or K2): darkens blue sky slightly, adding cloud definition; a mild, natural correction for landscapes; filter factor about 2 (one stop).
- Orange (Wratten 21): darkens skies more strongly and lightens skin tones, reducing blemishes; factor about 4 (two stops).
- Red (Wratten 25): dramatically darkens blue skies, almost to black, and deepens shadows lit by blue skylight; used for dramatic landscapes and with infrared-sensitive films; factor about 8 (three stops).
- Green (Wratten 11): lightens foliage and darkens red tones, giving fuller skin tones in outdoor portraits; factor about 4 (two stops).
- Blue (Wratten 47): emphasizes haze and atmosphere; rarely used.
Filter factors indicate how much extra exposure is needed: a factor of 2 means double the exposure (one stop), 4 means two stops, 8 means three stops. Cameras that meter through the lens often compensate automatically, though not always accurately with red filters, since meters are sensitive to colour differently from film. Polarizing filters darken skies and reduce reflections with both colour and black-and-white film, with a factor of about 2.5 to 4.
Reciprocity failure
Exposure normally follows the reciprocity law: halving the shutter speed and opening the aperture one stop gives the same exposure. With very long exposures, typically longer than about one second, film becomes less sensitive, an effect called reciprocity failure, and needs more exposure than the meter suggests; contrast may also increase. Manufacturers publish corrections. Ilford, for example, gives a power formula for its films:
where \(t_m\) is the metered time in seconds, \(t_c\) the corrected time, and \(p\) a film-specific exponent, such as about 1.31 for HP5 Plus and 1.26 for FP4 Plus, according to Ilford's published data at the time of writing. Kodak publishes tables for its films. Some modern tabular-grain films, such as Kodak T-Max 100 and Fujifilm Acros 100 II, have very low reciprocity failure. Long exposures are common in night, architectural interior and pinhole photography, where corrections can be large.
Worked problem
Correcting for reciprocity failure
A night scene on HP5 Plus meters at 10 seconds at f/8. Using the exponent 1.31, what corrected exposure time is needed? What if the metered time were 60 seconds?
Show solution
- For 10 s: \(t_c = 10^{1.31} \approx 20.4\) s, so expose for about 20 seconds.
- For 60 s: \(t_c = 60^{1.31} \approx 214\) s, about 3.5 minutes.
- Alternatively, open the aperture to shorten the metered time: at f/5.6 the metered time is 30 s, giving \(30^{1.31} \approx 86\) s.
Answer: About 20 seconds for a 10-second reading and about 3.5 minutes for a 60-second reading at the same aperture.
Pushing and pulling
Pushing film means rating it at a higher exposure index than box speed, effectively underexposing it, and compensating with longer development. For example, ISO 400 film rated at 1600, two stops faster, with extended development. Pushing is useful in low light when a faster shutter speed or smaller aperture is needed, such as concerts, sports and night street photography. It increases contrast and grain, and it does not recover shadow detail lost to underexposure; it raises mid-tones and highlights while shadows remain thin, giving a gritty, high-contrast look. Pulling means rating film at a lower index, giving more exposure, and reducing development, lowering contrast for very high-contrast scenes. Because pushing and pulling apply to development, all frames on the roll must be exposed at the same index. Manufacturers and the Massive Dev Chart, a widely used database of development times, list push and pull times for many film and developer combinations.
Bracketing and exposure records
Bracketing means taking several frames at different exposures, for example at the metered exposure and at one stop more and one stop less, to ensure that at least one is well exposed. It is common with slide film and in difficult light, but uses more film; with negative film, bracketing toward more exposure is usually more useful than toward less. Recording exposure details for each frame in a notebook or phone app, including the film, exposure index, aperture, shutter speed, filters, metering method and lighting, lets you learn from results when the negatives return. Over time, these records reveal patterns, such as a camera meter that consistently underexposes backlit subjects, or a film that you prefer at a particular exposure index.
Metering difficult scenes
Some scenes regularly fool meters. Backlit subjects, such as people in front of windows or bright skies, cause reflected meters to underexpose the subject; meter the subject's face up close, use an incident meter, or open up about 1.5 to 2 stops. Snow and beaches cause underexposure, needing about 1.5 to 2 stops more. Night scenes with bright lights and dark surroundings vary widely; meter the important lit areas and bracket. Stage performances with spotlights cause centre-weighted meters to overexpose dark stages or underexpose spotlit performers, depending on framing; spot-metering the performers' faces gives the most reliable reading. Over time, experience with your own meter and film becomes the most reliable guide.
Exposure for slide and colour negative film
Colour negative films behave like black-and-white negative films, with even greater overexposure latitude; many photographers rate ISO 400 colour negative film at 200 or 320 for denser negatives with cleaner shadows and richer colour. Slide films demand precise exposure and protection of highlights; meter carefully, use incident readings or spot-meter important bright areas, and bracket in third or half stops for important images. Because slides are the final image, there is no printing stage to correct exposure, although scanning can recover some detail.
Light meters and batteries
Many older cameras were designed for 1.35 V mercury batteries, now banned in many places because of mercury's toxicity. Modern replacements, such as silver oxide or alkaline batteries with different voltages, can give inaccurate readings unless an adapter with a voltage regulator is used or the meter is recalibrated. Zinc-air hearing aid batteries offer a voltage close to the original but have a short life once activated. Comparing the camera's meter with a handheld meter or a calibrated phone app reveals any offset, which can be compensated by adjusting the ISO dial.
Exposure and print quality
Good exposure saves time in the darkroom. A negative with full shadow detail and printable highlights prints easily at a normal contrast grade, needing little dodging and burning. Thin negatives force higher contrast grades and still lack shadow detail; very dense negatives need long printing times and show more grain. Most printing difficulties trace back to exposure, which is why careful metering matters so much in analog work.
Exposure for instant film
Instant films have narrow latitude, similar to slide film, and many instant cameras offer only a lighten/darken control, so meter carefully and avoid very high-contrast scenes.
Common mistakes
MistakeUnderexposing negative film to protect highlights.
InsteadExpose for the shadows; development controls highlights.
MistakeTrusting a reflected meter on snow.
InsteadAdd about 1.5 to 2 stops or use incident metering.
MistakeForgetting filter factors.
InsteadAdd one stop per doubling of the factor.
MistakeIgnoring reciprocity failure in long exposures.
InsteadApply the manufacturer's correction.
MistakePushing only some frames on a roll.
InsteadExpose the whole roll at the same index.
Summary and key terms
- Negative film tolerates overexposure but loses shadows when underexposed.
- Reflected meters suggest middle grey; incident meters measure light on the subject.
- Sunny 16: f/16 at 1/ISO in bright sun, adjusted for conditions.
- Expose for the shadows, placing important shadows about two stops below middle grey.
- Coloured filters change tonal rendering; factors indicate extra exposure.
- Long exposures need reciprocity corrections such as t_c = t_m^p.
- Pushing raises contrast and grain; pulling lowers contrast; record everything.
- Exposure latitude
- Range of exposures giving acceptable results.
- Incident meter
- Meter measuring light falling on the subject.
- Spot meter
- Narrow-angle reflected meter.
- Sunny 16
- Rule of f/16 at 1/ISO in bright sun.
- Filter factor
- Exposure multiplier needed with a filter.
- Reciprocity failure
- Loss of sensitivity in very long or short exposures.
- Pushing
- Underexposing and extending development.
- Pulling
- Overexposing and reducing development.
- Exposure index
- Speed rating chosen by the photographer.
- Bracketing
- Shooting several exposures around the estimate.
Practice problems
Work each problem on paper first, then reveal the answer to check.
How much overexposure can B&W negative film typically tolerate?
Show answer
About two to three stops.
Why is slide film harder to expose?
Show answer
Narrow latitude.
Sunny 16 exposure for ISO 100 film?
Show answer
f/16 at 1/100 s (or 1/125 s).
Aperture for overcast with sunny 16?
Show answer
f/8.
Where should important shadows be placed?
Show answer
About two stops below middle grey.
Stops for a red 25 filter?
Show answer
About three.
What does a green filter do to foliage?
Show answer
Lightens it.
Corrected time for 30 s on HP5 Plus (p = 1.31)?
Show answer
About 86 s.
Does pushing recover shadow detail?
Show answer
No; it raises mid-tones and highlights.
Why record exposures?
Show answer
To learn from results and spot patterns.
Lesson quiz · 5 questions
Score 60% or more to complete this lesson.
Create a free account to save your progress, take quizzes and earn a certificate.