
CINE-301 · Lesson 12 of 12 · 25 min
Analyzing shot design and capstone
Filmmakers learn shot design not only by shooting but by watching closely: studying how admired films build scenes, why a cut works, how a camera move reveals meaning, and how style supports story. Systematic analysis turns passive viewing into active learning and builds a library of solutions to draw on. This final lesson presents methods for analyzing shot design, including shot-by-shot breakdowns, overhead reconstructions, measuring pace, comparing coverage approaches, and studying style across a director's or cinematographer's work. It then brings the course together in the capstone: designing, documenting, shooting and analyzing the coverage of a scene.
Watching actively
Most viewers watch films for story and emotion, absorbing visual language without noticing it. Analyzing shot design requires a different kind of viewing: watching a scene several times, with the sound off and on, at normal speed and frame by frame. On the first viewing, note your emotional response. On later viewings, ask what produced it: the shot sizes, angles, movements, cuts, blocking, light and sound. Pause on each cut and ask why it happens at that moment. Turning the sound off reveals how much the images carry on their own; watching with sound but without picture reveals how much the soundtrack shapes rhythm. Many cinematographers keep notebooks or digital collections of frames and scenes that inspire them.
Shot-by-shot breakdowns
A shot-by-shot breakdown lists every shot in a scene, with its number, duration, size, angle, lens estimate, movement, subject and action, and the dialogue or beat it covers. It reveals patterns that are invisible at normal speed: how long the master lasts before the first cut, how the size progression follows the emotional arc, which character receives more close-ups, how often the camera moves, and how the scene is punctuated by inserts or reactions. Breakdowns can be created in spreadsheets, using editing software to find cut points and measure durations, or with frame-grab tools that extract an image of every shot. Comparing breakdowns of similar scenes from different films shows how different filmmakers solve the same problem.
| Shot | Duration (s) | Size / angle | Movement | Content | Beat |
|---|---|---|---|---|---|
| 1 | 14.2 | Wide, high | Slow crane down | Diner exterior, rain | Establish |
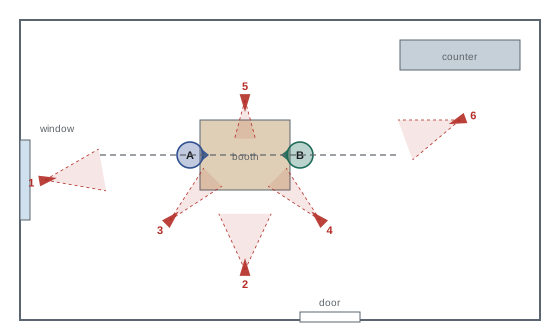
| 2 | 6.5 | MS two-shot, eye level | Static | Couple in booth | Conversation begins |
| 3 | 3.8 | OTS on her | Static | She asks the question | Inciting line |
| 4 | 5.1 | CU him | Slow push in | He hesitates | Tension |
| 5 | 2.4 | Insert | Static | His hand on the ring box | Reveal |
| 6 | 9.7 | Wide, low | Static | Both laugh, waitress arrives | Release |
Overhead reconstructions
Drawing an overhead floor plan of a scene from a finished film, with the positions of characters and each camera setup, reveals how the scene was covered: whether the line was respected, where the camera crossed it, how many setups were used, and how blocking changed the geography. Reconstructing scenes from masters such as Hitchcock, Kurosawa or Spielberg, or from recent films and series, helps students understand how complex scenes are built from a manageable number of setups. It also shows how filmmakers cheat space: rooms may be larger or arranged differently than the edited scene suggests.
Measuring pace
Pace can be measured. The average shot length (ASL) of a scene or film is its duration divided by the number of shots. Film scholars such as Barry Salt and the online Cinemetrics project have measured the ASL of thousands of films, showing that average shot lengths in mainstream American films have fallen substantially since the mid-twentieth century, from around 8 to 11 seconds in the 1930s to 1950s to roughly 4 to 6 seconds in many recent films, with action sequences often much shorter. ASL alone does not determine how fast a film feels, since movement within shots, performance and sound also matter, but measuring it alongside a breakdown helps relate pace to the scene's emotional structure.
Worked problem
Comparing the pace of two scenes
A two-minute dialogue scene in a drama contains 18 shots. A two-minute chase in the same film contains 64 shots. Calculate the average shot length of each, and interpret the difference.
Show solution
- Dialogue scene: \(120 / 18 \approx 6.7\) s.
- Chase: \(120 / 64 \approx 1.9\) s.
- The chase cuts about 3.5 times faster, creating urgency and fragmentation.
- A breakdown would show whether the dialogue scene slows further at its emotional climax, for example with a long-held close-up.
Answer: About 6.7 s for the dialogue and 1.9 s for the chase; faster cutting builds urgency, while longer shots allow performance and reflection.
Comparing coverage approaches
Comparing how different films cover similar scenes, such as a first meeting, a breakup, a dinner or an interrogation, reveals the range of choices available. One film might cover a breakup in a single static wide take, letting the audience watch from a distance; another in tight handheld close-ups, putting the audience inside the emotion; another in precise symmetrical singles with matched eyelines, creating formal distance. None is correct; each produces a different experience. Students can apply this by choosing a scene type, finding three or four examples, breaking them down, and writing about how each approach serves its film.
Studying style across a body of work
Studying several films by the same director or cinematographer reveals recurring choices that form a signature style, and how that style adapts to different stories. Watching Roger Deakins's work across many films shows consistent principles, such as motivated light and restrained camera movement, applied to very different genres. Watching Wes Anderson's films reveals planimetric compositions, centered framing, whip pans and lateral tracking repeated with variations. Such study helps aspiring cinematographers understand that style emerges from consistent principles rather than tricks, and helps them develop principles of their own.
Sharing analysis and critique
Analysis is most valuable when shared and discussed. In classes and crews, presenting breakdowns and reconstructions, with clips and frame grabs, invites discussion of alternatives: what if this scene had been played in a oner? What would change if the camera were lower? Constructive critique of each other's work uses the same vocabulary: describing choices precisely, explaining their effect, and suggesting alternatives grounded in the scene's purpose. Developing this vocabulary is one of the main goals of this course.
Capstone: designing and shooting a scene
The capstone brings together everything in the course. Choose a short dialogue scene of two to four pages, from a script you write or one you have permission to use, with at least two characters and at least one physical action or movement. Then:
- Analyze the scene: beats, point of view, key moments and emotional arc; write a one-page visual approach statement including aspect ratio, lens philosophy, camera movement and coverage strategy.
- Study references: break down two or three scenes from existing films that handle similar situations, with shot-by-shot tables and overhead reconstructions, and explain what you will borrow or avoid.
- Design the coverage: a lined script, a shot list with sizes, angles, lenses and movements, a floor plan with the axis of action and numbered camera positions, and storyboards or photo boards.
- Schedule it: estimate setups and times, classify shots by priority, and order them for an efficient shooting day.
- Shoot and edit the scene, ideally with actors, but stand-ins or friends will do, then assemble it.
- Reflect: compare the result with the plan, analyze what worked, what you changed on the day and why, and what you would do differently, in about 1,000 words with frame grabs.
Present the capstone as a package: the visual approach, reference analysis, planning documents, the edited scene and the reflection.
Analyzing a scene in practice
A practical method for analyzing a scene combines the tools of this lesson. First, watch the scene and write a short description of its story, the characters' objectives and the emotional arc. Second, build the shot-by-shot breakdown, recording sizes, angles, movements and durations. Third, draw the overhead reconstruction with camera positions and the axis of action. Fourth, calculate the ASL of the scene and of its sections, such as before and after the turning point. Fifth, interpret: how do the choices create the scene's effect, and what alternatives were available? Finally, compare with another film's handling of a similar scene. Writing this up in two or three pages with frame grabs is an excellent exercise, and the format of the capstone's reference analysis.
Learning from the masters and from contemporaries
Studying classic films gives a foundation in visual language, but contemporary work shows how conventions are evolving, for example in how streaming series use wide aspect ratios on home screens, how social media has influenced pacing and framing, and how virtual production and large-format digital cameras are changing staging. A balanced study list might include classics such as Citizen Kane (1941), Tokyo Story (1953), Vertigo (1958) and The Godfather (1972); modern landmarks such as Children of Men (2006) and Moonlight (2016); and recent films and series chosen by each student. Canadian films, including the work of Denis Villeneuve, Sarah Polley and Xavier Dolan, provide additional examples close to home for students in Canada, and the National Film Board's documentaries and animations offer models of visual storytelling with modest means.
Building a personal reference library
Cinematographers often maintain a reference library of frames and clips organized by idea: lighting moods, compositions, camera moves, coverage solutions for particular types of scenes. Digital tools such as image-collection apps and shared boards make this easy, and the library becomes a resource for look books and conversations with directors. Annotating each reference with why it works, not just what it shows, turns a collection of images into a working vocabulary. Over time, this library and the analysis behind it help a cinematographer develop principles that become a personal style.
Ethics and credit in analysis
When analyzing films and sharing frame grabs, students should credit the films, directors and cinematographers, use short excerpts appropriate for criticism and education, and respect copyright rules that allow such use, such as fair dealing for criticism, review and education in Canada and fair use in the United States. Analysis should also be fair to the filmmakers: understanding the constraints of budget, schedule, location and technology under which a scene was made, rather than judging choices without context. Interviews with cinematographers, published in magazines such as American Cinematographer and Canadian Cinematographer, podcasts and books, often reveal the reasons behind choices and the problems that shaped them.
Presenting the capstone
When presenting the capstone, organize materials so that a viewer can follow your thinking: begin with the visual approach and references, then show the planning documents, then screen the scene, and finally present the reflection with comparisons between plan and result. Use frame grabs side by side with storyboards, and floor plans annotated with what changed on the day. Invite critique, and note which suggestions you would adopt in a reshoot or in your next project. This process mirrors the professional cycle of prep, production and review, and builds habits that will serve you throughout a career in cinematography or directing.
Developing the habit of analysis takes time. A practical routine is to analyze one scene each week from a film or series you are watching, keeping the breakdowns in a single document or folder. Over a year, this produces a library of more than fifty analyzed scenes, covering many genres and approaches, and a much richer vocabulary for your own shot design. Sharing analyses with classmates or colleagues, and discussing disagreements, deepens understanding further.
Above all, keep watching films with curiosity: every scene is a set of decisions that someone made under real constraints, and understanding those decisions is the best preparation for making your own.
Common mistakes
MistakeWatching only for story when analyzing.
InsteadWatch repeatedly, with and without sound, frame by frame.
MistakeDescribing shots vaguely.
InsteadUse precise vocabulary for size, angle, lens and movement.
MistakeMeasuring ASL without context.
InsteadRelate pace to beats, movement and sound.
MistakeCopying a style without understanding its principles.
InsteadStudy why the choices serve each film.
MistakeSkipping reflection after shooting.
InsteadCompare result with plan and learn from changes.
Summary and key terms
- Active viewing studies scenes repeatedly with and without sound.
- Shot-by-shot breakdowns reveal patterns of size, movement and pace.
- Overhead reconstructions show setups, the line and cheated space.
- Average shot length measures pace and has fallen over the decades.
- Comparing coverage of similar scenes shows the range of choices.
- Style across a body of work comes from consistent principles.
- The capstone designs, schedules, shoots and reflects on a scene.
- Active viewing
- Watching to analyze how a film works.
- Shot-by-shot breakdown
- Table describing every shot in a scene.
- Frame grab
- Still image captured from a film.
- Overhead reconstruction
- Floor plan of a filmed scene's setups.
- Average shot length
- Scene or film duration divided by number of shots.
- Cinemetrics
- Project measuring shot lengths in films.
- Signature style
- Recurring choices across a filmmaker's work.
- Visual approach statement
- Summary of a project's visual plan.
- Critique
- Structured discussion of choices and alternatives.
- Reflection
- Analysis of results compared with intentions.
Practice problems
Work each problem on paper first, then reveal the answer to check.
Why watch a scene with the sound off?
Show answer
To see how much the images carry alone.
Name five columns of a breakdown.
Show answer
Shot, duration, size, angle, movement, content, beat.
What does an overhead reconstruction show?
Show answer
Setups, the line and cheated space.
ASL of a 90-second scene with 30 shots?
Show answer
3 seconds.
How have ASLs changed over time?
Show answer
They have fallen substantially.
Does ASL alone determine perceived pace?
Show answer
No, movement, performance and sound matter too.
How can you compare coverage approaches?
Show answer
Break down similar scenes from several films.
What does studying a body of work reveal?
Show answer
Consistent principles behind a style.
Name four capstone planning documents.
Show answer
Lined script, shot list, floor plan, storyboards, schedule.
What should the reflection cover?
Show answer
What worked, what changed and why, and lessons learned.
Lesson quiz · 5 questions
Score 60% or more to complete this lesson.
Create a free account to save your progress, take quizzes and earn a certificate.