
CINE-302 · Lesson 11 of 12 · 25 min
Lighting and color in LED volumes
One of the great promises of LED volumes is that the environment lights the actors. A sunset on the wall bathes faces in warm light; a neon city reflects in a car's paint; a forest glows green on skin. This interactive, image-based lighting is a large part of why volume footage can feel more integrated than green screen. But the wall is not a perfect light source: it is large, soft and relatively dim compared with real sunlight, its narrow-band LEDs render colors differently from natural light, and its color must be calibrated to the camera and the production's color pipeline. Cinematographers therefore combine the wall with traditional and image-based fixtures, and work with the volume team to manage color from the engine to the final grade. This lesson covers the wall as a light source, adding hard and directional light, image-based lighting fixtures and pixel mapping, spectral quality and skin tones, color calibration and the color pipeline, exposure balance and time of day, reflections, and lighting continuity with non-volume scenes.
The wall as a light source
An LED wall behaves like an enormous soft source whose brightness and color vary across its surface according to the displayed image. It provides ambient light, soft fill and reflections that match the environment, which is very difficult to achieve on green screen. However, a wall image that is correctly exposed for camera, a few tens of nits on average (Lesson 10), produces relatively little light on actors several meters away, and its light comes from the direction of the wall, not necessarily from the direction the environment's sun would come from. A ceiling of panels adds top light and sky fill. To light faces with the intensity and direction the scene requires, the wall's light is usually supplemented with fixtures, and wall brightness in areas outside the inner frustum can be raised to act as fill or key without changing what the camera sees.
Adding hard and directional light
Sunlight, moonlight, headlights and spotlights are hard, directional and intense, qualities the wall cannot reproduce. Cinematographers add conventional fixtures, such as Fresnels, HMIs, LED Fresnels or ellipsoidal spotlights, positioned to match the sun or practical sources in the virtual environment, often rigged above or behind the wall or through gaps in the ceiling. The light direction must match the digital environment: if the virtual sun is behind the actors and to the left, the hard key or rim should come from there. Shadows cast by hard light on the physical set and floor must match the shadows in the digital environment, which the virtual art department can adjust. Volume ceilings may have removable panels or gaps for rigging, and lighting plans must allow for the panels' heat and the weight and positions of fixtures.
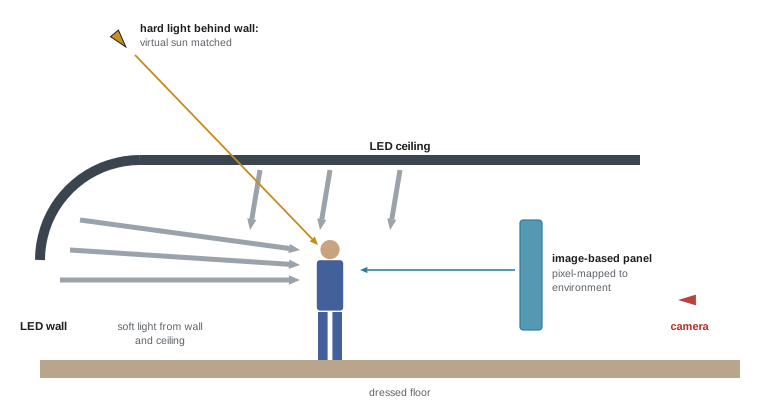
Image-based lighting fixtures and pixel mapping
Image-based lighting (IBL) fixtures are LED lights whose color and brightness are driven by the same content shown on the wall, so that they extend the environment's light beyond the panels. Techniques include pixel mapping, in which a light's color is sampled from a region of the virtual environment or of a video feed and updated continuously; driving tube lights and panels with video to create passing car lights, flickering fire or moving reflections; and using large soft fixtures with full-spectrum emitters to provide a brighter version of the wall's light. These lights are controlled over DMX, Art-Net or sACN from the engine or a lighting console (CINE-220), with the volume team and the lighting programmer coordinating changes. When the environment changes, for example clouds passing or a light turning on, the fixtures change in sync.
Spectral quality and skin tones
Most LED walls use red, green and blue emitters with narrow spectral peaks. Their light looks white to the eye and to cameras viewing the wall directly, but when it reflects off skin, costumes and props, the gaps in its spectrum can render colors inaccurately: skin may look flat, magenta, greenish or lacking warmth, and some fabrics may shift in color, a problem related to metamerism (PHOT-301). Because the camera sees both the wall directly and the actors lit by the wall, a balance that looks correct on the background can look wrong on faces, and vice versa. Solutions include supplementing the wall's light with full-spectrum fixtures (high-CRI or high-SSI white LEDs, or multi-emitter RGBWW and RGBACL lights) for faces, testing costumes and makeup in the volume before the shoot, and using newer panels with additional emitters, such as white or extended-color LEDs, that improve spectral coverage. Spectral metrics such as SSI and TM-30 (CINE-220) help compare sources.
| Light source | Spectrum | Effect on skin and costumes |
|---|---|---|
| RGB LED wall | Three narrow peaks | Can render skin and fabrics inaccurately |
| RGBW or multi-emitter panels | Broader coverage | Improved rendering |
| Full-spectrum LED fixtures | Broad, high CRI and SSI | Natural skin tones |
| Tungsten and HMI | Continuous | Natural rendering, but hot and less controllable |
Color calibration and the color pipeline
Color in a volume passes through a chain: the environment is authored in the engine in a working color space, rendered, sent through processors to the panels, emitted as light, photographed by the camera in its log and gamut, and finally graded. Each step can shift color. Productions calibrate the system so that the camera records the intended colors, a process often called camera-to-wall or in-camera color calibration: the wall displays known color patches, the camera records them, and correction transforms are calculated and applied, usually with OpenColorIO configurations in the engine. Agreements needed in pre-production include the working color space for content (often a scene-linear space such as ACEScg), the transforms from engine to wall, the camera format and log curve, the show LUT for monitoring, and how the colorist will treat the background in the grade (CINE-202 Lessons 9 and 10). Because the background is baked into the plate, major color changes in post affect both foreground and background, so getting color right on the day matters more than on a green screen.
Worked problem
Balancing a warm sunset environment
A volume scene shows a sunset sky averaging about 3,000 K on the wall. On camera at 5,600 K white balance, the background looks pleasingly warm, but the actor's face, lit only by the wall, looks flat and slightly magenta. What can be done?
Show solution
- Recognize that the wall's narrow-band light renders skin poorly even though the background looks correct.
- Add a soft full-spectrum fixture, set to about 3,200 K and placed in the direction of the brightest part of the sunset, as the key on the face.
- Add a harder warm source from behind as the virtual sun rim, matching the sun position in the environment.
- Keep the background white balance and color as calibrated, and confirm skin on a calibrated monitor with the show LUT.
Answer: Supplement the wall with a warm full-spectrum key and a matching sun rim, keeping the calibrated background unchanged.
Exposure balance and time of day
In a volume, the cinematographer can adjust the brightness of the background independently of the foreground lighting, a degree of control impossible on location. The background can be brightened or darkened in the engine, its color adjusted, clouds moved and the sun repositioned, all in seconds. This allows scenes to be shot at magic hour for an entire day, or at night with a moon exactly where the composition needs it. Discipline is needed: changes to the environment should be logged, so that continuity can be maintained across setups and days, and the foreground lighting must be adjusted to match when the environment changes. Cinematographers often agree with the director and virtual art department on a set of lighting states for each environment, saved as presets that can be recalled for each setup.
Reflections
Accurate reflections are one of the strongest benefits of volumes: cars, helmets, armor, glass, water and eyes reflect the environment naturally, avoiding the complex replacement work needed on green screen. To use this benefit, the content outside the inner frustum must be detailed enough where it is reflected, and the volume must surround the set sufficiently, sometimes with movable wall sections or a ceiling. Unwanted reflections, such as lighting fixtures, crew, the edges of the wall or the black gaps between wall and floor, must be controlled with flags, the placement of reflective objects, or digital cleanup. A reflective object close to the camera may also reflect the inner frustum, which shows the view from the camera's perspective rather than the object's, sometimes causing reflections that look subtly wrong.
Hybrid workflows and green screen in the volume
Volumes are often used flexibly. Some shots are captured as final pixels on the day; others use the wall for light and reflections while showing a green area inside the inner frustum, so that the background can be replaced in post with higher-quality rendering, while the actors still receive environmental light and reflections. This green frustum approach avoids moiré concerns and allows more camera freedom but returns some work to post-production. Volumes can also be combined with practical effects such as rain, wind and smoke, but water and haze must be managed carefully: haze can reduce the contrast of the wall and make it look flat, and water must be kept away from the electronics.
Continuity with non-volume scenes
Films that combine volume scenes with location and stage scenes must match their looks. Volume footage can look softer and lower in contrast if the wall's soft light dominates, or show subtly different color rendering. Strategies include using the same fixtures and lighting vocabulary in the volume as on location, adding hard light and negative fill to create contrast, testing volume and location footage side by side, and planning the grade with the colorist so that both kinds of footage share a look. Cinematographers increasingly treat the volume as one tool among many, choosing it for the scenes where it truly helps.
Negative fill and contrast in a volume
Because the wall surrounds the set with light, volume scenes can drift toward a flat, low-contrast look in which every side of a face is lit. Cinematographers restore shape by darkening areas of the wall outside the inner frustum, effectively creating negative fill in software; by placing black flags or solids between parts of the wall and the actors where the camera will not see them; and by raising the brightness of selected areas to act as a soft key. Engine operators can draw simple shapes on the outer frustum, such as a bright rectangle acting as a soft box or a black card acting as a flag, and move them in real time. This gives the cinematographer lighting tools that would be impossible on a normal stage, but they must be logged with the lighting state for continuity.
Monitoring and judging the image
Judging color in a volume is difficult by eye: the wall fills the crew's vision and the eye adapts to its color. Decisions should be made on calibrated monitors in a controlled viewing area, using the show LUT, and checked with waveform and vectorscope. Skin tones in particular should be compared against tests shot under reference lighting.
Lighting states should be named consistently, recorded with the scene and setup numbers, and backed up with the environment files, so that a scene can be resumed exactly after a break or a later pickup day.
Common mistakes
MistakeRelying on the wall alone for key light.
InsteadAdd directional and full-spectrum fixtures.
MistakeHard light that contradicts the virtual sun.
InsteadMatch fixture direction to the environment.
MistakeJudging skin only by eye in the volume.
InsteadCheck skin on calibrated monitors and test costumes.
MistakeSkipping camera-to-wall color calibration.
InsteadCalibrate and agree the color pipeline.
MistakeChanging environments without logging.
InsteadSave lighting states and track continuity.
Summary and key terms
- The wall provides soft, environmental light and reflections.
- Hard and intense light comes from fixtures matched to the virtual environment.
- Image-based lighting fixtures extend the environment through pixel mapping.
- Narrow-band RGB walls can render skin poorly; add full-spectrum light.
- Camera-to-wall calibration and an agreed color pipeline are essential.
- Volumes allow precise control of time of day, with logged lighting states.
- Reflections, hybrid green frustum workflows and continuity planning complete the picture.
- Image-based lighting fixture
- Light driven by environment content.
- Pixel mapping
- Sampling content to set a fixture's color and brightness.
- Narrow-band source
- Light with a few narrow spectral peaks.
- Metamerism
- Colors matching under one light but not another.
- Spectral similarity index
- Metric comparing a source to a reference spectrum.
- Camera-to-wall calibration
- Correcting wall color as recorded by the camera.
- OpenColorIO
- Open color management library used in engines and VFX.
- Lighting state
- Saved configuration of environment and fixtures.
- Green frustum
- Green area shown inside the camera view for later replacement.
- Final pixel
- Image captured on set as the finished background.
Practice problems
Work each problem on paper first, then reveal the answer to check.
Why does the wall need supplementing?
Show answer
It is soft, relatively dim and not directional like the sun.
Where should a hard key come from?
Show answer
The direction of the virtual sun or source.
What is pixel mapping?
Show answer
Driving fixture color from environment content.
Why can RGB walls render skin poorly?
Show answer
Narrow spectral peaks leave gaps.
Name a fix for poor skin rendering.
Show answer
Full-spectrum fixtures on faces, multi-emitter panels.
What is camera-to-wall calibration?
Show answer
Correcting wall colors as the camera records them.
Name a common working space for volume content.
Show answer
ACEScg.
Why log lighting states?
Show answer
For continuity across setups and days.
What is a green frustum?
Show answer
A green area in the camera view for later replacement.
Name one risk of haze in a volume.
Show answer
It flattens wall contrast.
Lesson quiz · 5 questions
Score 60% or more to complete this lesson.
Create a free account to save your progress, take quizzes and earn a certificate.