
CRE-240 · Lesson 4 of 12 · 28 min
Microphones, interfaces and recording chains
Listeners judge a podcast's quality first by its sound. They will forgive modest production values if voices are clear, warm and consistent, but harsh, distant, noisy or distorted audio drives them away within minutes. CRE-130 introduced microphones for phone video; this lesson goes deeper into the recording chain used for podcasts: how microphones work and the main types, polar patterns and placement, USB and XLR connections, audio interfaces and preamps, mixers and recorders, sample rate and bit depth, gain staging, headphones and monitoring, and building recording setups for different budgets and formats.
The recording chain
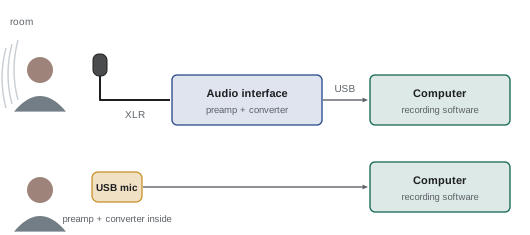
Every recording passes through a chain: the voice, the room, the microphone, the cable, a preamplifier that boosts the microphone's weak signal, an analog-to-digital converter that turns it into numbers, and software or a recorder that stores it. Each link can add noise, distortion or color, and the weakest link limits the result. A good microphone in an echoey room still sounds echoey; an excellent room with a poorly set preamp still distorts. Understanding the chain helps you find and fix problems systematically. In USB microphones, the preamp and converter are built into the microphone; with XLR microphones, they are in a separate interface, mixer or recorder.
Dynamic and condenser microphones
Two microphone types dominate podcasting:
- Dynamic microphones use a diaphragm attached to a coil moving in a magnetic field. They are rugged, need no power, handle loud sounds and are relatively insensitive, picking up mostly sound close to them. In untreated rooms, this lower sensitivity is an advantage: they capture the voice and less of the room and background noise. Many popular podcast microphones are end-address dynamic models designed to be spoken into from a few centimeters away. Some dynamic microphones have low output and need a preamp with plenty of clean gain, or an inline booster.
- Condenser microphones use a thin diaphragm forming one plate of a capacitor and need power, usually 48-volt phantom power from the interface or a battery. They are more sensitive and detailed, capturing subtle nuances of the voice, but also more of the room, keyboard clicks and background noise. They excel in treated rooms and studios.
Other types include ribbon microphones, prized for warm vocal sound but fragile and low in output, and lavalier and headset microphones, small microphones worn on the body that are useful for video podcasts and moving hosts.
| Feature | Dynamic | Condenser |
|---|---|---|
| Sensitivity | Lower | Higher |
| Power | None needed | Phantom power or battery |
| Room and background noise | Less pickup | More pickup |
| Detail | Good, slightly less airy | Very detailed |
| Best environment | Untreated rooms, multiple hosts | Treated rooms, studios |
| Durability | Very rugged | More delicate |
Polar patterns and placement
A microphone's polar pattern describes its sensitivity in different directions. Cardioid microphones, the most common for podcasting, pick up sound mainly from the front and reject sound from the rear, so pointing the back of the microphone toward noise sources, such as a computer or a window, reduces their pickup. Supercardioid and hypercardioid patterns are narrower, with some rear pickup. Omnidirectional microphones pick up equally in all directions and are rarely used for podcasts in ordinary rooms. Figure-8 microphones pick up front and back, occasionally used for two people facing each other. Multipattern condensers let you choose.
Placement matters more than price. For most podcast microphones, the mouth should be about 5 to 15 cm from the microphone, roughly a hand's width, slightly off-axis to reduce plosive pops from "p" and "b" sounds. Close placement maximizes the ratio of voice to room sound. It also creates the proximity effect: directional microphones boost bass when the source is very close, which can add warmth or, in excess, boominess. Consistent distance keeps the voice consistent; hosts who lean back and forth create level and tone changes that are hard to fix. Mounting microphones on boom arms makes consistent positioning easier and isolates them from desk bumps, and shock mounts reduce handling noise. Pop filters or foam windscreens reduce plosives.
Worked problem
How distance changes the voice-to-room ratio
A host speaks 30 cm from a microphone. Moving to 10 cm increases the direct voice level while the room reverberation stays roughly the same. Using the inverse square law, by how much does the direct voice level rise?
Show solution
- The direct sound level changes by 20 log₁₀(d₁/d₂) dB.
- Here 20 log₁₀(30/10) = 20 × 0.477 ≈ 9.5 dB.
- With gain reduced by 9.5 dB to keep the same voice level, the room sound drops by about 9.5 dB relative to the voice.
Answer: About 9.5 dB louder direct voice, so the room is roughly 9.5 dB quieter relative to the voice.
USB and XLR
USB microphones connect directly to a computer and include their own preamp and converter. They are simple, affordable and good for solo shows, but connecting several to one computer can be unreliable, and upgrading parts of the chain is impossible. XLR microphones connect with balanced three-pin cables to an audio interface, mixer or recorder; they allow multiple microphones, better preamps, longer cable runs without noise, and upgrades over time. Hybrid microphones with both USB and XLR outputs offer a path from a simple start to a fuller setup. For a show with two or more people in the same room, XLR microphones into a multi-input interface or recorder are the reliable choice, recording each microphone on its own track.
Interfaces, mixers and recorders
An audio interface provides preamps, phantom power, analog-to-digital conversion and headphone outputs, connecting to a computer by USB. Interfaces range from one or two inputs for solo shows to eight or more. Podcast-specific mixers and production consoles add features such as faders for each host, built-in sound pads for jingles and effects, mix-minus outputs for phone and remote guests, and onboard recording to memory cards. Portable recorders record multiple microphones without a computer, valuable on location and as backups. Important features include clean preamp gain (especially for low-output dynamic microphones), the number of inputs, separate headphone outputs for each host, multitrack recording, and reliable drivers.
Sample rate and bit depth
Digital audio is described by sample rate, the number of samples per second, and bit depth, the precision of each sample. Podcasts are typically recorded at 48 kHz, the video standard, or 44.1 kHz, the CD standard; 48 kHz is the safer choice for shows that may also be published as video. Recording at 24-bit gives a large dynamic range, about 144 dB in theory, providing generous headroom so that levels can be set conservatively without adding noise; some recorders offer 32-bit float, which effectively removes the risk of clipping within the converter's range. The final published episode is usually compressed to MP3 or AAC at a lower data rate (Lesson 11). Uncompressed recording takes space: a mono 48 kHz, 24-bit track uses about 518 MB per hour.
Worked problem
Storage for a recording session
A three-person show records each microphone as a separate mono 48 kHz, 24-bit track for 90 minutes. How much storage do the raw tracks need?
Show solution
- One mono track per hour: 48,000 × 3 bytes × 3600 ≈ 518 MB.
- For 1.5 hours: about 778 MB per track.
- Three tracks: about 2.3 GB.
Answer: About 2.3 GB for the raw multitrack session.
Gain staging
Gain staging means setting levels correctly at each stage so that the signal is well above the noise floor but never clips. Set the preamp gain while the host speaks at normal, then excited, volume, aiming for typical peaks around −18 to −12 dBFS and loud moments no higher than about −6 dBFS when recording at 24-bit. There is no benefit to recording close to 0 dBFS; with 24-bit recording, the extra headroom costs almost nothing in noise. Turn off automatic gain control on microphones and recorders, which pumps background noise up during pauses. Watch for clipping indicators, and record a short test before every session. If a dynamic microphone needs the preamp at maximum gain and still sounds quiet or hissy, use an inline booster or an interface with more clean gain.
Headphones and monitoring
Everyone on a podcast should wear headphones. Monitoring reveals problems as they happen, such as hum, rustle, plosives or a microphone that has been knocked out of position, and lets hosts hear themselves and each other clearly, which improves delivery. Closed-back headphones prevent sound leaking into the microphones; open-back headphones leak and are better suited to editing in a quiet room. Monitoring through the interface's direct monitoring, rather than through software, avoids delay. For remote recordings, headphones are essential to prevent the remote guest's voice from playing through speakers and being recorded as echo (Lesson 5).
Setups for different budgets
Good podcasts can be made at almost any budget if the room and technique are right:
- Starter solo: a USB dynamic microphone on a desk stand or boom arm, closed-back headphones and free recording software.
- Solo or remote host: an XLR dynamic microphone, a one- or two-input interface, a boom arm, headphones.
- In-person two to four people: XLR dynamic microphones on boom arms, a multi-input interface or podcast mixer recording separate tracks, headphones for everyone with a headphone amplifier if needed.
- Location and interviews in the field: a portable multitrack recorder with two or more microphones, or wireless lavaliers, plus windscreens and spare batteries.
- Video podcast studio: the same audio setup plus cameras and lighting (Lesson 10).
Spend first on the room (Lesson 5), then on microphones and technique, then on interfaces and accessories. Buying a second-hand microphone of a proven model is often wiser than buying a new unknown one.
Cables, connectors and stands
Small accessories cause many recording problems. Use good-quality balanced XLR cables of suitable length, replace cables that crackle when moved, and avoid running audio cables alongside power cables, which can introduce hum. USB microphones and interfaces work best connected directly to the computer rather than through unpowered hubs. Boom arms and stands should hold microphones securely at the right height and angle without drooping; desk stands transmit vibration from typing and bumping. Label cables and inputs in multi-person setups so that each host's microphone goes to the correct track, and photograph the setup so it can be rebuilt consistently.
Microphone technique for hosts
Technique matters as much as equipment. Speak across the microphone slightly rather than directly into it to reduce plosives; keep a consistent distance and angle, moving the head rather than leaning away; turn away from the microphone to cough or drink; avoid touching or tapping the microphone, stand or desk; and keep jewelry, paper and pens quiet. Hosts who move a lot can benefit from headset microphones, which keep the distance constant. Before each session, check that everyone's microphone is positioned correctly and that levels match, then record a short test and listen back.
Recording software
Software for recording ranges from free editors such as Audacity and GarageBand to professional digital audio workstations and dedicated podcast recording applications. Key features include multitrack recording with one track per microphone, a clear level meter, the ability to set the sample rate and bit depth, automatic backups or crash recovery, and markers that hosts can drop during recording to flag moments for editing. Remote recording platforms (Lesson 5) combine recording and conversation. Whatever software you use, set the file format, folder and naming conventions before recording, and check the free storage space.
Troubleshooting common problems
When something sounds wrong, work through the chain systematically. Hum or buzz often comes from ground loops, damaged cables, nearby power supplies or lights; try a different cable, outlet or USB port. Crackles often come from faulty cables or connectors. Distortion usually means gain is too high somewhere in the chain. Thin or distant sound usually means the microphone is too far away or pointed the wrong way. Echo means the room is too reflective. Dropouts and clicks in digital recording can mean the computer is overloaded or the buffer size is too small; close other applications and increase the buffer. Keeping a troubleshooting checklist saves time during stressful sessions.
Accessibility and comfort
Long recording sessions are physically demanding. Comfortable chairs, adjustable boom arms that let hosts sit naturally, water at room temperature and regular breaks help hosts sound and feel their best. For hosts or guests with disabilities, consider accessible studio layouts, headset microphones that do not require holding a position, captioning tools for deaf or hard-of-hearing participants during remote calls, and flexible scheduling. Asking participants what they need, rather than assuming, is the simplest and most respectful approach.
Common mistakes
MistakeUsing a sensitive condenser in an echoey room.
InsteadUse a dynamic microphone close up, or treat the room.
MistakeSpeaking from 30 cm or more away.
InsteadStay about a hand's width from the microphone.
MistakeRecording peaks near 0 dBFS.
InsteadAim for peaks around −18 to −12 dBFS at 24-bit.
MistakeRecording multiple people on one track.
InsteadRecord each microphone on its own track.
MistakeHosts without headphones.
InsteadEveryone monitors with closed-back headphones.
Summary and key terms
- The recording chain runs from voice and room through microphone, preamp and converter.
- Dynamic microphones reject rooms; condensers capture detail in treated spaces.
- Cardioid patterns and close, consistent placement give clean voices.
- XLR setups with multi-input interfaces suit multiple hosts.
- Record at 48 kHz and 24-bit, with each microphone on its own track.
- Gain staging keeps peaks well below clipping without noise.
- Headphones for everyone and spending on the room first improve results most.
- Dynamic microphone
- Rugged microphone with a moving coil.
- Condenser microphone
- Sensitive microphone needing power.
- Phantom power
- 48-volt power supplied through the XLR cable.
- Polar pattern
- Directional sensitivity of a microphone.
- Proximity effect
- Bass boost when close to a directional microphone.
- Plosive
- Burst of air from p and b sounds.
- XLR
- Balanced three-pin audio connector.
- Audio interface
- Device with preamps and converters for a computer.
- Sample rate
- Samples recorded per second.
- Gain staging
- Setting levels correctly through the chain.
Practice problems
Work each problem on paper first, then reveal the answer to check.
What does the preamp do?
Show answer
Boosts the weak microphone signal.
Why are dynamic microphones good in untreated rooms?
Show answer
They pick up less room and background sound.
What power do condensers usually need?
Show answer
48-volt phantom power.
Ideal mouth-to-microphone distance?
Show answer
About 5–15 cm.
Level change moving from 20 cm to 10 cm?
Show answer
About 6 dB.
Why choose XLR for multiple hosts?
Show answer
Reliable multi-input recording on separate tracks.
Recommended sample rate for shows with video?
Show answer
48 kHz.
Storage for one hour of mono 48 kHz 24-bit?
Show answer
About 518 MB.
Target recording peaks at 24-bit?
Show answer
About −18 to −12 dBFS.
Why closed-back headphones?
Show answer
They do not leak into microphones.
Lesson quiz · 5 questions
Score 60% or more to complete this lesson.
Create a free account to save your progress, take quizzes and earn a certificate.