
CRE-240 · Lesson 9 of 12 · 28 min
Mixing, mastering and loudness
After editing, an episode needs mixing and mastering: balancing and shaping voices, music and effects so that everything sounds clear and consistent, then preparing the final file at a suitable loudness and format for distribution. Listeners hear podcasts in cars, on earbuds on noisy trains, through smart speakers and at their desks, so a good mix must translate to all of them. Inconsistent levels, where one host is much louder than another or music suddenly blasts, are among the most common listener complaints. This lesson covers the goals of a podcast mix, equalization, compression and leveling, de-essing and other processing, balancing music and speech with ducking, stereo and mono, loudness and LUFS, true peak and limiting, export formats and bitrates, and checking a mix on different playback systems.
Goals of a podcast mix
A podcast mix aims for intelligibility, consistency and comfort. Every word should be easy to understand without straining; voices should sound natural and similar in level and tone, so that listeners do not have to adjust the volume; music and effects should support rather than compete with speech; and the overall sound should be pleasant over a long listen, without harshness, boominess or sudden changes. Unlike music production, podcast mixing favors clarity and restraint over creative effects. Mixing with a consistent chain and template for each show keeps episodes sounding alike.
Equalization
Equalization (EQ) adjusts the balance of frequencies in a voice. Common corrective moves include:
- High-pass filtering: removing low-frequency rumble below about 70 to 100 Hz, depending on the voice, to clean up desk thumps, traffic rumble and proximity-effect boominess.
- Reducing muddiness: a gentle cut in the 200 to 400 Hz range if a voice sounds muffled or boxy.
- Presence: a small boost around 2 to 5 kHz can improve clarity and intelligibility.
- Harshness and sibilance: cuts in the 5 to 8 kHz range for harsh voices, or a de-esser (below).
- Air: a gentle shelf boost above about 10 kHz can add openness on dull recordings.
Every voice and microphone differs, so listen and adjust rather than applying fixed settings. Make small changes, typically 1 to 4 dB, and compare with the processing bypassed at matched loudness, since louder always sounds "better" at first.
| Frequency range | Character | Typical adjustment |
|---|---|---|
| Below 80–100 Hz | Rumble, thumps | High-pass filter |
| 100–250 Hz | Warmth, body; boominess if excessive | Small cut or boost as needed |
| 200–400 Hz | Muddiness, boxiness | Gentle cut |
| 2–5 kHz | Presence, intelligibility | Small boost |
| 5–8 kHz | Sibilance, harshness | De-ess or cut |
| Above 10 kHz | Air, brightness | Gentle shelf boost if dull |
Compression and leveling
Speech varies in level: people get louder when excited and quieter when reflective, and some speakers are naturally louder than others. Compression reduces the difference between loud and quiet parts by turning down the signal when it exceeds a threshold. Key controls are threshold, the level above which compression starts; ratio, how strongly the signal is reduced above the threshold (for example 3:1 means that 3 dB above the threshold becomes 1 dB above); attack and release, how quickly compression starts and stops; and makeup gain, which raises the overall level after compression. Gentle settings, such as ratios of 2:1 to 4:1 with a few decibels of gain reduction, make voices more consistent and present without sounding squashed. Heavy compression makes speech fatiguing and raises background noise and breaths.
Before compression, clip gain or volume automation, adjusting the level of individual phrases, sections or speakers by hand, often gives the most natural results, especially when one person is much louder than another. Automatic leveling tools and AI-based "auto-level" processors can do this quickly across a whole episode, but should be checked.
Worked problem
Reading a compressor setting
A compressor has a threshold of −20 dBFS and a ratio of 4:1. A shout peaks at −8 dBFS. What is the level after compression, before makeup gain?
Show solution
- Amount above threshold: −8 − (−20) = 12 dB.
- At 4:1, 12 dB above becomes 12 / 4 = 3 dB above the threshold.
- Output level: −20 + 3 = −17 dBFS, a gain reduction of 9 dB.
Answer: About −17 dBFS, 9 dB of gain reduction on the loudest peak.
De-essing, gating and other processing
Other common processors include de-essers, which reduce sibilant "s" sounds selectively, often needed after brightening EQ or compression; noise gates and expanders, which reduce the level between phrases to lower background noise, though they can chop the starts of words and make room noise pump; and saturation, which adds subtle harmonic warmth. Reverb is rarely used on podcast voices, except for creative moments in narrative shows. Apply processing in a sensible order, typically clean-up (noise reduction), EQ, compression, de-essing, then any final tonal shaping, and use the same chain on each speaker, adjusted to their voice.
Balancing music and speech
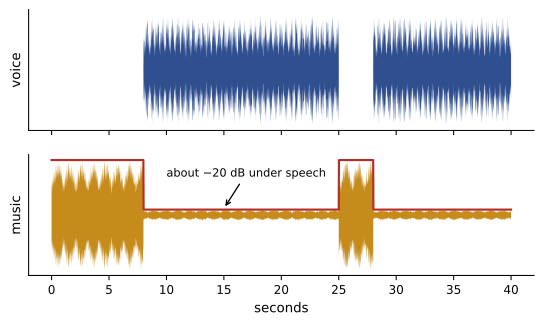
Music and sound effects must sit clearly below speech. A common approach is ducking: lowering the music automatically whenever someone speaks, using sidechain compression or automation, then raising it in pauses or between segments. Theme music might play at full level in the intro, then duck by 15 to 25 dB under speech. Music beds under narration should be quiet enough that speech is fully intelligible on small speakers and in noisy environments, which usually means much lower than it feels necessary when mixing on good headphones in a quiet room. Choose music without prominent vocals or busy melodies in the same frequency range as speech when it plays under talking.
Stereo and mono
Most podcast voices are recorded in mono, one channel per microphone, and placed in the center of a stereo mix. Panning voices to different sides can help separate co-hosts but is tiring on headphones and confusing on mono speakers, so most shows keep voices central or only slightly offset. Music and effects may be in stereo. Many shows publish a stereo file, but publishing a mono file halves the data needed for the same quality, suitable for speech-only shows. Always check that a stereo mix sounds correct when summed to mono, since many smart speakers and phones play in mono.
Loudness and LUFS
Loudness is measured in LUFS (loudness units relative to full scale), a standard measure that reflects how loud audio seems to human listeners over time, unlike peak meters, which show only the highest instant. Integrated loudness is the average over the whole episode. Many podcast apps and platforms apply loudness normalization, turning quieter shows up and louder shows down to a reference, but behavior varies across apps, and episodes that are much too quiet or too loud may still sound wrong. Common delivery targets for podcasts are around −16 LUFS integrated for stereo files, with mono files sometimes delivered around −19 LUFS so that they sound similar when played on two channels; Apple's guidance for podcast creators has recommended about −16 LUFS. Check current platform recommendations, and above all keep every episode consistent. Short-term and momentary loudness readings help find sections that are much louder or quieter than the rest.
Worked problem
Bringing an episode to target loudness
A finished episode measures −21.5 LUFS integrated with a true peak of −4.0 dBTP. The target is −16 LUFS with a true-peak ceiling of −1 dBTP. What gain is needed, and what happens to the peaks?
Show solution
- Gain needed: −16 − (−21.5) = +5.5 dB.
- Peaks would rise to −4.0 + 5.5 = +1.5 dBTP, above the ceiling.
- Apply the gain into a true-peak limiter set to −1 dBTP, which will reduce the highest peaks by about 2.5 dB.
- Re-measure: integrated loudness should be close to −16 LUFS with peaks at or below −1 dBTP.
Answer: Add 5.5 dB of gain through a true-peak limiter at −1 dBTP so peaks stay safe.
True peak and limiting
Digital audio clips if any sample exceeds 0 dBFS, and lossy encoding to MP3 or AAC can create intersample peaks slightly higher than the original samples. A true-peak limiter at the end of the chain prevents these overs, typically with a ceiling of −1 dBTP (decibels true peak); some recommendations use −2 dBTP for low-bitrate encoding. A limiter should catch only occasional peaks: if it is constantly reducing the level by several decibels, the mix is being pushed too loud and will sound flat and distorted. Gentle compression earlier in the chain reduces the work the limiter has to do.
Export formats and bitrates
Podcasts are usually distributed as MP3 files, which every app supports, or as AAC (M4A) files, which give slightly better quality at the same bitrate. Common settings are 128 kbps stereo or 64 to 96 kbps mono for speech-focused shows, at 44.1 or 48 kHz. Higher bitrates add file size with little audible benefit for speech, while lower bitrates save data but introduce artifacts, especially on music. Keep a high-quality master, such as a 24-bit WAV, for archiving and future re-encoding. Add ID3 metadata to MP3 files, such as title, show, episode number and artwork, although hosting services usually manage metadata through the RSS feed (Lesson 11).
| Format | Typical bitrate | Size per hour | Use |
|---|---|---|---|
| WAV 48 kHz, 24-bit stereo | About 2,304 kbps | About 1 GB | Master and archive |
| MP3 stereo | 128 kbps | About 58 MB | General distribution |
| MP3 mono | 64–96 kbps | About 29–43 MB | Speech-only shows |
| AAC (M4A) stereo | 96–128 kbps | About 43–58 MB | Efficient distribution |
Checking the mix
Before publishing, check the mix on several systems: good headphones, cheap earbuds, a phone speaker, a car and, if possible, a smart speaker. Listen for voices that disappear in noisy conditions, music that is too loud on small speakers, harshness on earbuds and boominess in cars. Compare with a few well-produced shows in the same genre at matched loudness. Confirm the loudness measurement of the final exported file, not just the session, and listen to the beginning and end of the exported file to make sure nothing was cut off. Keep notes of settings that work for each host and show, and refine them over time.
A typical voice processing chain
A simple, reliable processing chain for each voice might be: noise reduction if needed, a high-pass filter at about 80 Hz, corrective EQ to reduce muddiness or harshness, a compressor at a 3:1 ratio taking 3 to 6 dB off the louder phrases, a de-esser, and a gentle presence boost. On the master bus, a loudness-normalizing gain stage and a true-peak limiter complete the chain. Settings should be adjusted for each voice and checked by ear, but saving a starting preset for each host saves time and keeps episodes consistent. Avoid stacking many plug-ins that each do a little; every process can add artifacts.
Matching voices
When hosts and guests are recorded in different rooms and on different microphones, voices can sound mismatched: one bright and close, another dull and distant. Matching techniques include EQ to bring the tonal balance closer, compression to match density, careful level balancing so that each voice sits at similar loudness, and sometimes a small amount of shared ambience to make voices sound as if they are in the same space. Some voice enhancement tools can match voices automatically, but results vary. Perfect matching is not always possible; the goal is that listeners are not distracted by the differences.
Loudness consistency across segments
Even when the integrated loudness of an episode is on target, individual sections can be too loud or quiet: a quiet guest, a loud ad, or a music sting that jumps out. Short-term loudness meters, which measure over a few seconds, help find these sections. Aim for speech segments within a few loudness units of each other, ads and sponsor reads at a similar level to the surrounding speech, and music stings that do not exceed speech loudness noticeably. Dynamically inserted ads, which are produced separately, should be delivered at the same loudness target as the episode to avoid jarring changes.
Monitoring environment
Mixing decisions depend on what you hear. Good closed or open headphones and, where possible, a pair of near-field monitors in a treated space allow accurate judgments. Mix at a moderate, consistent listening level, take breaks to rest your ears, and check regularly on small speakers and earbuds. Reference tracks from respected shows in the same genre, loaded into the session at matched loudness, provide a quick comparison for tone and level. Hearing is easily fatigued, so return to an important mix with fresh ears before publishing.
Mastering for video and audio versions
When a show is published as both audio and video, the same mix may need different masters. Video platforms apply their own loudness normalization and listeners often watch on television speakers or laptops, while podcast apps may normalize differently or not at all. Many shows deliver a podcast master around −16 LUFS and a video version at a similar or slightly louder level according to platform guidance, always with true peaks controlled. Keep the mix itself identical, so that content and balance match, and only adjust final loudness and format for each destination.
Common mistakes
MistakeLarge EQ boosts that sound impressive at first.
InsteadMake small moves and compare at matched loudness.
MistakeHeavy compression on voices.
InsteadUse gentle ratios and clip gain for consistency.
MistakeMusic too loud under speech.
InsteadDuck music 15–25 dB and check on small speakers.
MistakeIgnoring loudness consistency.
InsteadMeasure integrated LUFS and keep every episode on target.
MistakeExporting without a true-peak limit.
InsteadUse a true-peak limiter around −1 dBTP.
Summary and key terms
- Mixes aim for intelligibility, consistency and comfort.
- EQ removes rumble and mud and adds presence with small moves.
- Gentle compression and clip gain even out speech levels.
- De-essers, gates and saturation are used sparingly in a consistent chain.
- Music ducks well below speech; check mono compatibility.
- Measure integrated loudness in LUFS, commonly about −16 LUFS for stereo.
- Limit true peaks, export suitable MP3 or AAC files and check on several systems.
- Mixing
- Balancing and processing tracks into a final blend.
- Mastering
- Final preparation of loudness and format.
- Equalization
- Adjusting the balance of frequencies.
- High-pass filter
- Filter removing low frequencies.
- Compression
- Reducing the difference between loud and quiet sounds.
- Ratio
- Strength of compression above the threshold.
- Ducking
- Lowering music automatically under speech.
- LUFS
- Loudness units relative to full scale.
- True peak
- Highest level including intersample peaks.
- Bitrate
- Data per second in an encoded file.
Practice problems
Work each problem on paper first, then reveal the answer to check.
What are the goals of a podcast mix?
Show answer
Intelligibility, consistency and comfort.
Typical high-pass frequency for voices?
Show answer
About 70–100 Hz.
Which range improves presence?
Show answer
About 2–5 kHz.
Output for a −10 dBFS peak, −22 threshold, 3:1 ratio?
Show answer
−18 dBFS.
Why compare processing at matched loudness?
Show answer
Louder always sounds better at first.
How far below speech should music usually duck?
Show answer
About 15–25 dB.
Why check mono compatibility?
Show answer
Many devices play in mono.
Gain needed from −19 LUFS to −16 LUFS?
Show answer
+3 dB.
Typical true-peak ceiling?
Show answer
About −1 dBTP.
File size of a 45-minute 96 kbps MP3?
Show answer
About 32 MB.
Lesson quiz · 5 questions
Score 60% or more to complete this lesson.
Create a free account to save your progress, take quizzes and earn a certificate.