
PHOT-202 · Lesson 1 of 12 · 25 min
The digital darkroom
For most of photography's history, the darkroom was where a negative became a photograph. Printers dodged and burned, chose papers and contrast grades, and spent hours refining a single print. Ansel Adams famously compared the negative to a musical score and the print to its performance. Digital photography moved this work to the computer, but the principles remain: a capture is raw material, and processing shapes it into a finished image that expresses the photographer's intent. This course covers the digital darkroom, from organizing and processing raw files through local adjustments, retouching and compositing to output and the ethics of manipulation. This first lesson introduces the digital workflow, the main software, non-destructive editing, the hardware a digital darkroom needs, and the habits that make editing efficient and consistent.
From chemical to digital darkroom
Many digital tools are named after their darkroom ancestors. Dodging and burning, lightening and darkening parts of a print by controlling exposure under the enlarger, became the dodge and burn tools and local exposure brushes. Contrast grades of paper became curves and contrast sliders. Toning prints with selenium or sepia became split toning and color grading. Retouching negatives with pencils and dyes became the healing brush and clone stamp. Combination printing, in which nineteenth-century photographers such as Oscar Rejlander and Henry Peach Robinson combined several negatives into one image, became digital compositing. Understanding this history is useful because it reminds us that manipulation is as old as photography, and that the questions it raises about truth and artistry are not new (Lesson 12).
The digital workflow
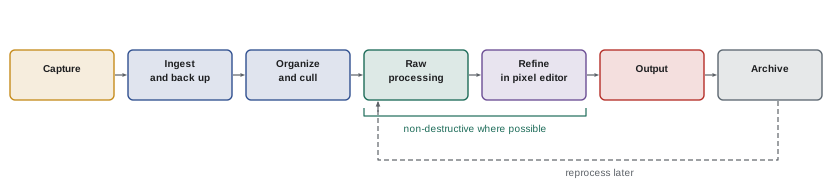
A digital photography workflow is the sequence of steps from capture to delivery and archive. A typical workflow includes:
- Capture: shooting in raw, with correct exposure and white balance where possible.
- Ingest: copying files from cards to the computer and backup drives, renaming, and adding basic metadata such as copyright.
- Organize and cull: reviewing images, rating and flagging selections, rejecting failures, and grouping images into collections.
- Process: global raw adjustments to exposure, tone, color and detail, often synchronized across similar images.
- Refine: local adjustments, retouching and, where needed, compositing in a pixel editor such as Photoshop.
- Output: exporting files sized, sharpened and color-managed for web, print or clients.
- Archive: backing up originals, edited files and catalogs in a reliable, organized way.
Each step affects the next. A consistent workflow saves time, reduces mistakes and makes it possible to find and reprocess images years later.
Software for the digital darkroom
Photographers use two broad kinds of software, often together:
- Raw processors and catalog applications, which import, organize and process raw files non-destructively. Adobe Lightroom Classic is the most widely used, with a catalog database, powerful raw processing, AI masking and integration with Photoshop. Adobe Lightroom (the cloud-based version) stores originals online for access across devices. Capture One, from Phase One, is popular with studio, commercial and fashion photographers for its color rendering, tethered shooting and session-based workflow. Other options include DxO PhotoLab, known for lens corrections and noise reduction; ON1 Photo RAW; Apple Photos for casual use; and free, open-source programs such as darktable and RawTherapee.
- Pixel editors, which edit individual pixels and layers for detailed retouching, compositing and graphic work. Adobe Photoshop is the industry standard; Affinity Photo, now part of Canva, and GIMP, a free open-source editor, are alternatives. Pixel editors work with layers, masks and selections, and save layered files in formats such as PSD or TIFF.
Many photographers do most work in a raw processor and send selected images to Photoshop for retouching or compositing, returning the edited file to the catalog. Subscription pricing, ownership models and feature sets change, so choose software that suits your work, your budget and the clients and collaborators you exchange files with.
| Software | Type | Known for |
|---|---|---|
| Lightroom Classic | Raw processor and catalog | Organization, raw editing, AI masks, Photoshop integration |
| Capture One | Raw processor, sessions or catalogs | Color, tethering, studio and commercial work |
| DxO PhotoLab | Raw processor | Lens corrections, noise reduction |
| darktable / RawTherapee | Open-source raw processors | Free, highly configurable |
| Photoshop | Pixel editor | Layers, retouching, compositing, generative tools |
| Affinity Photo / GIMP | Pixel editors | Alternatives to Photoshop |
Non-destructive editing
Non-destructive editing means that the original image data is never changed. Raw processors store adjustments as instructions in a catalog database or in sidecar files (XMP files beside each raw file), and apply them to the raw data whenever the image is displayed or exported. Every adjustment can be changed, reversed or copied to other images at any time, and multiple versions, called virtual copies or variants, can be created without duplicating the file. In pixel editors, non-destructive techniques include adjustment layers, which apply tonal and color changes that can be edited later; layer masks, which hide or reveal parts of a layer without erasing pixels; smart objects, which preserve the original data of embedded images; and working on separate retouching layers rather than the original background layer. Non-destructive habits protect your work and make experimentation safe.
Hardware for the digital darkroom
Editing places demands on hardware, especially with high-resolution raw files, AI tools and large layered files:
- A computer with a modern processor, ample memory (32 GB or more is comfortable for large files and Photoshop work) and a capable graphics processor, which many AI features use.
- Fast internal storage, ideally solid-state drives, for the operating system, applications, catalog and current projects; and larger external or network storage for the archive.
- A good monitor: a wide-gamut, high-quality display that can be calibrated, ideally covering most of Adobe RGB or Display P3, with uniform brightness across the screen. A monitor hood reduces reflections.
- A hardware calibration device, a colorimeter, to calibrate and profile the monitor regularly (PHOT-301 covers calibration in depth).
- A pen tablet, which gives precise, pressure-sensitive control for masking, dodging and burning and retouching.
- A backup system following the 3-2-1 principle.
The editing environment
Where you edit affects how you see images. A room with controlled, moderate, neutral lighting, without strong colored light or bright sunlight falling on the screen, gives the most reliable view. Many photographers calibrate their monitors to a brightness of about 100 to 120 candelas per square meter for print work, since very bright screens make prints look dark by comparison. Neutral gray interface themes and desktop backgrounds avoid color bias. Taking breaks, and returning to images with fresh eyes, helps avoid overediting, because the eye adapts quickly to strong adjustments and begins to see them as normal.
Worked problem
Diagnosing dark prints
A photographer edits images on a laptop at full brightness in a dim room. Prints from a professional lab consistently look much darker and slightly warmer than the screen. What is the most likely cause, and how should it be fixed?
Show solution
- A laptop at full brightness may reach 400 to 500 candelas per square meter, far brighter than a print viewed under normal light.
- Edits made on a bright screen tend to be too dark when printed, because the photographer did not brighten images enough.
- An uncalibrated screen may also be too cool, so edits compensate with too much warmth.
- Calibrate a suitable monitor to about 100 to 120 cd/m² and D65, edit in a room with moderate light, and use soft proofing with the lab's printer profile.
Answer: An overly bright, uncalibrated screen; calibrate to about 100–120 cd/m² and D65 and soft proof with the lab's profile.
Developing an editing style
Editing is where much of a photographer's style emerges. Some photographers aim for natural, faithful renderings; others for bold color, moody tones, film-like softness or graphic contrast. A consistent style across a body of work makes it recognizable and helps clients know what to expect. Style develops through practice and study: analyzing the work of photographers you admire, experimenting, and noticing which edits feel true to your intentions. Presets and profiles can encode a style, but each image still needs individual judgment. Style should serve the photograph; heavy editing cannot rescue a weak image, and the strongest edits often look effortless.
Working efficiently
Professional photographers may process hundreds or thousands of images a week, so efficiency matters. Useful habits include learning keyboard shortcuts for the most frequent tasks; culling ruthlessly before editing; editing one representative image from a set and synchronizing its settings to similar images; creating presets for common starting points and import settings; using batch export with saved presets for each output; and keeping catalogs and folders organized so that images can be found quickly. AI-assisted tools for culling, masking, noise reduction and retouching can save considerable time, but their results must be checked. Time saved on routine work can be spent on the images that matter most.
Course overview
Lesson 2 covers importing, organizing and culling; Lessons 3 to 6 cover raw processing: tone, color, detail and local adjustments; Lesson 7 introduces Photoshop layers, masks and selections; Lessons 8 and 9 cover portrait and product retouching; Lesson 10 covers compositing and multi-image techniques; Lesson 11 covers output for screen and print; and Lesson 12 addresses the ethics and law of image manipulation and the capstone portfolio.
Raw files, JPEGs and the digital negative
The raw file plays the role that the negative played in film photography: it holds the captured information, and each processing of it is an interpretation. A JPEG straight from the camera is more like a print made by an automated lab: quick and often attractive, but with decisions about white balance, contrast, color and sharpening already made and much of the original information discarded. For the digital darkroom, raw capture is strongly preferred, because it allows larger corrections without banding, recovers highlights and shadows that a JPEG has lost, permits white balance changes without degradation, and benefits from improvements in processing software over the years. An image processed today can be reprocessed in ten years with better demosaicing, noise reduction and color, much as a negative can be reprinted with better techniques. Many photographers convert proprietary raw files to DNG for archiving, or keep both, to reduce dependence on manufacturer-specific formats.
Bit depth and editing headroom
Raw files contain 12 or 14 bits of data per photosite, and editing in 16-bit mode in Photoshop preserves that precision, with 65,536 levels per channel rather than the 256 of an 8-bit file. Heavy adjustments to an 8-bit file, such as strong curves, large shadow lifts or extensive color changes, can stretch the available levels so far that gaps appear between them, showing as banding in smooth gradients such as skies and studio backgrounds, or posterization in skin. Working in 16-bit until the final export avoids these problems at the cost of larger files. A histogram with gaps or a comb-like appearance after editing is a sign that tonal levels have been stretched too far.
The photographer and the retoucher
In commercial photography, the roles of photographer and retoucher are often separate. Photographers may deliver selected raw files with basic adjustments, and specialist retouchers, sometimes in-house at agencies and brands, sometimes freelance or at dedicated retouching studios, complete the high-end work. Clear communication between them, through reference images, written notes, marked-up proofs and agreed style guides, ensures that the final images match the creative vision. Photographers who understand retouching shoot with it in mind, for example by photographing clean background plates, extra frames for head swaps, or separate passes for products, which makes post-production faster and better.
Common mistakes
MistakeEditing on an uncalibrated, overly bright screen.
InsteadCalibrate the monitor and control the room lighting.
MistakeEditing the original pixels directly.
InsteadWork non-destructively with adjustment layers and sidecars.
MistakeEditing every image before culling.
InsteadCull first and edit only the selections.
MistakeRelying on presets without adjustment.
InsteadUse presets as starting points and judge each image.
MistakeSkipping backups.
InsteadFollow the 3-2-1 approach from the moment of ingest.
Summary and key terms
- Digital tools descend from darkroom techniques such as dodging, burning and combination printing.
- A workflow runs from capture through ingest, culling, processing, refining, output and archive.
- Raw processors organize and process; pixel editors handle layers, retouching and compositing.
- Non-destructive editing keeps originals intact and edits reversible.
- A capable computer, calibrated monitor, pen tablet and backups form the core hardware.
- A controlled editing environment gives reliable judgment.
- Style and efficiency develop through practice, presets and good habits.
- Digital darkroom
- Software and hardware used to process digital images.
- Workflow
- Sequence of steps from capture to archive.
- Raw processor
- Software that converts and edits raw files.
- Catalog
- Database of images and their adjustments.
- Sidecar file
- XMP file storing edits beside a raw file.
- Pixel editor
- Software editing pixels and layers.
- Non-destructive editing
- Editing that never changes original data.
- Virtual copy
- Alternative version of an image without a duplicate file.
- Adjustment layer
- Editable layer applying tonal or color changes.
- Colorimeter
- Device used to calibrate monitors.
Practice problems
Work each problem on paper first, then reveal the answer to check.
What did dodging and burning do in the darkroom?
Show answer
Lightened and darkened parts of a print.
Name the main workflow stages.
Show answer
Capture, ingest, cull, process, refine, output, archive.
Name two raw processors.
Show answer
Lightroom Classic, Capture One, DxO PhotoLab, darktable.
What is a pixel editor used for?
Show answer
Layers, retouching and compositing.
Where do raw processors store edits?
Show answer
In a catalog or XMP sidecar files.
Name two non-destructive Photoshop techniques.
Show answer
Adjustment layers, masks, smart objects, separate layers.
Why use a pen tablet?
Show answer
Precise, pressure-sensitive control.
Suggested monitor brightness for print work?
Show answer
About 100–120 cd/m².
Why take breaks when editing?
Show answer
The eye adapts to strong edits.
Name two efficiency habits.
Show answer
Shortcuts, culling, syncing, presets, batch export.
Lesson quiz · 5 questions
Score 60% or more to complete this lesson.
Create a free account to save your progress, take quizzes and earn a certificate.