
PHOT-220 · Lesson 3 of 12 · 25 min
Connecting with and directing subjects
Most people are uncomfortable being photographed. They worry about how they look, do not know what to do with their hands, and freeze when a lens points at them. The portraits that result, with tight smiles and wary eyes, show the discomfort rather than the person. The difference between an average portrait photographer and an excellent one is rarely equipment or lighting; it is the ability to make people feel at ease, to direct them clearly and kindly, and to recognize and capture the moments when they are themselves. This lesson covers preparing subjects before the session, building rapport, the psychology of being photographed, giving clear direction, using prompts and activities, feedback and encouragement, reading body language, working with nervous and difficult subjects, and managing the session's pace and energy.
Before the session
Connection begins before the camera comes out. A pre-session conversation, by phone, video call or questionnaire, lets you learn about the person, their purpose and their concerns, and lets them get to know you. Useful questions include what the images are for, how they would like to come across, whether they have images of themselves they like or dislike and why, what they feel self-conscious about, and what activities or places are meaningful to them. Send practical guidance: what to wear (solid colors and well-fitting clothing, a few options, avoiding busy patterns and logos), grooming, what to bring and how long the session will take. Knowing what to expect reduces anxiety. For professional and editorial portraits, research the subject's work, so that you can talk knowledgeably and plan meaningful images.
The first few minutes
First impressions set the tone. Greet subjects warmly, introduce yourself and anyone assisting, and spend a few minutes talking before shooting: offer water, ask about their day, explain what will happen in the session. Show them the space and the light. Many photographers start with deliberately low-stakes "warm-up" frames, telling the subject that the first shots are just to check the light, which lets them get used to the camera without pressure. Keep the camera ready but not aggressively pointed at them while you talk. Small talk is not wasted time: it builds trust, and the natural expressions that appear during conversation are often the best of the session.
Why people freeze in front of a camera
Understanding the psychology helps. Being photographed means being observed and judged, and many people have a long history of disliking photographs of themselves, partly because they are used to their mirror image, which is reversed. Feeling watched makes people self-conscious about their faces, bodies and movements, and they try to control them, producing stiffness: held breath, raised shoulders, clenched jaws, rigid hands and forced smiles. The photographer's task is to shift the subject's attention away from being watched and toward something else: a conversation, a task, a memory, a person, or simply following clear instructions that remove the need to decide what to do. Silence behind the camera increases anxiety; steady, confident communication reduces it.
| Sign of discomfort | What it looks like | Possible response |
|---|---|---|
| Held breath and raised shoulders | Tense neck, shoulders near ears | Ask for a deep breath out, drop shoulders |
| Forced smile | Mouth smiles, eyes do not | Make them laugh, ask a question, prompt a memory |
| Rigid hands | Clenched fists, arms pinned to sides | Give hands something to do |
| Avoiding the lens | Eyes darting, looking down | Lower the camera, talk, then reintroduce |
| Constant checking | Asking to see every image | Show a strong frame early, then keep shooting |
Giving clear direction
Clear, specific direction is kind: it removes uncertainty and makes subjects feel guided rather than judged. Principles of good direction include:
- Be specific: "turn your shoulders toward the window" rather than "turn a bit".
- Use their perspective: say "your left" or point, rather than leaving them to translate your left into theirs; mirroring the pose yourself works well, so they can copy you.
- Give one or two instructions at a time, then shoot, rather than a long list.
- Explain the purpose when useful: "lean forward a little; it brings your eyes closer and looks more engaged".
- Use positive language: "chin forward and down" rather than "you have a double chin".
- Demonstrate: show the pose yourself, which also makes it feel less awkward for them.
- Keep talking while you shoot, so that the subject never feels abandoned in silence.
Some photographers touch subjects to adjust a pose, but always ask permission first and explain what you will do, and many prefer to adjust only by demonstration and verbal direction. With clothing and hair adjustments, offer the subject a mirror or ask them to do it themselves, or ask permission clearly.
Prompts and activities
Prompts are instructions or questions that create genuine reactions and movements rather than poses. They are widely used in family, couple and lifestyle photography and work in headshots and editorial portraits too. Examples include asking a subject to tell you about a favorite trip, to think of someone who makes them laugh, to walk toward you and stop when they reach a mark, to whisper something to their partner, or to look away and then back at the camera on the count of three. Activities give people something to do: an artist painting, a chef cooking, a musician playing, a family baking together. Absorbed in an activity, people forget the camera, and their expressions and gestures become natural. The photographer can then direct small adjustments within the activity, such as turning toward the light.
Worked problem
Turning a stiff headshot into a natural one
A nervous engineer is having a headshot taken for a company website. Their smile is tight, and their shoulders are raised. What sequence of direction and prompts might help?
Show solution
- Lower the camera and chat about their work and what they enjoy about it.
- Ask them to take a deep breath and let it out slowly, dropping their shoulders.
- Give one physical adjustment: turn the shoulders slightly, bring the forehead a little forward.
- Ask a question that makes them smile genuinely, such as the strangest thing that has happened at work, and shoot during and just after the answer.
- Show them one good frame on the camera to build confidence, then continue with a few variations.
Answer: Conversation, a breath to release tension, one clear adjustment, a genuine prompt, and a confidence-building look at a good frame.
Feedback and encouragement
Subjects cannot see themselves, so they depend on the photographer's feedback. Specific, honest encouragement builds confidence: "that's great, the light on your face is lovely", "yes, that expression is exactly right". Avoid long silences while you adjust settings, which subjects interpret as problems with them; explain what you are doing ("I'm just adjusting the light"). Avoid negative or critical comments about their appearance. Showing an especially good frame on the camera's screen early in a session often transforms a nervous subject, because it proves that the session is going well; avoid showing frames constantly, which interrupts the flow and invites self-criticism. Praise authentic moments more than poses, so subjects learn what you are looking for.
Reading body language
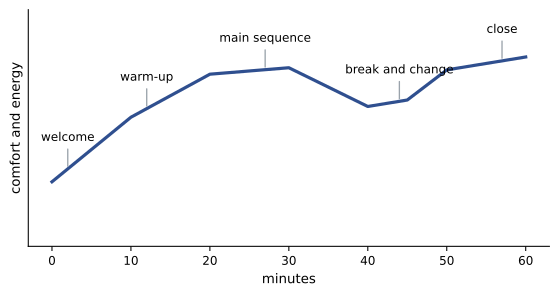
Watching the subject closely tells you what to do next. Signs of relaxation include loose shoulders, soft hands, natural breathing, genuine smiles reaching the eyes and spontaneous movement. Signs of tension include the reverse, as well as crossed arms, fidgeting and averted gaze. Notice how subjects respond to different topics, directions and set-ups; some people come alive talking about their children or work, others when joking. Notice also when energy flags: tired subjects need a break, a change of location or setup, or a short, fun activity. Subjects often relax in the moments after you say "that's it" or between setups, which is why many photographers keep shooting quietly during these transitions.
Nervous, reluctant and difficult subjects
Some subjects need extra care. Very nervous people benefit from longer warm-ups, more conversation, simple direction, quick early successes and perhaps a friend present. Reluctant subjects, such as executives who see photography as a chore or teenagers dragged along by parents, respond to efficiency, respect for their time and involving them in choices, such as picking the location or music. People who have had bad experiences of being photographed, or who are self-conscious about specific features, appreciate being asked how they prefer to be photographed and reassurance that you will choose images together. Occasionally a subject is rude or uncooperative; staying calm, professional and focused on the outcome usually wins them over. Children and pets require their own approaches (Lesson 10).
Pace, music and the environment
The session environment affects mood. Comfortable temperature, a place to change, water, a mirror and privacy help subjects relax. Music chosen with or by the subject can lift energy and fill silence. Keeping a steady pace, without long technical delays, maintains momentum; prepare lighting and settings before the subject arrives where possible. Plan sessions with variety, such as different setups, outfits, poses and moods, so that energy remains high and the client receives a range of images. Shorter, focused sessions often produce better results than long, exhausting ones. End positively, thank the subject, explain what happens next (selection, editing, delivery) and when.
Your own presence
Subjects mirror the photographer. A calm, confident, warm photographer creates calm, confident subjects; an anxious one fiddling with gear creates anxiety. Know your equipment well enough that it does not need conscious attention, so that your focus can stay on the person. Be genuinely curious about people; most will open up when someone is interested in them. Be yourself: some photographers are quiet and gentle, others energetic and funny, and both can work if they are authentic. Practice directing friends and family, and review your sessions to notice which phrases and approaches produce the best responses.
Directing with demonstrations and references
Many subjects find it easier to copy than to interpret words. Demonstrating a pose yourself, exaggerating slightly, often gets the best results and creates a light-hearted moment as the subject sees the photographer looking a little silly. Some photographers show reference images on a phone or tablet, such as a pose they would like to try. When using references, emphasize that they are starting points, and adapt them to the person. Mirroring works best when you stand facing the subject and say "do what I do", moving your own right side so that it corresponds to their left, as in a mirror.
Working with assistants and stylists
On larger shoots, assistants, hair and makeup artists, stylists and clients may be present. Agree in advance who gives direction to the subject; multiple voices calling instructions confuse and stress people. Typically, the photographer directs pose and expression, while stylists step in to fix hair, makeup and clothing between frames. Assistants can hold reflectors, manage lights, check details such as collars and stray hairs, and keep the session moving. A calm, organized team makes subjects feel cared for; a chaotic one makes them anxious.
Remote and virtual direction
Some portrait work now happens remotely: photographing people via video calls for publications, directing clients who photograph themselves with phones, or coaching teams through self-shot headshots. Principles of direction still apply, with added clarity: describe light sources in the room, ask the subject to move toward a window, guide framing by describing the frame edges, and use the same prompts for expression. Remote portraits rarely match in-person quality but can serve needs when travel is impossible.
Ending well
How a session ends affects how clients remember it. Finish on a strong setup, tell the subject what went well, explain when they will see images, and thank them. People who leave feeling good about the experience are more likely to like their photographs, recommend you and return.
Common mistakes
MistakeShooting immediately without conversation.
InsteadSpend a few minutes building rapport first.
MistakeLong silences while adjusting settings.
InsteadKeep talking and explain what you are doing.
MistakeVague directions like "move a bit".
InsteadGive specific, mirrored, one-at-a-time instructions.
MistakeSaying "say cheese" for every frame.
InsteadUse prompts and conversation for genuine expressions.
MistakeTouching subjects without asking.
InsteadDemonstrate, or ask permission before adjusting.
Summary and key terms
- Connection matters more than equipment in portraiture.
- Pre-session conversations and guidance reduce anxiety.
- Warm-up frames and small talk ease subjects into the session.
- People freeze because they feel observed; shift their attention.
- Direction should be specific, positive, mirrored and paced.
- Prompts and activities create genuine expressions and movement.
- Read body language, manage energy and bring calm, confident presence.
- Rapport
- Trust and ease between photographer and subject.
- Pre-session consultation
- Conversation to plan a session.
- Warm-up frames
- Low-pressure early images to ease subjects in.
- Direction
- Instructions guiding pose and expression.
- Mirroring
- Demonstrating a pose for the subject to copy.
- Prompt
- Question or instruction that creates a genuine reaction.
- Activity-based portrait
- Portrait made while the subject does something.
- Body language
- Physical signs of comfort or tension.
- Session flow
- Pace and sequence of a portrait session.
- Genuine smile
- Smile that reaches the eyes.
Practice problems
Work each problem on paper first, then reveal the answer to check.
Name three pre-session questions.
Show answer
Purpose, how they want to come across, concerns, images they like.
What are warm-up frames?
Show answer
Low-pressure early shots to ease the subject in.
Why do people dislike photos of themselves?
Show answer
They are used to their reversed mirror image and feel judged.
How should you refer to left and right?
Show answer
From the subject's perspective, or by pointing or mirroring.
Give an example of a prompt.
Show answer
Tell me about your favorite trip.
Why do activities help?
Show answer
Absorbed people forget the camera.
When should you show a frame on the camera?
Show answer
Early, once, to build confidence.
Name two signs of tension.
Show answer
Raised shoulders, held breath, rigid hands, forced smile.
How do you help a reluctant executive?
Show answer
Be efficient, respect their time, involve them in choices.
Why does the photographer's presence matter?
Show answer
Subjects mirror the photographer's mood.
Lesson quiz · 5 questions
Score 60% or more to complete this lesson.
Create a free account to save your progress, take quizzes and earn a certificate.