
PHOT-220 · Lesson 9 of 12 · 25 min
Group portraits
Group portraits record families, teams, wedding parties, classes, clubs and communities. They are often among the most valued photographs people own, because they record who belonged together at a moment in time. They are also among the most technically and socially demanding: every face must be visible, sharp, well lit and expressive in the same frame, and the photographer must organize and engage people who may be restless, distracted or reluctant. This lesson covers the goals of group portraits, arranging small and large groups, shapes and layers, height and spacing, depth of field and focus, lighting groups evenly, camera position and lens choice, managing people and expressions, the shot list for events, and technical techniques such as composites and blink checks.
Goals of a group portrait
A good group portrait shows everyone clearly, conveys the relationships and spirit of the group, and is pleasing as a composition. Clear means every face visible, sharp, lit and not hidden behind another person, with eyes open and attention on the camera or on a shared moment. Relationships mean couples and families close together, leaders or honorees given appropriate prominence, and a feeling of connection rather than strangers lined up. Composition means a balanced shape, consistent spacing, attractive variation in heights and no awkward gaps. Groups for formal records, such as boards of directors and graduating classes, prioritize clarity and order; groups for families and friends prioritize warmth and connection.
Arranging small groups
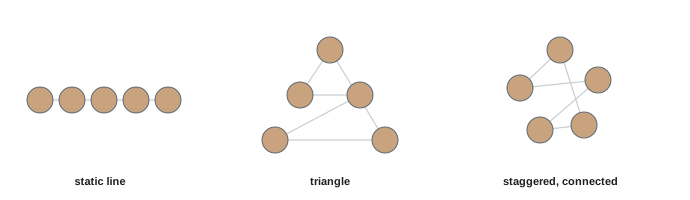
For small groups of two to six people, think in shapes rather than lines. Triangles and diamonds, formed by varying head heights, create dynamic, connected arrangements; a straight line of heads at the same height looks static. Techniques include seating some people and standing others; having taller people stand behind; using steps, chairs, sofas, walls and cars to create levels; and angling people toward the center of the group, with bodies overlapping slightly. Heads should be staggered so that no head is directly above another, and so that faces are close but not touching awkwardly. Couples look connected with shoulders overlapping and heads slightly tilted toward each other. Hands should rest naturally on shoulders, laps, waists or each other's hands. Avoid gaps between people, which look like missing members.
Larger groups
Groups of ten to several hundred need structured arrangements. Rows are the most practical: a seated front row, a standing row behind, and further rows on steps, benches, risers or a slope. Ensuring each row is higher than the one in front, so that every face is visible, is essential; staggering people so that each face appears in the gap between the two people in front makes every face visible. Keep rows curved slightly toward the camera, like an arc, so that people at the ends are at a similar distance from the camera as those in the middle, which helps both focus and lighting. Very large groups may be photographed from a raised position, such as a balcony, ladder or elevated platform, looking down so that each row is visible. Leaders, honorees or couples are typically placed near the center.
| Group size | Typical arrangement | Key technique |
|---|---|---|
| 2–3 | Close, overlapping, varied heights | Connection, head tilts, hands |
| 4–8 | Triangles and diamonds, seated and standing | Levels, staggered heads |
| 10–30 | Two or three rows | Stagger faces between gaps, slight arc |
| 30–100 | Multiple rows on steps or risers | Elevated camera, clear row heights |
| 100+ | Stands, bleachers or crowd from height | High vantage point, wide lens or panorama |
Depth of field and focus
Groups extend in depth: front and back rows may be a meter or more apart. All faces must be acceptably sharp, so depth of field becomes a priority over background blur. For small groups in one plane, f/4 to f/5.6 is often enough; for several rows, f/8 to f/11 is common. Focusing about one third of the way into the group from the front row places the depth of field to cover more of the group, since depth of field extends farther behind the focus point than in front at typical group distances. Keeping everyone in as shallow a depth as possible, by arranging rows tightly and avoiding large gaps between them, also helps. Check sharpness on the faces at the front and back by zooming in on the camera screen.
Worked problem
Choosing an aperture for a three-row group
A team of 24 is arranged in three rows, with the front row 6 meters from a full-frame camera with a 50 mm lens and the back row about 1.2 meters behind the front row. Using a circle of confusion of 0.03 mm, will f/5.6 keep all rows sharp if focused on the middle row?
Show solution
- Hyperfocal distance H ≈ f²/(Nc) = 50² / (5.6 × 0.03) ≈ 14.9 m.
- Focus at the middle row, about 6.6 m.
- Near limit ≈ Hs/(H + s) = 14.9 × 6.6 / (14.9 + 6.6) ≈ 4.6 m; far limit ≈ Hs/(H − s) = 14.9 × 6.6 / (14.9 − 6.6) ≈ 11.8 m.
- The rows span 6 to 7.2 m, well within 4.6 to 11.8 m.
Answer: Yes; at f/5.6 focused on the middle row, sharpness extends from about 4.6 to 11.8 m, covering all three rows.
Lighting groups evenly
Even lighting across a group is harder than lighting one person, because light falls off with distance (PHOT-210). People nearer the light are brighter than those farther away. Strategies include using large, soft sources placed far enough from the group that the distance differences across it are small relative to the light-to-subject distance; placing lights near the camera axis, sometimes two lights on either side of the camera feathered across the group; bouncing light off ceilings and walls in interiors; and in open shade outdoors, positioning the group so that the open sky lights them evenly. Avoid placing the group with some members in sun and others in shade, or with dappled light through trees. Watch for shadows cast by one person onto another, especially with side light, and for reflections in glasses across many faces.
For example, if the nearest person is 3 meters and the farthest 4 meters from a light, the difference is about 2 log₂(4/3) ≈ 0.8 stop; moving the light back so that the distances are 6 and 7 meters reduces it to about 0.4 stop.
Camera position and lens choice
For most groups, a camera position slightly above eye level, looking very slightly down, helps rows behind to be seen and is flattering. A step ladder is an essential accessory for group photographers, allowing views over front rows and making large groups appear more evenly. Lens choice balances perspective and space: moderate focal lengths, such as 35 to 85 mm on full frame, from a sufficient distance give natural proportions; wide-angle lenses allow large groups in tight spaces but distort people at the edges of the frame, stretching them sideways, so place the group with a margin at the sides or use a longer lens from farther back. Keep the camera level and centered on the group to avoid tilting verticals and uneven distortion. Leave space around the group for different print crops.
Managing people and expressions
The social side of group photography is often harder than the technical side. Clear, confident, friendly leadership makes groups cooperate: explain what you are doing, use a loud enough voice or a microphone for very large groups, learn and use names where possible, and work quickly, because attention fades fast. Arrange the core people first and add others around them. Give simple instructions to the whole group ("everyone shift your weight to your back foot", "chins down a touch"). Use humor and prompts to create genuine expressions simultaneously across the group; a shared laugh often produces the best frame. Ask people to look at the lens, not at other cameras, which is a common problem at events where guests also photograph the group. Keep a family or event coordinator, or the couple at a wedding, involved to gather people and identify who should be in each group.
Event group shot lists
At weddings, reunions and corporate events, groups follow a planned shot list prepared in advance with the client, listing each combination of people and the order in which they will be photographed. An efficient order starts with the largest group and removes people progressively, or starts with the core couple or honorees and adds people, so that no one waits unnecessarily and elderly or young family members can leave early. Assign a helper who knows the family or team to call names. Allow about one to two minutes per small group combination. Photographing groups immediately after a ceremony or at the start of an event, when everyone is present and fresh, avoids hunting for missing people later.
Blinks, composites and checks
In a group of ten, the chance that someone blinks in any frame is high; in a group of thirty, it is almost certain. Take several frames of each arrangement, in short bursts after a count, and check faces at full magnification on the camera screen or a tethered laptop. Some photographers ask everyone to close their eyes and open them on the count of three, which reduces blinks at the moment of exposure. When no single frame is perfect, faces can be swapped from adjacent frames in post-production (PHOT-202); shooting from a tripod with consistent settings makes this easy. For very large groups or wide spaces, a panorama of several overlapping frames can produce higher resolution, but people must stay still between frames. Before dismissing a group, review the images to confirm that everyone is visible and sharp.
Groups on location
Outdoor and location group portraits benefit from settings with natural levels: staircases, hillsides, benches, low walls and fallen logs make arranging rows easy. Check the light across the whole group, since part of a group may stand in sun while others are in shade, and look for backgrounds without distracting signs, cars or crowds. A step ladder gives a slightly raised view that helps with large groups on flat ground. For wedding and event groups outdoors, choosing a location close to where guests are gathered saves time and keeps people from wandering away.
Formal groups and protocol
Some groups follow formal protocol: boards of directors, graduation classes, military units, sports teams and dignitaries. Order may be determined by rank, role or seniority, with the leader at the center, and uniforms and insignia must be shown correctly. Ask the organizer about protocol in advance, and prepare a seating plan. Name captions for formal groups list people row by row, left to right, so check and record names as you arrange people.
Creative groups
Not every group portrait needs rows. Creative group portraits use movement, such as walking toward the camera together, jumping, or laughing at a shared joke; unusual vantage points, such as shooting from above with everyone lying in a circle; or environmental settings that tell a story about the group. These images often become favorites, but take a classic version first so that the client has a reliable image.
Delivering group images
Deliver group portraits at high resolution, since people often crop or enlarge to see individual faces. For formal groups, provide name lists matching the arrangement, checked carefully against the image.
Groups test a photographer's organization more than any other portrait type, so a calm plan, a clear voice and a good helper are as important as any lens or light; practice directing groups of friends before working with large clients.
Common mistakes
MistakeLining everyone up at the same height.
InsteadUse levels and staggered heads to form shapes.
MistakeShooting groups at f/1.8.
InsteadUse f/5.6–f/11 depending on depth.
MistakeLighting a group from close to one side.
InsteadUse large sources farther away or near the camera axis.
MistakePlacing people at the edges of a wide-angle frame.
InsteadLeave margins or use a longer lens from farther back.
MistakeDismissing the group without checking for blinks.
InsteadShoot several frames and check faces before moving on.
Summary and key terms
- Group portraits must show every face clearly and convey relationships.
- Small groups work best in triangles and diamonds with varied heights.
- Large groups use staggered, rising rows in a gentle arc.
- Prioritize depth of field and focus about a third into the group.
- Light evenly with large or distant sources and avoid mixed sun and shade.
- Use a slightly raised camera, moderate lenses and level framing.
- Lead people clearly, follow shot lists and check for blinks.
- Group portrait
- Portrait of several people together.
- Staggering
- Placing faces in the gaps of the row in front.
- Triangle composition
- Arrangement of heads at three levels.
- Rows
- Lines of people at increasing heights.
- Arc
- Curved row keeping distances to the camera similar.
- Hyperfocal distance
- Focus distance giving maximum depth of field.
- Light falloff
- Decrease in light with distance from a source.
- Shot list
- Planned list of group combinations.
- Face swap
- Replacing a face from another frame.
- Vantage point
- Camera position, such as elevated.
Practice problems
Work each problem on paper first, then reveal the answer to check.
Name the three goals of a group portrait.
Show answer
Clarity, relationships, composition.
Why avoid a straight line of heads?
Show answer
It looks static.
What does staggering achieve?
Show answer
Every face appears in a gap.
Why curve rows into an arc?
Show answer
To keep distances similar for focus and light.
Where should you focus in a deep group?
Show answer
About one third into the group.
Light difference for people at 3 m and 6 m from a light?
Show answer
2 stops.
Why use a step ladder?
Show answer
To see over front rows and raise the camera.
What happens at the edges of wide frames?
Show answer
People are stretched sideways.
Name two shot list order strategies.
Show answer
Largest first then remove, or core first then add.
How can blinks be reduced?
Show answer
Several frames, eyes-closed-then-open count, face swaps.
Lesson quiz · 5 questions
Score 60% or more to complete this lesson.
Create a free account to save your progress, take quizzes and earn a certificate.