
PHOT-240 · Lesson 5 of 12 · 27 min
The zone system
The zone system is a method for previsualizing a photograph and controlling exposure and development so that the final print matches that vision. Developed by Ansel Adams and Fred Archer around 1939 to 1940, and described in Adams's books The Negative and The Print, it links three things: the tones of the scene, measured with a meter; the densities of the negative, controlled by exposure and development; and the tones of the print. Although it was designed for sheet film, where each negative can be developed individually, its principles help every film photographer understand exposure and contrast, and they underlie many digital exposure practices. This lesson covers previsualization, the zones and their descriptions, placement and fall, measuring scene contrast, expansion and contraction development, applying the system to roll film, and personal film speed and development testing.
Previsualization
Adams emphasized previsualization: imagining the finished print before releasing the shutter, including how bright or dark each important area should appear. A photographer standing before a granite cliff in shade with a sunlit waterfall might decide that the shaded rock should be a deep, textured dark gray, the waterfall a brilliant white with a hint of texture, and the foreground grass a mid-gray. The zone system then provides the means to achieve this: placing the rock's exposure on a particular zone, checking where the waterfall falls, and adjusting development so that the waterfall prints with the desired texture. Previsualization turns exposure from a technical calculation into an expressive decision.
The zones
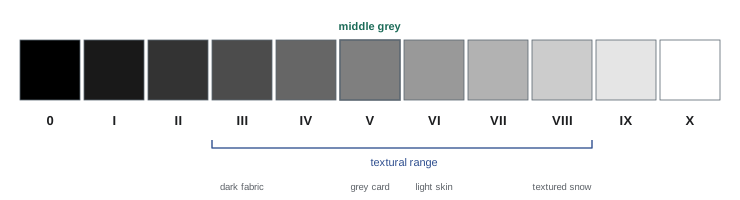
The zone system divides the tonal scale from pure black to pure white into eleven zones, numbered with Roman numerals from 0 to X, each one stop apart. Zone V is middle gray, the tone a meter assumes. Each zone has a typical description:
| Zone | Description | Typical subject |
|---|---|---|
| 0 | Pure black, maximum density of the paper | Deep openings, no detail |
| I | Near black, first tonality without texture | Deep shadows |
| II | First suggestion of texture | Dark shadows with faint detail |
| III | Dark tones with full texture and detail | Dark fabrics, shadowed foliage |
| IV | Dark mid-tones | Shadowed skin, dark stone, foliage |
| V | Middle gray, 18 % reflectance | Gray card, weathered wood, clear north sky |
| VI | Light mid-tones | Average light skin in sun, light stone |
| VII | Light tones with texture | Very light skin, light gray concrete |
| VIII | Whites with delicate texture | Textured snow, white paint in light |
| IX | Near white without texture | Glaring snow, bright surfaces |
| X | Pure paper white | Light sources, specular highlights |
The important zones for detail are generally III to VIII, the textural range; zones II and IX hold only faint tone, and 0 and X are pure black and white. Because each zone is one stop, a subject five stops brighter than another lies five zones higher.
Placement and fall
The zone system uses two key ideas. Placement means deciding which zone an important area should occupy and setting exposure accordingly. Any meter reading, taken from any area, would place that area in Zone V; to place it elsewhere, adjust the exposure by the number of zones. To place a shaded rock in Zone III, two zones below V, give two stops less exposure than the meter reading of the rock. Usually, photographers place an important shadow, the area that must retain detail, since exposure determines shadow density.
Fall describes where other areas of the scene land once one area has been placed. If the waterfall is metered at five stops brighter than the rock, and the rock is placed on Zone III, the waterfall falls on Zone VIII, a textured white. If the waterfall were seven stops brighter, it would fall on Zone X, pure white without texture, unless development is adjusted. Placement is a choice; fall is a consequence that the photographer can modify through development.
Worked problem
Placement and fall in a landscape
With ISO 125 film, a photographer spot-meters a shaded tree trunk at 1/30 s at f/8, and a sunlit cloud at 1/1000 s at f/8. He wants the trunk in Zone III. What exposure should he give, and where will the cloud fall?
Show solution
- Difference between readings: 1/30 to 1/1000 s is 5 stops (1/60, 1/125, 1/250, 1/500, 1/1000).
- Placing the trunk on Zone III requires 2 stops less than its reading: 1/30 s at f/16, or 1/125 s at f/8.
- The cloud, 5 stops brighter than the trunk, falls on Zone III + 5 = Zone VIII.
- Zone VIII gives a white cloud with delicate texture, so normal development is suitable.
Answer: Expose at 1/125 s at f/8 (or an equivalent); the cloud falls on Zone VIII, so develop normally.
Measuring scene contrast
The subject brightness range, the difference in stops between the darkest area that needs detail and the brightest area that needs texture, determines what development is needed. A normal scene, in zone system terms, is one where the shadow placed on Zone III has highlights falling on Zone VIII, a range of five stops between them; more broadly, a scene with about seven stops from Zone II to IX prints well on normal paper with normal development. Spot meters make measuring the range straightforward: meter the key shadow and the key highlight, count the stops, place the shadow, and see where the highlight falls. Scenes in flat light, such as overcast days and fog, have short ranges; scenes in harsh sun with deep shade, or interiors with windows, have long ranges.
Expansion and contraction
The second half of the system is development control, based on the principle that development time affects highlight density far more than shadow density, because shadows contain few exposed crystals to develop, while highlights contain many. Extending development raises highlights more than shadows, expanding contrast; reducing development lowers highlights, contracting contrast. Adams described development by the letter N:
- N (normal): highlights fall where placed; normal development.
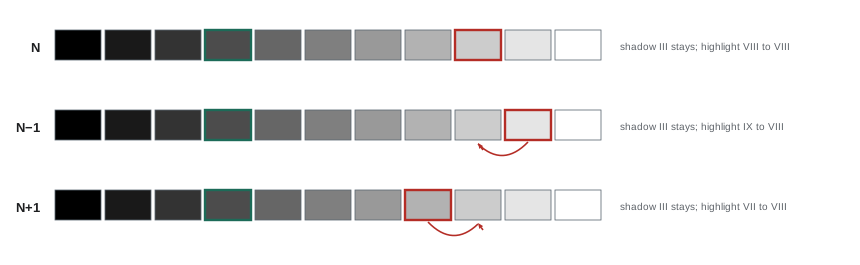
- N+1: development that moves a Zone VII highlight to Zone VIII, expanding a flat scene by one zone; typically about 25 to 40 % longer development, depending on film and developer.
- N+2: expands by two zones, for very flat scenes.
- N−1: development that moves a Zone IX highlight to Zone VIII, contracting a contrasty scene by one zone; typically about 20 to 30 % shorter.
- N−2: contracts by two zones, often with dilute or compensating developers for very contrasty scenes.
The exact times must be determined by testing for each combination of film, developer, agitation and enlarger. In the previous example, if the cloud had fallen on Zone IX, the photographer would choose N−1 development to bring it down to Zone VIII.
The zone system with roll film
Roll film presents a challenge: every frame on the roll receives the same development, so frames needing N−1 and N+1 cannot both be accommodated. Approaches include:
- Dedicating rolls or camera backs to particular contrast conditions, such as one roll for contrasty sunny scenes and another for overcast days, a practice made easier by medium format cameras with interchangeable backs.
- Exposing for the shadows and developing for the average scene, relying on variable-contrast paper (Lesson 9) to adjust contrast during printing.
- Slightly reducing development as a default for roll film, giving negatives that are easier to print and adjusting paper contrast upward when needed.
- Using compensating developers or dilute developers with reduced agitation, which control highlights in contrasty scenes.
In practice, many roll-film photographers use the zone system mainly for exposure placement, and rely on variable-contrast papers for contrast control, which works very well.
Personal film speed and development testing
Manufacturers' speeds and development times are starting points; actual results depend on your camera, lens, meter, thermometer, agitation, water and enlarger. Zone system testing finds your personal exposure index and normal development time:
- Film speed test: photograph an evenly lit, textured card placed on Zone I at different exposure indexes (for example at box speed and one-third, two-thirds and one stop slower). After development, the correct EI is the one producing a Zone I density about 0.1 above base plus fog, measured with a densitometer, or the first frame showing a just-visible tone when printed at the minimum time to print the clear film base to maximum black.
- Development test: with the EI established, photograph the card placed on Zone VIII, develop at several times, and find the time giving a Zone VIII density appropriate for your enlarger, typically about 1.2 to 1.35 above base plus fog for diffusion enlargers, or a print with delicate texture at the standard printing time.
Many photographers find their personal EI is about two-thirds to one stop slower than box speed. Testing is time-consuming but makes subsequent work more predictable and confident.
Applying the zone system with digital tools
The zone system's concepts translate directly into digital practice. Placing tones in zones is similar to exposing to the right or placing skin tones on a waveform; development control is similar to tone curves and contrast adjustment. Phone apps that display spot meter readings in zones, and digital camera histograms, can help film photographers previsualize. Some photographers use a digital camera as a light meter and previsualization tool alongside a film camera, checking the scene's range before committing a sheet of film.
Previsualizing with a zone ruler
A zone ruler, a printed scale of zones from 0 to X, or a modified meter dial marked with zones, helps apply the system in the field. The photographer spot-meters important areas, writes their readings against the zones, chooses a placement for the key shadow, and reads off where every other area falls. Some photographers mark meter dials with tape showing zones relative to the meter's Zone V pointer. Phone apps provide the same function, displaying spot readings as zones. Writing the readings and placements in a notebook for each sheet or roll makes it possible to review decisions against results later.
Common misunderstandings
The zone system has a reputation for complexity, and several misunderstandings are common. It does not require every photograph to contain all eleven zones; a foggy landscape might use only zones IV to VII by design. It does not dictate how a print should look; previsualization is the photographer's choice. It is not only for landscapes; it applies to portraits, architecture and still life. And it does not replace looking at negatives and prints; testing and evaluation are central to it. Understood simply, the zone system is a vocabulary for talking about tones and a method for getting the tones you want.
Worked problem
Planning development for a contrasty interior
A large format photographer meters a dark wooden cabinet she wants on Zone III and a sunlit window frame she wants on Zone VIII with texture. The window meters 7 stops brighter than the cabinet. What development should she plan?
Show solution
- Placing the cabinet on Zone III puts the window frame at III + 7 = Zone X.
- She wants the window on Zone VIII, two zones lower.
- Plan N−2 development for this sheet, typically with a dilute or compensating developer and reduced agitation, determined by testing.
Answer: Place the cabinet on Zone III and give the sheet N−2 development to bring the window from Zone X to Zone VIII.
The zone system and print tones
The zones correspond to print tones only when the printing paper and process match the negative's density range. For a normally developed negative printed on normal-contrast paper, Zone V in the scene prints as middle gray, Zone III as a textured dark gray, and Zone VIII as a textured white. Variable-contrast papers give extra flexibility: a negative that came out slightly contrasty can be printed at grade 1½ to restore the intended tones. Adams himself relied on both precise negatives and skilled printing, including dodging and burning, to achieve his previsualized prints.
Practicing the zone system
A good exercise is to photograph the same scene several times, placing the key shadow on Zones II, III and IV, and then print each negative at the same time and grade. Comparing the prints shows how placement changes the mood of an image and builds intuition for future decisions.
Common mistakes
MistakePlacing highlights rather than shadows.
InsteadPlace the important shadow; development controls highlights.
MistakeAssuming meter readings give correct tones.
InsteadMeters place readings on Zone V; adjust for placement.
MistakeDeveloping a roll for one frame's contrast.
InsteadDevelop for the average or dedicate rolls to conditions.
MistakeUsing published times without testing.
InsteadTest personal EI and development time.
MistakeExpecting development to rescue shadows.
InsteadDevelopment affects highlights far more than shadows.
Summary and key terms
- The zone system links scene tones, negative density and print tones.
- Previsualization decides how each area should look in the print.
- Eleven zones from 0 to X are one stop apart; Zone V is middle gray.
- Place the important shadow; other areas fall according to their brightness.
- N+ development expands contrast; N− contracts it.
- Roll film users rely on placement and variable-contrast paper.
- Testing finds personal EI and normal development time.
- Zone system
- Method linking exposure, development and print tones.
- Previsualization
- Imagining the final print before exposure.
- Zone
- One-stop step on an eleven-step tonal scale.
- Placement
- Choosing the zone for a metered area.
- Fall
- Where other areas land after placement.
- Subject brightness range
- Stops between key shadow and highlight.
- Expansion
- Extended development to increase contrast (N+).
- Contraction
- Reduced development to lower contrast (N−).
- Textural range
- Zones III to VIII showing detail.
- Densitometer
- Instrument that measures density.
Practice problems
Work each problem on paper first, then reveal the answer to check.
Who developed the zone system?
Show answer
Ansel Adams and Fred Archer.
How many zones are there?
Show answer
Eleven, from 0 to X.
Which zone is middle gray?
Show answer
Zone V.
What is the textural range?
Show answer
Zones III to VIII.
How do you place a shadow on Zone III?
Show answer
Give two stops less than its meter reading.
A highlight 6 stops brighter than a Zone III shadow falls on?
Show answer
Zone IX.
What development brings Zone IX to VIII?
Show answer
N−1.
Why does development affect highlights more?
Show answer
Highlights contain more exposed crystals.
What density defines Zone I in testing?
Show answer
About 0.1 above base plus fog.
How do roll-film users control contrast?
Show answer
Variable-contrast paper, dedicated rolls, compensating developers.
Lesson quiz · 5 questions
Score 60% or more to complete this lesson.
Create a free account to save your progress, take quizzes and earn a certificate.