
PHOT-240 · Lesson 7 of 12 · 26 min
Reading and troubleshooting negatives
When negatives come out of the tank, they reveal not only the photographs but also a record of every decision and mistake along the way. Learning to read negatives, judging exposure and development from their densities, and diagnosing faults from their appearance is an essential skill that makes every subsequent roll better. Problems that look mysterious at first, such as blank frames, streaks, spots, fog and scratches, usually have clear causes. This lesson covers evaluating negatives on a light box, distinguishing exposure from development problems, common camera and loading faults, development faults, fixing and washing faults, drying and handling faults, and rescuing problem negatives.
Evaluating negatives on a light box
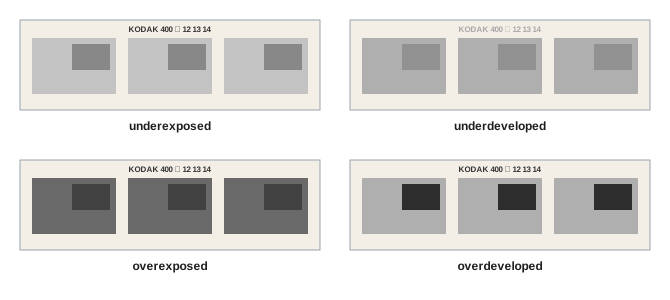
Examine dry negatives on a light box or against an evenly lit window, using a loupe to check sharpness and detail. Look first at the film edges: the edge markings (manufacturer name, film type and frame numbers) are printed onto the film by exposure during manufacture, so they develop with the film. Clear, dense edge markings indicate the film was developed; missing or faint markings point to development problems. Then look at the frames themselves. A well-exposed and well-developed negative shows visible detail in the important shadow areas, which appear only slightly darker than the clear film base, and dense but not completely opaque highlights through which you can still see detail when holding the negative up to a bright light. Print-through is a traditional test: a correctly dense negative laid on newsprint allows text to be read faintly through the mid-tones.
| Appearance | Shadows | Highlights | Likely cause |
|---|---|---|---|
| Thin overall | Clear, no detail | Gray, weak | Underexposure |
| Thin highlights, good shadows | Detailed | Weak, flat | Underdevelopment |
| Dense overall | Detailed, dense | Very dense | Overexposure |
| Dense highlights, good shadows | Detailed | Blocked, very dense | Overdevelopment |
| Thin shadows, dense highlights | Clear | Very dense | Underexposure with overdevelopment, or a contrasty scene |
| Good shadows and highlights | Detailed | Dense with detail | Correct exposure and development |
Exposure or development?
The key to diagnosis is that exposure mainly controls shadow density, while development mainly controls highlight density and contrast. A negative with empty shadows but reasonable highlights was underexposed; one with good shadows but weak, gray highlights was underdeveloped. Both can produce thin-looking negatives, but they need different corrections: more exposure in the first case, more development in the second. Similarly, dense negatives with detailed shadows and printable highlights were probably overexposed, which is usually harmless, while negatives with blocked, chalky highlights were overdeveloped. Comparing the edge markings, which receive a fixed exposure, helps separate the two: faint markings indicate underdevelopment, while normal markings with thin frames indicate underexposure.
Worked problem
Diagnosing a thin roll
A student's roll of ISO 400 film, shot indoors, has very thin frames with almost clear shadows. The edge markings are clear and dense. The highlights, such as windows, have reasonable density. What happened, and what should change?
Show solution
- Dense edge markings show that development was normal.
- Clear shadows with reasonable highlights indicate the scene was underexposed.
- Indoor light was probably dimmer than the meter suggested, or the meter was misled by bright windows.
- Next time, meter the shadows or use incident metering, give more exposure, or use faster film or push processing.
Answer: The roll was underexposed, not underdeveloped; increase exposure, meter for the shadows, or use faster film.
Camera and loading faults
Some faults originate before development:
- Completely blank film with edge markings: the film never advanced through the camera, the lens cap was on, or the shutter did not open. Check that the film was engaged on the take-up spool and the rewind knob turned.
- Completely clear film without edge markings: the film was not developed, often because fixer was poured in before developer.
- Completely black film: the film was exposed to light, for example by opening the camera back or loading the reel in a room that was not fully dark.
- Light leaks: streaks or blotches of extra density, often reaching from the edge of the frame, from worn light seals, a damaged camera body or loosely wound 120 rolls.
- Overlapping frames: a faulty advance mechanism or film slipping.
- Frames with one dense edge or uneven exposure: a shutter capping, where the curtains travel unevenly at fast speeds.
- Fogged edges on 120 rolls: loosely wound rolls exposed to light at the edges.
- Blurred images throughout: camera shake, missed focus or a lens problem; check film flatness and lens alignment if consistent.
Development faults
Faults during development include:
- Uneven development and streaks: insufficient or inconsistent agitation, or too little developer to cover the reel.
- Bromide drag or surge marks: streaks of density difference running from the sprocket holes or dense areas, caused by exhausted developer by-products flowing across the film, typically from too little agitation or excessive agitation patterns that create regular flows.
- Air bells: small clear spots on the negative (dark spots on the print) where air bubbles clung to the film and prevented development; tapping the tank after pouring prevents them.
- Kinks and crescent marks: dark or light half-moon marks from bending the film while loading.
- Areas where film touched itself on the reel: undeveloped patches where layers overlapped.
- Fog: an overall grayish density in clear areas, from exhausted or contaminated developer, excessive development, expired film, heat, or light leaks in the tank or darkroom.
- Reticulation: a crazed pattern in the emulsion from sudden temperature changes, rare with modern films.
Fixing and washing faults
Fixing problems include a milky, cloudy or purple-pink cast in the film, indicating insufficient fixing or exhausted fixer, often visible as residual anti-halation dye or undissolved halide; re-fixing in fresh fixer usually solves this. Inadequate washing leaves residual fixer, which is invisible at first but causes yellowing, staining and fading years later; following recommended wash times protects negatives for the long term. A brown or yellow stain can also come from oxidized developer, staining developers or contamination.
Drying and handling faults
Drying marks, irregular spots or streaks where water droplets dried slowly, appear when wetting agent is not used or water is hard. Rewashing the film, using a final rinse in distilled water with wetting agent, and drying again often removes them. Dust and lint embedded in the emulsion while drying produce white specks on prints; dry film in a dust-free space and avoid squeegees. Scratches, lines running along the length of the film, can come from grit in the camera's film path, felt light traps on cassettes, squeegees or careless handling; lines that appear on every roll at the same position suggest a camera or cassette problem. Fingerprints on the emulsion can become permanent; handle negatives by the edges and wear cotton or nitrile gloves when cutting and sleeving.
| Fault | Appearance on negative | Likely cause | Prevention |
|---|---|---|---|
| Air bells | Small clear round spots | Bubbles clinging to film | Tap tank after pouring |
| Bromide drag | Streaks from sprocket holes | Inadequate or patterned agitation | Consistent, varied inversions |
| Crescent marks | Half-moon marks | Kinked film during loading | Handle film gently |
| Light leaks | Dense streaks from edges | Worn seals, damaged body | Replace seals, check camera |
| Drying marks | Irregular spots | No wetting agent, hard water | Wetting agent, distilled rinse |
| Scratches | Lengthwise lines | Grit in camera or cassette | Clean film path, care in handling |
Rescuing problem negatives
Some problems can be corrected after development. Under-fixed negatives can be re-fixed and washed again. Drying marks can be removed by rewashing. Very thin negatives can sometimes be intensified chemically, for example with selenium toner, which slightly increases highlight density, or with other intensifiers, though these involve hazardous chemicals and should be handled carefully. Very dense negatives can be reduced with Farmer's reducer, a mixture of potassium ferricyanide and fixer, which bleaches density; it must be used cautiously. Scratches on the base side can be filled with scratch-filling solutions or minimized by printing with a diffusion enlarger or in a wet-gate scanner. Many problems are easier to correct by scanning and digital retouching in a hybrid workflow (Lesson 11). Above all, learn from faults: each identified cause leads to a habit that prevents it next time.
A systematic approach to diagnosis
When something goes wrong, work through the process in order, from camera to drying, rather than guessing. First, check the whole roll: is the problem on every frame, some frames, or only at certain positions? Problems on every frame at the same position suggest a camera or development fault; problems on some frames suggest exposure or handling issues specific to those shots. Second, check the edge markings to confirm development. Third, compare frames shot in similar light. Fourth, review your notes: the exposure settings, metering method, developer, dilution, temperature, time and agitation. Fifth, examine the physical faults, such as spots, streaks and scratches, under a loupe and note their shape, color and orientation. Most faults can be traced to a single cause by this method.
Light leaks in detail
Light leaks deserve particular attention because they can come from several places. Leaks from worn camera seals usually appear as streaks or fogging reaching into frames from one edge, often at the same position on every frame, and are worse in bright sunlight. Leaks from the film cassette or felt light trap appear along the edges of the film, often at the start of the roll. Leaks during loading in a changing bag or darkroom appear as overall fog or as patches on the outer layers of the roll, with inner frames less affected. Leaks in a developing tank, from a lid not fully seated, appear at the top or bottom of the film. Matching the pattern to the source narrows down the cause.
Fog and its sources
Overall fog, a gray veil over the whole negative including the edges and spaces between frames, raises the base plus fog density and reduces contrast in the shadows. Sources include expired or heat-damaged film, X-ray exposure from airport scanners, contaminated or exhausted developer, development at too high a temperature or for too long, and light leaks in the darkroom or changing bag. Measuring base plus fog on an unexposed section with a densitometer, and comparing with a fresh roll developed the same way, distinguishes film fog from process fog. Some fog is normal; fast films have higher base plus fog than slow ones.
Uneven development patterns
Uneven development can take several forms. Streaks running from sprocket holes indicate bromide drag. Mottling or blotchiness across the frame suggests insufficient agitation, particularly with stand development. Denser edges than centers can result from vigorous agitation that moves developer quickly along the film edges, or from reels that hold the film too close to the tank walls. Bands at the top or bottom of the film suggest too little developer, so that part of the film was not covered, a common problem when a tank designed for two reels is used with one reel and the volume for one, but the reel slides up the central column. Using a reel stopper or filling the tank fully solves this.
Learning from contact sheets
Contact sheets made at the minimum time for maximum black are powerful diagnostic tools. A roll that is consistently dark on the contact sheet indicates underexposure or underdevelopment, and frames that look right reveal the conditions under which your exposure method works. Comparing contact sheets across rolls reveals patterns: perhaps backlit scenes are always underexposed, or night scenes overexposed. Keep contact sheets with notes, and review them periodically to refine your methods.
Scratches and their position
The position of a scratch on the negative reveals its source. A scratch on the emulsion side, which looks like a fine line through the image and may print as a dark or white line depending on depth, often comes from grit in the camera's pressure plate or film rails. A scratch on the base side is shallower and can often be minimized by printing with a diffusion enlarger or by applying a scratch-filling solution. Scratches that run continuously across several frames came from the camera or cassette; scratches confined to a frame or two came from handling after processing. Cleaning the camera's film path with a blower and soft brush before loading, and storing cassettes in their containers, prevent most scratches.
Keeping a fault reference
Many printers keep a small reference of faulty negatives, labeled with their causes: an air bell, bromide drag, a light leak, under- and overdevelopment. Comparing new faults with this reference speeds diagnosis and helps students learn to recognize problems quickly.
Common mistakes
MistakeAssuming every thin negative is underexposed.
InsteadCheck edge markings to separate exposure from development.
MistakeIgnoring a milky cast after fixing.
InsteadRe-fix in fresh fixer and rewash.
MistakeUsing a squeegee on wet film.
InsteadUse wetting agent and let film drip dry.
MistakeTouching the emulsion.
InsteadHandle negatives by the edges with gloves.
MistakeNot recording faults.
InsteadLog causes and corrections to prevent repeats.
Summary and key terms
- Read negatives on a light box with a loupe, starting with edge markings.
- Exposure controls shadow density; development controls highlight density.
- Edge markings separate development faults from exposure faults.
- Camera and loading faults include blank film, light leaks and fogged edges.
- Development faults include streaks, bromide drag, air bells and fog.
- Fixing, washing and drying faults affect clarity and permanence.
- Some faults can be corrected; all should inform better habits.
- Light box
- Even, backlit surface for viewing negatives.
- Loupe
- Magnifier for inspecting negatives.
- Edge markings
- Pre-exposed text and numbers on film edges.
- Thin negative
- Negative with low density.
- Dense negative
- Negative with high density.
- Bromide drag
- Streaks caused by developer by-products.
- Air bell
- Clear spot from a bubble during development.
- Fog
- Unwanted overall density.
- Intensifier
- Chemical that increases negative density.
- Farmer's reducer
- Ferricyanide solution that reduces density.
Practice problems
Work each problem on paper first, then reveal the answer to check.
Why examine edge markings first?
Show answer
They show whether development was normal.
Thin shadows, normal highlights: cause?
Show answer
Underexposure.
Good shadows, weak highlights: cause?
Show answer
Underdevelopment.
Clear film without edge markings?
Show answer
Not developed, e.g. fixer poured first.
Black film throughout?
Show answer
Exposed to light.
What causes air bells?
Show answer
Bubbles clinging to the film.
What does a milky cast indicate?
Show answer
Insufficient fixing.
How are drying marks removed?
Show answer
Rewash with wetting agent and dry again.
What do lengthwise scratches suggest?
Show answer
Grit in the camera, cassette or handling.
What reduces a very dense negative?
Show answer
Farmer's reducer.
Lesson quiz · 5 questions
Score 60% or more to complete this lesson.
Create a free account to save your progress, take quizzes and earn a certificate.