
PHOT-301 · Lesson 6 of 12 · 25 min
Input profiling: cameras, scanners and reproduction
Color management begins at capture. A camera or scanner records color according to its own spectral sensitivities, which differ from those of the human eye, and an input profile translates those device values into a standard color space. For most photography, the generic profiles in raw processors work well. But for work in which color accuracy is the purpose, such as reproducing paintings and documents, photographing products whose color must match, scientific and forensic imaging, and scanning film, custom input profiles and controlled capture make the difference. This lesson covers how cameras see color differently from people, generic and custom camera profiles, color targets, building a camera profile, controlled lighting for reproduction, scanners and film scanning, the cultural heritage imaging guidelines, and evaluating accuracy.
How cameras see color
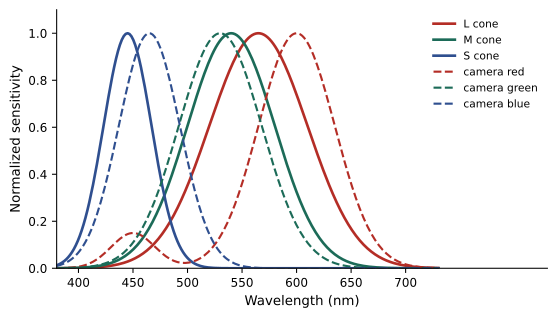
A camera sensor's red, green and blue filters have spectral sensitivity curves that differ from the eye's cone sensitivities. As a result, a camera is not colorimetric: it cannot perfectly predict human color perception for all spectra. Two surfaces that look identical to a person may record differently, and two that look different may record the same, a phenomenon called camera metamerism. The raw processor's profile uses a mathematical transform, typically a matrix combined with look-up tables, to estimate the XYZ values a human observer would see from the camera's RGB values. The transform works very well for most natural colors but has errors for some saturated colors and unusual spectra, such as certain blue and violet flowers, synthetic dyes and fluorescent materials. Understanding this limit helps explain why some colors are hard to reproduce no matter how carefully profiles are made.
Generic and custom camera profiles
Raw processors include generic profiles for each camera model, created by the software developer from measurements of one or more cameras under standard illuminants. They are designed to give pleasing, consistent color across many scenes and are often adjusted for appearance rather than strict accuracy, with slightly increased contrast and saturation and preferred skin tones. Camera-matching profiles imitate the manufacturer's picture styles. Custom profiles are created by photographing a color target under the actual shooting light and comparing the recorded colors with the target's known values. They correct both the individual camera's response and the specific light source, giving more accurate color under those conditions. Dual-illuminant profiles, built from target captures under two light sources such as daylight and tungsten, interpolate between them for intermediate white balances.
Color targets
Color targets carry patches with measured color values. Common targets include:
- The 24-patch ColorChecker Classic, with natural colors, primaries and a grayscale, widely used for checking and basic profiling.
- Larger digital targets such as the ColorChecker Digital SG with about 140 patches, designed for detailed camera profiling, including patches on the edge of the gamut and skin tones.
- Passport-style targets combining a profiling chart, a white balance card and a creative enhancement chart, convenient for location work.
- Specialized targets for cultural heritage reproduction, such as those used in the FADGI and Metamorfoze guidelines, combining color patches, grayscales, resolution and geometry markings.
Targets should be stored away from light and replaced periodically, since their colors change with age, and their reference values should come from measurements of the specific target or batch where possible. Generic reference data are less accurate.
| Target | Patches | Typical use |
|---|---|---|
| ColorChecker Classic | 24 | Checking color, basic profiles, white balance |
| ColorChecker Digital SG | About 140 | Detailed camera profiling |
| Passport-style targets | 24 plus white balance and enhancement | Location profiling |
| Heritage imaging targets | Varies, with grayscale and resolution marks | Museum and archive reproduction |
Building a camera profile
Creating a custom camera profile follows a repeatable process:
- Light the target evenly with the light you will use for the work, avoiding glare and reflections, typically at about 45 degrees on each side.
- Place the target flat and square to the camera, filling a reasonable part of the frame, and expose correctly in raw, with the white patch well below clipping.
- Process the raw file with neutral settings: no creative adjustments, linear or standard tone, and white balance set from a neutral patch.
- Use profiling software, such as the tools supplied with targets, Lumariver, basICColor input or open-source tools built on ArgyllCMS and DCamProf, to locate the patches and compute a profile comparing measured and reference values.
- Install the profile in the raw processor and apply it to images shot under the same light.
- Verify by photographing a check target or a different chart, and measuring Delta E between reproduced and reference values.
Profiles are specific to the camera body, lens (to a small degree), light source and processing software. Rebuild them when any of these change significantly.
Worked problem
Evaluating a custom profile
A reproduction photographer profiles a camera under LED copy lights. Using the generic profile, the average Delta E 2000 across a 24-patch target is 4.1, with a maximum of 9.2 on the cyan patch. With the custom profile, the average is 1.3 and the maximum 3.4. Is the custom profile an improvement, and does it meet a heritage guideline requiring an average below 2 and maximum below 5?
Show solution
- The average error fell from 4.1 to 1.3, a large improvement.
- The maximum error fell from 9.2 to 3.4.
- Both meet the example requirements of average below 2 and maximum below 5.
- Document the profile, light setup and verification results for the project.
Answer: Yes: the custom profile reduces average error to 1.3 and maximum to 3.4, meeting the guideline.
Lighting for reproduction
Accurate reproduction of flat artwork, documents and photographs requires controlled lighting. The standard copy setup places two identical lights at about 45 degrees to the artwork on each side, at equal distances, to provide even illumination and avoid glare from the surface. Uniformity should be checked with a meter or by photographing a gray card at the center and corners; variations should be within about 5 % or corrected with flat-field correction in software. High-CRI LED or electronic flash sources are used, and polarizing filters on both lights and lens (cross-polarization) can eliminate glare from varnished paintings and glossy surfaces, though they also change the appearance of some surfaces and reduce texture. Raking light at a low angle reveals texture and brushstrokes and may be photographed as a separate documentation image. Glass and reflective frames should be removed where possible.
Scanners and film scanning
Flatbed and film scanners also have spectral sensitivities and need profiles. Flatbed scanners are profiled with reflective targets such as IT8.7/2 or larger targets; film scanners are profiled with transparency targets such as IT8.7/1 on the relevant film stock. Profiling color negative film is more complex, because the orange mask and the film's design for printing on photographic paper mean there is no single "correct" color in the negative; inversion software applies film-specific transformations, and many photographers now digitize film with a camera, a macro lens and a high-CRI light source, then invert in software. Scanning black-and-white negatives requires attention to tonal range rather than color. Scanner resolution in pixels per inch, bit depth and dynamic range, expressed as maximum density, affect quality; drum scanners and high-end flatbeds remain valued for large-format film.
Cultural heritage imaging guidelines
Museums, libraries and archives digitize collections according to published guidelines that specify color accuracy, tonal response, resolution, noise and lighting uniformity. In the United States, the Federal Agencies Digital Guidelines Initiative (FADGI) defines quality levels from one star to four stars for different material types. In Europe, the Metamorfoze guidelines from the Netherlands and the ISO 19264-1 standard play similar roles. Canadian institutions such as Library and Archives Canada and provincial archives often refer to these international guidelines. Compliance is measured with specialized targets and analysis software, and the resulting digital masters are expected to remain accurate and usable for decades. Photographers working in reproduction should learn the relevant guideline for each client.
When accuracy is not the goal
Most photography does not aim for strict colorimetric accuracy. A landscape, portrait or fashion image aims for color that looks right, expresses mood and flatters subjects, which may differ from measured accuracy. Generic profiles and creative profiles are designed for this. Even so, custom profiles provide a neutral, accurate starting point from which creative adjustments can be made deliberately, and they reduce the color differences between cameras in multi-camera shoots. Knowing when accuracy matters, and when appearance and intent matter more, is part of professional judgment.
Profiling for multiple light sources
Reproduction studios often work with a single, stable lighting setup, but product and location photographers may face many different light sources. A profile built for one light can introduce errors under another, particularly with LED lights of different spectra. Options include building profiles for each regular light source, using dual-illuminant profiles that cover a range of white balances, or capturing a target in every setup and building or checking a profile on location. Some software can create a profile directly from a target shot in each scene. Keeping a target in the kit and shooting it at the start of each setup is inexpensive insurance.
Fluorescent and difficult colors
Some materials challenge every camera and profile: fluorescent inks and fabrics, which emit light under UV; optical brighteners in clothing and paper; certain blue, purple and turquoise dyes; and iridescent and metallic surfaces whose color changes with angle. Cameras may record these colors inaccurately because their spectra fall where camera and eye sensitivities differ most. Strategies include filtering UV from lights, adjusting color locally in editing while comparing with the physical object under standard light, and photographing reference swatches alongside products. Clients should be told when a color cannot be reproduced exactly.
Documenting capture for reproduction
Accurate reproduction depends on documentation. Record the camera, lens, aperture, focus distance, lighting setup, light source type, distance and angle, polarization, white balance target, profile used and verification results for each session, and include the target in a reference frame at the start. Many institutions keep capture metadata with the digital master, so future users know how it was created. Good documentation makes it possible to reproduce or correct work years later, and to defend the accuracy of reproductions.
Monitoring consistency over time
Lights age, cameras are serviced and software is updated. In long digitization projects, shoot a target regularly, for example at the start of each day, and measure it to confirm that color accuracy remains within tolerance. Trends in Delta E over time reveal drift before it becomes a problem.
Checking color without a full profile
Not every project needs a custom profile. For product and portrait sessions, photographing a ColorChecker in the first frame of each lighting setup allows quick white balance and visual checks against the known patches, and color sampler readings in the raw processor reveal casts and saturation errors. If results are consistently off for specific colors, a custom profile may be justified. Comparing generic and custom profiles on the same target capture shows the improvement in numbers and helps decide whether the effort is worthwhile for a given client or type of work.
Ethics of color accuracy
In product photography, accurate color is not only a technical goal but a matter of honesty with customers, who rely on images to decide what to buy. In reproduction of artworks and documents, inaccurate color can misrepresent an artist's work or historical evidence. Photographers should avoid exaggerating colors in images that claim to represent products or originals, and should disclose limitations when a color cannot be reproduced faithfully.
Common mistakes
MistakeProfiling under light different from the shoot.
InsteadCapture the target under the actual working light.
MistakeOverexposing the white patch of the target.
InsteadExpose correctly with highlights below clipping.
MistakeUsing old, faded targets with generic data.
InsteadReplace targets and use measured reference values.
MistakeUneven lighting on artwork.
InsteadUse symmetrical lights and check uniformity.
MistakeExpecting perfect accuracy for every color.
InsteadUnderstand camera metamerism limits and verify with Delta E.
Summary and key terms
- Camera sensitivities differ from human vision, so cameras are not colorimetric.
- Generic profiles aim for pleasing color; custom profiles for accuracy under specific light.
- Targets range from 24 patches to detailed profiling and heritage charts.
- Build profiles from correctly exposed, neutrally processed raw captures.
- Reproduction requires even, glare-free lighting, often with cross-polarization.
- Scanners need profiles; color negatives need inversion processing.
- Heritage guidelines such as FADGI, Metamorfoze and ISO 19264-1 set accuracy levels.
- Input profile
- Profile describing a camera or scanner.
- Camera metamerism
- Camera and eye disagreeing about which colors match.
- Color target
- Chart with patches of known color values.
- Custom camera profile
- Profile built from a target under specific light.
- Dual-illuminant profile
- Profile built from captures under two light sources.
- Copy lighting
- Symmetrical lighting for flat reproduction.
- Cross-polarization
- Polarizers on lights and lens to remove glare.
- Flat-field correction
- Software correction of uneven illumination.
- FADGI
- US federal guidelines for digitization quality.
- IT8 target
- Standard target for scanner profiling.
Practice problems
Work each problem on paper first, then reveal the answer to check.
Why are cameras not colorimetric?
Show answer
Their sensitivities differ from the eye's cone responses.
What do generic profiles aim for?
Show answer
Pleasing, consistent color.
When are custom profiles valuable?
Show answer
Reproduction, products, scientific work.
Name two color targets.
Show answer
ColorChecker Classic, Digital SG, passport targets, heritage targets.
How should the raw file be processed for profiling?
Show answer
Neutrally, with white balance from a gray patch.
What is a good average Delta E for a custom profile?
Show answer
Below about 2.
What is the standard copy-light angle?
Show answer
About 45 degrees each side.
What does cross-polarization remove?
Show answer
Glare from glossy surfaces.
Which target profiles transparency scanners?
Show answer
IT8.7/1.
Name two heritage imaging guidelines.
Show answer
FADGI, Metamorfoze, ISO 19264-1.
Lesson quiz · 5 questions
Score 60% or more to complete this lesson.
Create a free account to save your progress, take quizzes and earn a certificate.