
PHOT-330 · Lesson 3 of 12 · 27 min
Landscape composition
Composition in landscape photography is the art of turning a messy, three-dimensional world into a clear, two-dimensional image. Unlike a studio, the landscape cannot be rearranged: mountains, trees and rivers stay where they are. The photographer's main tools are position, focal length, framing, timing and choice of subject. This lesson covers how to find a subject, build depth with foreground, middle ground and background, use lines, shapes and patterns, handle the horizon, show scale, simplify scenes, work with intimate landscapes, and use panoramas. Earlier courses introduced general composition principles; here we apply them to the special challenges of land, water and sky.
Start with the subject and the feeling
Many weak landscape photographs try to include everything in front of the photographer. Strong ones begin with a clear answer to two questions: What is this picture about? And what should it feel like? The subject might be a peak catching first light, a curve of river, the pattern of ice on a lake or the vastness of a prairie sky. The feeling might be calm, power, isolation, abundance or fragility. Once you know the subject and the feeling, every other choice, from lens to framing to shutter speed, can support them, and anything that does not support them can be left out.
A useful habit is to describe the picture in one sentence before setting up the tripod, for example, “A lone spruce on the ridge against a stormy sky, emphasizing exposure and endurance.” If you cannot write that sentence, keep looking.
Foreground, middle ground and background
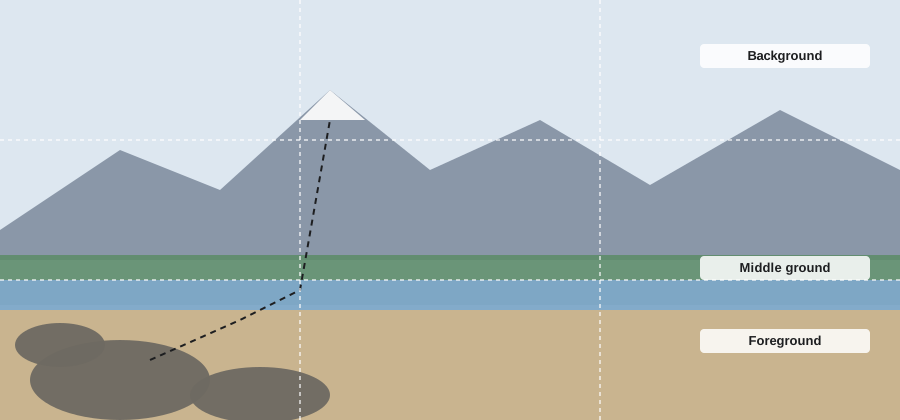
Grand landscapes often gain depth through three layers. A strong foreground element, such as rocks, flowers, ice or a fallen log, close to the camera draws the viewer into the frame. The middle ground, such as a lake, meadow or forest, leads the eye onward. The background, often mountains or sky, provides the destination. Wide-angle lenses exaggerate the size of near objects and the distance between layers, which is why landscape photographers often get very low and close to a foreground subject with a 16 to 24 mm lens.
The risk is clutter. A foreground needs to be interesting in its own right and related to the rest of the scene, such as rocks pointing toward the peak or flowers that echo the color of the sunset. Random grass or a cut-off branch adds nothing. Each layer should be separated clearly by tone, color or space, so the viewer can read them.
Lines, shapes and patterns
The eye follows lines. In landscapes, lines come from rivers, shorelines, roads, ridges, fences, tracks in snow and even the direction of light and shadow. Leading lines that start near the bottom corners of the frame and run toward the main subject pull the viewer into the image. S-curves, common in rivers and roads, add rhythm and lead the eye gently. Diagonals feel dynamic; horizontals feel calm; verticals such as trees and waterfalls feel strong and tall.
Shapes and patterns are also powerful. Repeating forms, such as rows of hills fading into haze, waves on sand or a stand of birch trunks, create rhythm. Breaking a pattern, such as one red leaf among yellow ones, creates a focal point. Silhouettes reduce a scene to shape alone and work well against bright skies at sunrise and sunset.
The horizon
Where you place the horizon tells the viewer what matters. A horizon in the lower third emphasizes the sky, good for dramatic clouds or aurora. A horizon in the upper third emphasizes the land or water, good for a strong foreground or reflections. A horizon in the center can work for symmetrical reflections, but often feels static. Whatever you choose, keep the horizon level unless you have a clear reason not to; a tilted horizon on a seascape looks like a mistake. Use the camera's electronic level or a spirit level on the tripod.
Lens distortion and perspective also matter. With a wide lens, tilting the camera up makes trees and cliffs lean inward, the same converging verticals discussed in PHOT-311. Natural subjects tolerate some convergence better than buildings do, but tall trees leaning sharply can look odd. Keeping the camera level and cropping later, or using a lens with shift, reduces the effect.
Showing scale
A photograph of a huge mountain or waterfall can look surprisingly small if nothing in the frame gives a sense of size. Including an object of known size, such as a person, a canoe, a tree or a cabin, helps the viewer understand scale. The size of a person in the frame depends on distance and focal length. On a full-frame sensor 36 mm wide, the width of the scene covered at distance \( d \) with focal length \( f \) is about:
with \( W \) and \( d \) in the same units and \( f \) in millimeters.
Worked problem
How big will the hiker be?
A hiker 5.6 ft tall stands on a ridge 1,300 ft away. Using a 200 mm lens on a full-frame camera in landscape orientation (sensor 36 × 24 mm), how much of the frame height does the hiker fill?
Show solution
- Frame height covered: \( H = 24 \times 1{,}300 / 200 = 156 \) ft.
- Hiker's share of the height: 5.6 / 156 ≈ 0.036, or 3.6 percent.
- On a 6,000-pixel-wide image (4,000 pixels high), that is about 0.036 × 4,000 ≈ 144 pixels.
Answer: About 3.5 percent of the frame height, roughly 140 pixels: small enough to emphasize the vastness of the ridge, but large enough to read clearly if the figure stands against a clean background such as sky or snow. Bright clothing helps.
When you include people in landscapes, consider whether they are the subject or a scale marker, and get permission if they are identifiable and the image may be used commercially (PHOT-302 covered releases).
Simplify
Landscapes are full of distractions: a bright patch of sky in the corner, a branch poking into the frame, a road sign, a piece of litter, an unwanted hiker. Before pressing the shutter, scan the edges and corners of the frame. Move a step left or right, lower or raise the tripod, change focal length, or wait for the hiker to move. Tighter compositions are often stronger, and a longer lens can isolate the best part of a scene. Weather can also simplify: fog hides clutter, snow covers detail, and a low-contrast overcast day reduces distracting highlights.
Removing natural elements from the scene itself, such as breaking branches or pulling plants, damages the place and is unacceptable in protected areas; it is also widely considered unethical elsewhere (Lesson 10). Removing distractions digitally is a separate question, covered under honest editing in Lesson 12.
Intimate landscapes
Intimate landscapes, sometimes called mid-range or detail landscapes, isolate small parts of a scene with a short or medium telephoto lens: the pattern of aspen trunks, a section of rippled sand, ice formations on a creek, reflections of autumn color in water. They often work best in soft, overcast light, which reveals color and texture without harsh shadows. Because they lack a horizon, the viewer reads them as abstract designs, so balance, rhythm and color harmony become the main concerns.
Intimate landscapes are valuable for working photographers because they can be found almost anywhere, at almost any time, and they resist the sameness of famous viewpoints. A local park can produce a strong portfolio of intimate work across the seasons.
Color and tone
Color sets mood. Warm golden light feels inviting; blue twilight feels calm or cold; a complementary pairing such as orange rocks against blue sky creates energy. A limited palette, for example soft greens and grays in fog, often looks more refined than a scene full of saturated colors. Black and white removes color so shape, texture and tone carry the image, which suits dramatic skies, snow and rock. Decide early whether a scene works best in color or monochrome and compose for it.
Aspect ratio and panoramas
Most cameras record a 3:2 or 4:3 frame, but landscapes often suit other shapes. A wide panorama, such as 2:1 or 3:1, fits a mountain range or coastline; a square can suit a symmetrical reflection or intimate scene; a tall vertical suits a waterfall or tall trees. You can crop a single frame, but for high-resolution panoramas photographers stitch several overlapping frames. To stitch well, rotate the camera around the lens's no-parallax point (often called the nodal point), level the tripod, keep exposure and focus constant, and overlap frames by about 25 to 40 percent.
Worked problem
Planning a stitched panorama
A photographer wants a panorama covering 150 degrees horizontally with a 50 mm lens on a full-frame camera held vertically (portrait orientation, so the 24 mm side is horizontal). With 30 percent overlap, how many frames are needed?
Show solution
- Horizontal angle of view in portrait: \( 2 \arctan(24 / (2 \times 50)) = 2 \arctan(0.24) ≈ 27.0° \).
- With 30 percent overlap, each new frame adds 70 percent of that: 0.7 × 27.0 ≈ 18.9°.
- Frames needed: 1 + (150 − 27.0) / 18.9 ≈ 1 + 6.5 = 7.5, so 8 frames.
Answer: Eight frames. Portrait orientation gives a taller panorama with more vertical resolution; shooting a second row would increase height further. Keep exposure manual so all frames match.
| Aspect ratio | Typical use |
|---|---|
| 3:2 or 4:3 | General landscapes; most camera sensors |
| 1:1 | Symmetry, reflections, intimate scenes |
| 16:9 | Screens and video thumbnails |
| 2:1 to 3:1 | Mountain ranges, coastlines, prairie skies |
| 4:5 or 2:3 vertical | Waterfalls, trees, social media feeds |
Working a scene
Professional landscape photographers rarely take one frame and leave. They work a scene: trying different positions, heights and focal lengths; shooting vertical and horizontal; waiting for light to change; returning at a different time. A practical sequence is to first make a safe overall frame, then look for stronger foregrounds, then try tighter or more abstract versions, and finally watch for fleeting moments, such as a gap in the clouds or a bird crossing the frame. Reviewing the frames on the camera screen, using the histogram and magnified focus check, helps catch mistakes while you can still fix them.
Composition in changing light
Light changes composition. A scene that works as a broad vista at sunrise may need a tighter frame an hour later, when the light flattens and the sky loses color. As the sun rises, shadows shorten and textures fade, so many photographers switch from wide lenses to longer ones, looking for pockets of light, reflections or patterns. On overcast days, leave out a featureless white sky and fill the frame with land, water or forest instead. In fog, distant layers separate into soft tones, so compositions built from overlapping ridges or tree lines become stronger. Keeping a mental list of compositions that suit different light lets you adapt quickly when conditions do not match the plan.
Reviewing compositions afterwards
After a shoot, compare your frames side by side. Ask which foreground worked best, whether the horizon placement helped, and which edges carried distractions you missed in the field. Many photographers keep a notebook or digital file of these lessons for each location. When you return to the place, you can start from the strongest composition and build on it rather than repeating the same mistakes.
Common mistakes
MistakeIncluding everything because it all looks beautiful in person.
InsteadDecide the subject and feeling, then leave out anything that does not support them.
MistakeAdding a random foreground just to fill the bottom of the frame.
InsteadChoose a foreground that is interesting and related to the rest of the scene.
MistakeLeaving the horizon tilted on seascapes.
InsteadUse the camera's level and correct any tilt.
MistakeBreaking branches or pulling plants to clean up a composition.
InsteadMove your position or change focal length; leave the place undisturbed.
MistakeShooting one frame and leaving.
InsteadWork the scene with different positions, focal lengths, orientations and times.
Summary and key terms
- Begin with a clear subject and feeling; describe the picture in one sentence.
- Foreground, middle ground and background build depth; wide lenses exaggerate near objects.
- Leading lines, S-curves, diagonals, shapes and patterns guide the eye.
- Horizon placement shows what matters; keep it level.
- Objects of known size show scale; frame width is about \( 36d/f \) on full frame.
- Simplify by moving, changing focal length or waiting, never by damaging the scene.
- Intimate landscapes, color choices and panoramas extend the photographer's options.
Practice problems
Work each problem on paper first, then reveal the answer to check.
Write a one-sentence description for a picture of fog in a valley at dawn.
Show answer
For example: “Fog fills the valley at dawn while the first light touches the ridgeline, emphasizing calm.”
Why do wide lenses suit strong foregrounds?
Show answer
They exaggerate near objects and the distance between layers, creating depth.
Where should the horizon go for a dramatic sky?
Show answer
In the lower third.
Frame width at 600 m with a 300 mm lens on full frame?
Show answer
36 × 600 / 300 = 72 m.
A 2 m canoe at 200 m with a 100 mm lens: share of frame width?
Show answer
Width = 36 × 200 / 100 = 72 m; 2 / 72 ≈ 2.8 percent.
What light suits intimate forest scenes?
Show answer
Soft, overcast light.
Horizontal angle of a 35 mm lens in landscape orientation on full frame?
Show answer
2 arctan(36/70) ≈ 54.4°.
Why rotate around the no-parallax point when stitching?
Show answer
To avoid near and far objects shifting between frames, which causes stitching errors.
Name two ways to remove a distracting branch without touching it.
Show answer
Move position or change focal length (or crop).
Give a reason to shoot both vertical and horizontal frames.
Show answer
Different uses need different orientations, and one may compose better.
Lesson quiz · 5 questions
Score 60% or more to complete this lesson.
Create a free account to save your progress, take quizzes and earn a certificate.