
PHOT-350 · Lesson 6 of 12 · 29 min
Aerial composition and light
Getting a drone into the air is easy; making an aerial photograph worth looking at is not. Height flattens the world, removes the familiar eye-level view and turns landscapes into patterns, which can produce striking images or confusing ones. The classic principles of composition from earlier courses still apply, but height, angle, scale and the direction of light work differently from above. A field of wheat, a parking lot or a beach crowd can become a graphic abstract; a house or a landmark can lose its character if photographed straight down at noon. This lesson covers how to choose altitude and angle, how to compose top-down and oblique images, how to show scale, how light and shadow behave from above, and how seasons, weather and location change what is possible.
Choosing the angle: top-down, oblique and low
Aerial photographers work with three broad viewpoints. A top-down or nadir view points the camera straight down. It removes perspective and horizon, turning the scene into a map-like pattern of shapes, colors and textures, and it is the basis of mapping (lesson 8). A high oblique view tilts the camera so the horizon appears in the frame; it shows how a place sits in its landscape and is the classic aerial real estate and travel view. A low oblique view, from perhaps 5 to 30 meters up with the camera nearly level, gives a slightly elevated version of a ground view, useful for showing a building's facade above parked cars or fences, or a wedding party on a lawn without looking down on them.
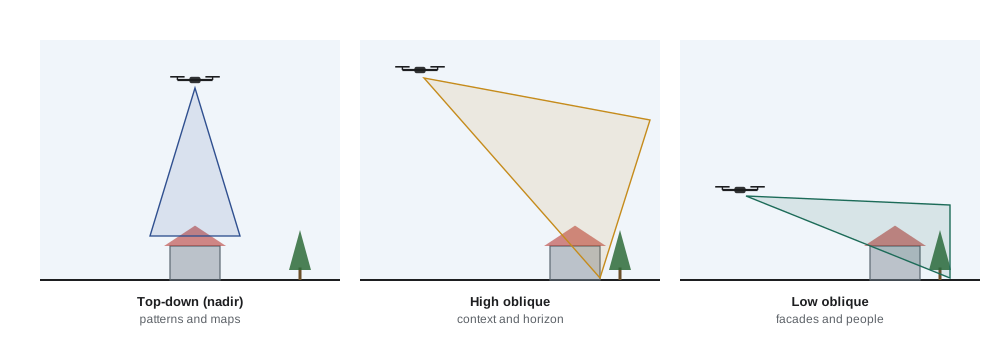
Each viewpoint suits different subjects. Patterns in agriculture, roads, coastlines, parking lots, swimming pools and crowds suit top-down views. Context, such as a property's distance from the lake, a festival's layout or a city's skyline, suits high oblique views. Architecture, landmarks and people suit low oblique views, because faces and facades read best from close to eye level. Many jobs need all three, so a shot list should name the viewpoint for each image.
Altitude and framing
Altitude controls how much of the ground fits in the frame and how large objects appear. For a camera pointing straight down, the width of ground covered depends on the altitude and the lens's horizontal angle of view. Wide lenses on small drones, often equivalent to about 24 mm on full frame, cover a lot of ground; telephoto cameras on some drones let the photographer stay higher or farther away while filling the frame.
Here W is the ground width covered, h is the height above the ground and θ is the horizontal angle of view. A 24 mm-equivalent lens has a horizontal angle of view of about 74 degrees.
Worked problem
How high to frame a farmyard from directly above?
A photographer wants a top-down image of a farmyard 300 ft wide, using a drone camera with a 74° horizontal angle of view. Leaving about 10 percent margin on each side, what altitude is needed, and is it within the Part 107 limit?
Show solution
- Required width with margins: 300 × 1.2 = 360 ft.
- tan(37°) ≈ 0.754, so W = 2h × 0.754 = 1.508h.
- h = 360 ÷ 1.508 ≈ 240 ft.
- 240 ft is below the 400 ft limit.
Answer: About 240 ft, comfortably within the 400 ft ceiling.
Altitude also affects how a scene reads. Low top-down images, from 10 to 40 meters, show people, cars and objects as recognizable shapes with strong shadows. Higher top-down images, from 60 to 120 meters, become more abstract, with people reduced to dots and roads to lines. Higher is not always better; many of the most memorable top-down images are made surprisingly low.
Composition from above
The principles of visual design still hold: a clear subject, a simple background, balance, leading lines and deliberate use of space. From above, they take particular forms.
- Pattern and repetition: rows of crops, stacked containers, beach umbrellas, solar panels and parked cars create rhythm. A single break in the pattern, such as one red umbrella among blue ones, gives the eye a subject.
- Leading lines: roads, rivers, rail lines, shorelines, fences and plow lines lead the eye, especially when they enter from a corner.
- Contrast of color and texture: water against sand, snow against dark forest, autumn leaves against evergreen, a green golf course against desert.
- Symmetry and geometry: roundabouts, stadiums, interchanges, bridges and sports fields from directly above become diagrams. Precise centering and a level camera make them work.
- Negative space: a lone swimmer in a large blue pool, a canoe on a still lake or a single tree in a snowfield gains impact from empty space around it.
- The horizon in oblique views: keep it level, decide whether sky or land dominates, and avoid cutting it through the middle unless symmetry is the point.
Top-down compositions have no up or down, so the photographer chooses an orientation by rotating the drone (yaw) until the main lines and shapes sit well in the frame. A slight rotation can change a static grid into a dynamic diagonal.
| Subject | Usual viewpoint | Composition tip |
|---|---|---|
| Fields, farms, vineyards | Top-down, 40–120 m | Rotate so rows run diagonally; look for a tractor or a break in the pattern |
| Coastlines and beaches | Top-down or high oblique | Use the line where water meets sand; time it with waves |
| Buildings and homes | Low and high oblique | Show the facade and its setting; avoid looking straight down on roofs |
| Roads and bridges | Top-down or high oblique | Place curves and intersections deliberately; include traffic for life |
| Events and crowds | Top-down or high oblique, at a legal distance | Show layout and scale; follow the rules on flying near people |
| Forests in autumn | Top-down and oblique | Look for color contrasts, rivers and roads cutting through |
Showing scale
From above, scale disappears quickly. Without a familiar object, a pond could be a puddle or a lake, and a path could be a road. Including something of known size, such as a person, a car, a boat, a house, a road marking or a tree, gives viewers a reference. A person walking along a beach or a kayak on a lake also adds a story. When people are included, the photographer must respect the rules on flying near and over people (lesson 3) and privacy (lesson 10), often by working with a known subject who is part of the operation.
Worked problem
How big will a person appear?
A drone camera has a sensor 13.2 mm wide recording 5,472 pixels across, with an 8.8 mm lens. Flying top-down at 164 ft (50 m), how many pixels wide are a person's shoulders (about 18 in, 0.45 m)?
Show solution
- Ground width covered: W = sensor width × h ÷ focal length = 13.2 × 50 ÷ 8.8 = 75 m.
- Ground size of one pixel: 75 m ÷ 5,472 ≈ 0.0137 m, about 1.4 cm.
- Shoulders: 0.45 ÷ 0.0137 ≈ 33 pixels.
Answer: About 33 pixels wide, enough to read as a person but not to recognize a face, which matters for privacy as well as composition.
Light and shadow from above
Light shapes aerial images as much as ground images, but height changes what matters. From above, the photographer sees shadows on the ground rather than the shaded side of a subject, so long shadows become a major design element. Low sun in the early morning and late afternoon stretches the shadows of trees, people, buildings and fences across the ground, adding depth and drama to top-down images. At midday, especially in summer, shadows shrink under objects and top-down images look flat.
Worked problem
Planning long shadows
A photographer wants the shadow of a 15 m poplar row to be at least three times the trees' height in a top-down image. What sun elevation does this need, and when might it occur?
Show solution
- Shadow length ≥ 3 × 15 = 45 m.
- tan(elevation) ≤ 15 ÷ 45 = 0.333.
- Elevation ≤ about 18.4°.
- In mid-latitude summer, the sun is below about 18° in roughly the first two hours after sunrise and the last two before sunset; in winter it may stay low all day.
Answer: A sun elevation of about 18° or less, which means early morning or late afternoon in summer, or much of the day in a northern winter.
Direction matters too. For oblique views of a building, the sun behind the photographer lights the facade evenly but flattens it; side light reveals texture and form; back light creates rim light and glow but can blow out the sky and cause lens flare. Small drone lenses are prone to flare and ghosting when pointed toward the sun, so slight changes in angle or a lens hood (where available) help.
Golden hour, when the sun is low, gives warm light and long shadows; blue hour, just after sunset or before sunrise, gives soft, even light and lets city lights glow. Night flying is allowed in both countries with proper lighting and training, but it brings extra risk and stricter planning (lesson 3). Overcast days, often avoided on the ground, can suit aerial images of forests, rivers and colorful subjects, because soft light removes harsh shadows and saturates colors.
Sun-position apps show the sun's direction and height for any date and place, so the photographer can plan the time when shadows will fall in the right direction or when a building's facade will be lit.
Seasons, weather and atmosphere
Seasons transform aerial subjects. Spring brings fresh green and flooding rivers; summer brings crops and beaches; autumn brings color and harvest patterns; winter brings snow that simplifies the landscape into lines and shadows. In Canada and the northern United States, winter aerial work is spectacular but demanding: batteries lose capacity in cold, propellers can ice in fog, and snow can confuse downward sensors during landing (lesson 5).
Weather adds mood and difficulty. Fog lying in valleys photographed from above at sunrise is a favorite subject, but fog can also hide obstacles and creep over the drone. Haze reduces contrast, especially at long distances; a polarizing filter or careful processing helps. After rain, the air is often clearer. Wind ripples water and shakes trees, which can be good for texture and bad for long exposures.
Telling a story from the air
A set of aerial images, like any photo essay, needs variety. A useful structure is wide, medium and close: an establishing high oblique view that shows the place in its landscape, medium views that show the main subject and its features, and close or low views that show details and people. Mixing aerial and ground images, as many editorial and wedding photographers do, gives viewers the overview from above and the intimacy of eye level.
Before each flight, the photographer should list the images needed and where to take each from. Batteries are limited, so efficient flying matters: plan a route that moves from one viewpoint to the next without backtracking, shoot stills and video on the same flight where possible, and review images on the controller screen before moving on.
Common mistakes
MistakeFlying to the maximum altitude for every shot.
InsteadTry lower heights first; many top-down images work best from 20 to 50 m.
MistakeShooting top-down images of buildings at noon.
InsteadUse low or oblique sun for shadows and texture, or switch to oblique views.
MistakeLeaving the horizon tilted in oblique shots.
InsteadLevel the gimbal and check the horizon line before shooting.
MistakeForgetting scale, so viewers cannot tell how big things are.
InsteadInclude a person, vehicle or known object, within the rules on people.
MistakeUsing only one viewpoint for a whole job.
InsteadCombine top-down, high oblique and low oblique images in a planned sequence.
Summary and key terms
- Top-down views make patterns and maps; high oblique views show context; low oblique views suit buildings and people.
- Ground width covered equals 2h tan(θ/2) for a camera pointing straight down.
- Pattern, leading lines, contrast, symmetry and negative space drive aerial composition.
- Rotating the drone changes the orientation of top-down compositions.
- Including a known object shows scale; people must be included within the rules.
- Long shadows from low sun add depth; shadow length equals height divided by the tangent of sun elevation.
- Seasons, weather and a planned sequence of wide, medium and close views make a stronger set.
Practice problems
Work each problem on paper first, then reveal the answer to check.
Which viewpoint best shows a house in relation to a nearby lake?
Show answer
A high oblique view.
A camera has a 74° horizontal angle of view. What width does it cover from 40 m straight down?
Show answer
2 × 40 × tan 37° ≈ 60 m.
Why can a low top-down image be more interesting than a high one?
Show answer
Shapes, people and shadows remain recognizable and graphic.
A 10 m building casts a shadow with the sun at 20° elevation. How long is the shadow?
Show answer
10 ÷ tan 20° ≈ 27 m.
Name two ways to show scale in an aerial image.
Show answer
Include a person, car, boat, house or road marking.
How does rotating the drone help a top-down composition?
Show answer
It places lines and shapes diagonally or balances the frame.
Why are overcast days sometimes good for aerial work?
Show answer
Soft light removes harsh shadows and keeps colors rich.
What causes flare in drone images?
Show answer
Bright light, usually the sun, reflecting inside the lens.
Describe a wide, medium and close sequence for a vineyard.
Show answer
A high oblique of the estate in its valley, top-down rows, then a low view of pickers or grapes.
Why plan shots before each flight?
Show answer
Battery time is limited, so an efficient route gets all the images needed.
Lesson quiz · 5 questions
Score 60% or more to complete this lesson.
Create a free account to save your progress, take quizzes and earn a certificate.