
CINE-310 · Lesson 6 of 12 · 29 min
Grade structure: nodes, layers, groups and order of operations
A grade is not a single adjustment but a sequence of operations, and the order in which they are applied changes the result. Grading systems organize operations in two main ways: node graphs, as in DaVinci Resolve, where each node is a processing step connected to others in series, parallel or layer arrangements; and layer stacks, as in Baselight, where operations are stacked vertically and processed from bottom to top. Both approaches let colourists build complex grades that remain readable, adjustable and transferable between shots. This lesson explains why order matters, common node and layer structures, groups and timeline-level grades, how colour management fits into the structure, and how to build templates that make a feature grade manageable.
Why order matters
Colour operations are generally not commutative: applying A then B does not give the same result as B then A. A simple example is saturation and contrast: increasing contrast after saturation can push already saturated colours into clipping, while increasing saturation after contrast can make the shadows more colourful than expected. Similarly, a qualifier placed after a large balance change selects different pixels than one placed before it, and a LUT applied before primary adjustments clips or compresses values that later adjustments cannot recover. A consistent order of operations makes grades predictable and lets colourists diagnose problems by disabling one step at a time.
Worked problem
Order of gain and offset
A pixel has value 0.40. Operation A multiplies by a gain of 1.2; operation B adds an offset of 0.05. What is the result of A then B, and of B then A?
Show solution
- A then B: 0.40 × 1.2 = 0.48; 0.48 + 0.05 = 0.53.
- B then A: 0.40 + 0.05 = 0.45; 0.45 × 1.2 = 0.54.
- The results differ by 0.01; at other values the gap grows with the gain, so order changes the tonal shape, not only the level.
Answer: 0.53 with gain first and 0.54 with offset first: the operations do not commute.
Nodes in series, parallel and layer
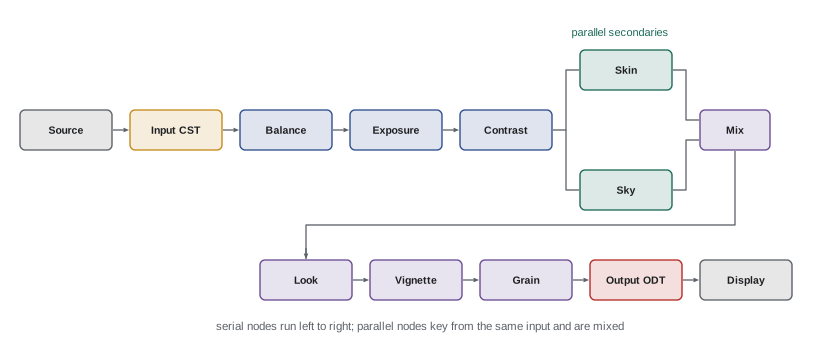
In a node-based system, each node contains a set of tools: primaries, curves, a qualifier and window, blur, and so on. Serial nodes pass the output of one to the input of the next, so each operates on the result of the previous. Parallel nodes each receive the same input and their outputs are blended, so corrections do not affect each other's selection: two qualifiers in parallel both key from the same original image. Layer nodes are similar to parallel but stack in priority order, with the lower node taking precedence where they overlap. Splitter and combiner nodes separate and recombine channels for per-channel operations, and key mixers combine mattes. Labelling nodes, such as BAL, CON, SKIN, SKY or VIG, makes structures readable for the colourist and anyone who inherits the project.
Layer stacks
In layer-based systems such as Baselight, each operation is a layer, processed from the bottom of the stack up. A layer can have an inside and outside correction controlled by a key or shape, and layers can be grouped, muted or blended with a mix control. Layer stacks are read like a recipe: the bottom layers handle input and balance, middle layers handle secondaries, and top layers handle the look and output. Baselight also allows grades to be applied at different levels of the timeline through sequence and scene grades, multi-paste and categories, which let colourists apply and adjust the same operations across many shots. Despite the different interfaces, node and layer systems express the same ideas: ordered operations, isolated corrections and shared grades.
A common structure
Colourists develop their own structures, but many follow a pattern like the one below. The aim is to separate technical correction from creative look, and shot-specific work from shared work, so that each part can be changed without breaking the others.
| Stage | Purpose | Level |
|---|---|---|
| Input transform | Convert camera encoding to working space | Clip or timeline |
| Camera-match | Remove camera or lens differences | Group |
| Balance and exposure | Shot-specific primary correction | Clip |
| Contrast and curves | Tonal shape | Clip or group |
| Secondaries | Skin, sky, relighting, fixes | Clip |
| Scene look | Creative palette for the scene | Group |
| Show look / film emulation | Overall look of the production | Timeline |
| Vignette, grain, texture | Finishing effects | Clip or timeline |
| Output transform | Convert to the display or delivery format | Timeline or project |
Groups and shared grades
Grading a feature shot by shot would be slow and inconsistent. Grading systems let colourists link shots so they share parts of a grade. In Resolve, shots can be placed in groups, each with pre-clip and post-clip node trees applied before and after the shot's own clip grade, and a timeline node tree applies to every shot. A typical use is a group per scene, with the scene look in the post-clip nodes, and a group per secondary camera, with camera matching in the pre-clip nodes. Shared nodes, sometimes called remote or shared grades, let one node appear in many shots so that a change propagates everywhere. In Baselight, similar results are achieved with scene grades, sequence grades and multi-paste operations that copy chosen layers to selected shots.
Colour management in the structure
Where the input and output transforms sit determines the space each tool works in. In a colour-managed project, such as ACES or DaVinci Wide Gamut with Intermediate, the system converts each clip into the working space before the first node and converts to the display after the last, so every node works in log. In a manually managed project, the colourist places the input conversion, often a colour space transform node or LUT, at the start of the tree and the output conversion at the end, again so the nodes in between operate on log values. Placing a display LUT early in the tree is a common error: everything after it works on a display-referred, clipped image, so highlight recovery and natural exposure changes become impossible. Some colourists deliberately place a few nodes after the output transform for display-referred tweaks, such as a final trim of a specific deliverable, but only with care.
Worked problem
Highlight recovery before and after a LUT
A sky reads 0.92 in log; the display LUT maps log values of 0.85 and above to 1.0 (clipped white). The colourist wants to darken the sky by one stop, which in this log space is a change of 0.075. What happens if the correction is applied before the LUT, and if it is applied after?
Show solution
- Before the LUT: 0.92 − 0.075 = 0.845, which is just below 0.85, so the LUT maps it to a value just below white and detail returns.
- After the LUT: the sky is already 1.0 for every pixel above 0.85, so darkening it gives a flat grey with no detail.
Answer: Before the LUT the sky regains detail; after the LUT it becomes a flat grey, because the clipped information is already gone.
Templates and stills
Feature colourists usually start each project with a template: a node or layer structure saved and applied to every shot, with empty nodes in a consistent order and clear labels. The template can include the input transform, empty balance, contrast and secondary nodes, group nodes for scenes and cameras, and the show look in the timeline. Using the same structure everywhere means that grades can be copied between shots node by node, that a colleague or assistant can understand the project, and that the colourist can quickly append or ripple changes. Reference stills and grade libraries store complete grades, such as a scene look approved by the director, which can be applied to new shots and compared later.
Rippling and versioning
During review, a note such as "the whole night exterior needs to be a little less blue" affects dozens of shots. Grading systems provide ripple functions that apply a change, either an absolute value or a relative offset, to a set of shots, and shared grades make many such notes a single change. Versioning lets colourists keep multiple grades per shot, such as a first-pass version and a director's version, and switch between them for comparison. Good practice is to name versions clearly, to use relative rather than absolute ripples so shot-specific corrections are not overwritten, and to save the project and export stills or CDLs at milestones.
Worked problem
Relative and absolute ripple
Three shots in a scene have blue offsets of −2, 0 and +3 printer points. A note asks for the scene to be two points less blue. What do the shots become with a relative ripple of −2 and with an absolute ripple setting blue to −2?
Show solution
- Relative ripple: −2 − 2 = −4; 0 − 2 = −2; +3 − 2 = +1.
- Absolute ripple: every shot becomes −2.
- The absolute ripple has erased the individual matching corrections of the second and third shots.
Answer: Relative: −4, −2 and +1, preserving the match. Absolute: −2, −2, −2, destroying it.
Performance
Complex structures can slow playback, especially with noise reduction, tracking, blur, AI masks and high-resolution media. Colourists manage performance by caching heavy nodes, rendering optimized media, disabling expensive effects while balancing and enabling them for review, and keeping noise reduction and other heavy operations early in the tree or in dedicated nodes that can be bypassed. Real-time playback matters: a grade that cannot be watched at speed cannot be properly judged for flicker, tracking and continuity.
Reading someone else's grade
Colourists frequently inherit projects: a series graded by another colourist in earlier seasons, a film returning for a remaster, or a project started by an assistant. A clear structure is a courtesy to whoever opens the project next. When inheriting a grade, the colourist first examines the timeline and group levels to understand the show look, then the template structure of a few representative shots, disabling nodes one at a time to see what each does. Unlabelled or inconsistent structures make this slow and error-prone, and may force the inheriting colourist to rebuild grades from scratch. Many facilities therefore set house standards for node labels, the order of operations and where colour management sits, so that any colourist can open any project and understand it within minutes.
Bypassing and comparing
Good structures make it easy to compare stages of the grade. Most systems let the colourist bypass all grading to see the source, disable individual nodes or layers, and compare the current grade with a stored version or still. Comparing the balanced shot with and without the look shows how much the look is contributing; comparing with and without secondaries shows whether they are improving the image or merely changing it. A useful habit is to bypass the whole grade occasionally during a session, which resets the eye and reveals whether the grade has drifted too far from the original photography.
Structure for HDR and multiple deliverables
When a project has HDR and SDR deliverables, the structure must allow both to be derived from one grade. In colour-managed projects, the grading nodes stay the same and only the output transform and trims change. In manually managed projects, the colourist may add separate output nodes or timeline versions for each deliverable. Keeping creative decisions upstream of the output transform, and target-specific adjustments downstream of it, ensures that a change to the creative grade updates every deliverable automatically. Trim metadata in Dolby Vision workflows sits outside the node structure altogether, as per-shot metadata, which is another reason to keep shot grades consistent and well organized.
| Structure decision | Benefit | Risk if ignored |
|---|---|---|
| Template on every shot | Copyable, readable grades | Slow, inconsistent changes |
| Look at group or timeline level | One change updates many shots | Hundreds of manual edits |
| Input and output transforms at the ends | Predictable log behaviour | Clipping and poor highlight recovery |
| Labelled nodes | Easy handover and diagnosis | Lost time and errors |
| Relative ripples | Matches preserved | Matches erased |
Grade levels can be pictured as a stack: clip grades apply to one shot, group grades to every shot in a scene or camera, the timeline grade to every shot in the programme, and the output transform last of all. The higher a correction sits in that stack, the more shots one change will affect.
Common mistakes
MistakePlacing a display LUT at the start of the tree.
InsteadKeep display transforms at the end so nodes work in log.
MistakeUnlabelled, inconsistent node trees.
InsteadUse a labelled template on every shot.
MistakeAbsolute ripples that overwrite matches.
InsteadUse relative ripples or shared nodes.
MistakePutting the look in every clip grade.
InsteadPut shared looks in group or timeline levels.
MistakeChaining qualifiers in series after big changes.
InsteadKey in parallel or from the source image when needed.
Summary and key terms
- Colour operations do not commute, so order matters.
- Node systems use serial, parallel and layer nodes; layer systems stack operations.
- A common structure separates technical correction from creative look.
- Groups, timeline grades and shared nodes apply corrections across shots.
- Input and output transforms bracket the grading nodes.
- Templates make grades consistent and transferable.
- Relative ripples and versioning handle notes safely.
- Node
- Processing step in a node-based grade.
- Serial node
- Node receiving the previous node's output.
- Parallel node
- Node receiving the same input as others, then blended.
- Layer stack
- Ordered list of operations processed bottom to top.
- Group grade
- Grade shared by a set of shots.
- Timeline grade
- Grade applied to every shot.
- Shared node
- Node appearing in many shots and changing them together.
- Template
- Saved standard grade structure.
- Ripple
- Applying a change to many shots.
- Version
- Alternative grade stored for a shot.
Practice problems
Work each problem on paper first, then reveal the answer to check.
Why does order of operations matter?
Show answer
Colour operations do not commute.
Gain 1.5 then offset 0.1 on 0.2 gives?
Show answer
0.40.
Offset 0.1 then gain 1.5 on 0.2 gives?
Show answer
0.45.
What does a parallel node receive?
Show answer
The same input as its siblings.
In what order is a Baselight stack processed?
Show answer
Bottom to top.
Where should a scene look usually live?
Show answer
In a group or scene-level grade.
Why not put a display LUT early?
Show answer
Later nodes work on clipped display values.
What is a template for?
Show answer
Consistent, transferable structure.
Relative ripple of +1 on −3 gives?
Show answer
−2.
Why cache heavy nodes?
Show answer
To keep real-time playback.
Lesson quiz · 5 questions
Score 60% or more to complete this lesson.
Create a free account to save your progress, take quizzes and earn a certificate.