
CINE-499 · Lesson 10 of 12 · 28 min
Post-production: editorial, conform, grade and sound
When the camera wraps, the cinematographer's work is not finished. The edit decides which of your images survive and in what order, the conform links the cut back to the original files, the grade shapes the final look and the mix completes the experience. On a capstone, the DP often supervises the grade personally and stays involved through delivery. CINE-310 covered grading craft in depth and CINE-430 covered mastering and delivery for streaming; this lesson walks through the post-production path of a short film from the DP's point of view: collaborating with the editor, preparing for the grade, running grading sessions, fixing problems with visual effects and understanding enough about the sound mix to support the whole film.
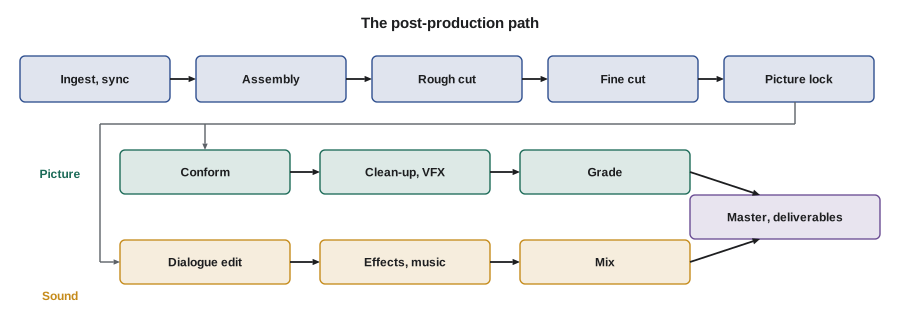
The post-production path
Post on a short film usually follows these stages, though small teams combine some of them.
- Ingest and sync: footage is organized, synced with production sound and given a show look for editing.
- Assembly: all usable takes in script order.
- Rough cut and fine cut: the editor and director shape the story.
- Picture lock: no more changes to the edit.
- Conform: the locked edit is relinked to the original camera files at full quality.
- Visual effects and clean-up: fixes such as removing a boom shadow or a logo, and any planned effects.
- Grade: the colourist and DP shape the final look.
- Sound edit and mix: dialogue edit, effects, music and the final mix.
- Mastering and deliverables: final files for screenings, festivals and online (Lesson 11).
Working with the editor
The editor sees the footage with fresh eyes. Their job is to tell the story with the material, not to use every shot you love. A good DP supports the edit and learns from it.
- Give the editor the camera reports, script supervisor notes and a list of circled takes.
- Point out technical problems you know about, such as a soft take or a flicker, so the editor does not build the scene around it.
- Watch the rough cut with an open mind; note where images help or hurt the story.
- Accept that some favourite shots will go.
- Track which coverage the editor uses most and which they never touch; it will teach you more about coverage than any book.
Worked problem
Estimating the shooting ratio
The team shot 6 hours 30 minutes of footage for a film that runs 8 minutes. What is the shooting ratio, and how does it compare with a typical narrative short?
Show solution
- Footage in minutes = 6 × 60 + 30 = 390 minutes.
- Ratio = 390 ÷ 8 ≈ 49:1.
- Narrative shorts commonly fall roughly between 10:1 and 50:1, depending on coverage style and takes.
Answer: About 49:1, at the high end of a typical range. The reflection might ask whether fewer set-ups or takes would have produced the same film more efficiently.
Picture lock and the conform
Picture lock means the edit will not change. It matters because the grade, visual effects and sound all depend on exact timing. Changing the edit after the grade starts wastes work and money.
- Agree a lock date with the director and editor in the schedule.
- Export an edit decision list or project file for the conform, with reel names and timecode intact.
- Check that the conform matches the offline edit frame for frame, using a reference video.
- Confirm that all shots link to the original camera files at full resolution.
- Note any shots that need visual effects or clean-up.
Preparing for the grade
Arrive at the grade prepared. A short film might get one or two days of grading, sometimes less. Time spent finding your notes is time taken from the image.
- Bring the look book, test report and reference stills from tests.
- Bring the CDLs or notes from set, so the colourist knows the intended starting point.
- Watch the conformed cut and make scene-by-scene notes on mood, time of day and continuity.
- Identify hero shots for each scene, which set the look for the rest.
- Agree with the director which decisions belong to the grade and which are already settled.
- Confirm the grading environment: calibrated reference monitor, controlled lighting and the target delivery (SDR, HDR or both).
Running a grading session
CINE-310 covered the colourist's tools: primaries, secondaries, windows, matching and looks. In the session, the DP guides and decides, and the colourist operates. Respect their craft and give clear notes.
- Start with a balance pass: neutralize, match and set exposure for each scene.
- Then build the look for hero shots and apply it across the scene.
- Work from wide shots to tight shots, and match close-ups to masters.
- Watch the film in real time after each major pass; still frames hide jumps in continuity.
- Give notes in terms of the story and the image: "she should feel more isolated here" or "the window is pulling the eye too much".
- Save versions so you can return to earlier choices.
Worked problem
Budgeting grading time
A 9-minute film has 120 shots. The colourist estimates 3 minutes per shot for a balance pass and 2 minutes per shot for the look pass, plus 90 minutes for review and fixes. How long is the grade?
Show solution
- Balance pass = 120 × 3 = 360 minutes.
- Look pass = 120 × 2 = 240 minutes.
- Total = 360 + 240 + 90 = 690 minutes = 11.5 hours.
Answer: About 11.5 hours, roughly one and a half working days. If only one day is available, simplify the look or reduce secondaries on minor shots.
Worked problem
Matching a close-up to the master
In the master, a probe on actor A's forehead reads about 0.55 on the waveform scale. In the close-up, the same area reads 0.48. If one stop corresponds to about 0.09 on this display curve in the midtones, how far off is the close-up and what should the colourist do?
Show solution
- Difference = 0.55 − 0.48 = 0.07.
- In stops = 0.07 ÷ 0.09 ≈ 0.8 stop.
Answer: The close-up is about 0.8 stop darker. Lift it with offset or exposure so the forehead reads about 0.55, then check that the shadows and highlights still match.
Visual effects and clean-up
Small fixes are common on capstones: a boom in frame, a reflection of the crew in a window, an uncleared logo, a cable on the floor, a flickering light. Some can be fixed in the grade with windows; others need compositing.
- List every fix with its shot, timecode and description.
- Fix the most visible problems first.
- Avoid planning large effects that the team cannot finish; a simple practical solution on set is usually better.
- Make sure fixed shots return to the grade in the same format and colour space as the originals.
- Check fixes on a large screen, where artefacts are more visible.
Sound: what the DP should know
Sound is half of the experience, and the DP's choices on set affect it: noisy lights, fans, generators, camera noise, booms that cannot get close because of the framing. In post, the sound team edits dialogue, adds effects and ambience, places music and mixes everything to a target loudness.
- Dialogue editing cleans and evens out production sound; replacing it later (ADR) is expensive.
- Sound effects and ambience build the world beyond the frame.
- Music is licensed or composed (Lesson 5).
- The mix balances dialogue, effects and music, and is delivered as a stereo mix and sometimes 5.1, plus stems.
- Festivals often ask for a stereo mix and a 5.1 mix in the DCP, and online platforms normalize loudness.
Support the sound team on set by choosing quiet lights, framing to allow a boom and giving sound time to record room tone. In post, attend the mix playback and listen to how sound changes the meaning of your images.
Reviewing the master
Before delivery, watch the finished master from start to finish on a calibrated display, ideally with the director, editor, colourist and sound mixer.
- Check picture: grade continuity, flicker, dead pixels, artefacts, titles and credits.
- Check sound: sync, levels, clicks and dropouts.
- Check that every clearance is in place for what is on screen and on the soundtrack.
- Record any fixes and approve the final version in writing.
Common grading problems on capstones
Some problems appear in almost every first grade. Mismatched skin tones between cameras or set-ups are the most common; fix them with careful primary balance before building a look. Heavy looks that crush shadows or clip highlights can hide the work you did on set; a lighter touch often looks more confident. Inconsistent black levels between scenes make the film feel uneven; set a target for black and stick to it. Noise in underexposed shots becomes more visible after grading; use noise reduction sparingly and remember the lesson for next time. Finally, grading on an uncalibrated laptop screen produces a master that looks different everywhere else, so grade on a calibrated reference display in a controlled room whenever possible.
- Balance skin tones first, then build the look.
- Avoid crushing shadows or clipping highlights for style alone.
- Set consistent black and white targets across the film.
- Use noise reduction carefully on underexposed shots.
- Grade on a calibrated reference display in a controlled room.
Archiving the project
After delivery, archive the project so you can make new versions later, such as a new festival format or a reel excerpt. Keep the original camera files, the edit project, the conform and grade projects, the graded master, the sound stems and all documents. Store at least two copies on separate drives, ideally in different places, and check them once or twice a year. Write a short note listing what is on each drive and how the project was finished.
- Keep original files, projects, master, stems and documents.
- Store two copies in different places and check them regularly.
- Include a short note describing the finishing pipeline and versions.
Reviewing the grade on other screens
Before approving the grade, check the master on the kinds of screens the audience will use: a television, a laptop and a phone, as well as the reference display. The reference display is the standard, so do not regrade for every screen, but note anything that falls apart, such as shadows that disappear on a phone or skin that turns orange on a consumer television. Small trims to the master or a separate online version can fix the worst problems.
Common mistakes
MistakeThe editor should use every shot the DP loves.
InsteadThe editor tells the story with the material; accept that some favourite shots will go.
MistakeThe grade can start before picture lock without problems.
InsteadChanges after the grade begins waste work; agree a lock date and keep it.
MistakeNotes for the colourist should be technical commands.
InsteadGive notes about the story and the image, and let the colourist choose tools.
MistakeStill frames are enough to check a grade.
InsteadWatch in real time to catch continuity jumps between shots.
MistakeSound is not the DP's concern.
InsteadThe DP's choices on set affect sound, and sound changes how images are read.
Summary and key terms
- Post moves from ingest through assembly, cuts and picture lock to conform, effects, grade, mix and mastering.
- Support the editor with reports and notes, and learn from the coverage they use.
- Picture lock protects the grade, effects and mix from wasted work.
- Prepare for the grade with the look book, test stills, CDLs, scene notes and hero shots.
- Grade with a balance pass and a look pass, matching close-ups to masters and reviewing in real time.
- List and fix visual problems systematically and avoid effects the team cannot finish.
- Understand sound well enough to support it on set and review it in the master.
- Assembly
- The first edit of all usable takes in script order.
- Picture lock
- The point at which the edit no longer changes.
- Conform
- Relinking the locked edit to the original camera files at full quality.
- Edit decision list
- A file listing the source and timing of every shot in an edit.
- Hero shot
- A key shot that sets the look for a scene in the grade.
- Balance pass
- The first grading pass, neutralizing and matching shots.
- Shooting ratio
- Footage shot divided by final running time.
- Clean-up
- Visual effects work that removes unwanted elements from shots.
- Stems
- Separate mixed groups of dialogue, music and effects.
- ADR
- Automated dialogue replacement: re-recording dialogue in post.
Practice problems
Work each problem on paper first, then reveal the answer to check.
List the main stages of post on a short film.
Show answer
Ingest and sync, assembly, rough and fine cut, picture lock, conform, effects, grade, sound edit and mix, mastering.
5 hours of footage for a 6-minute film gives what shooting ratio?
Show answer
300 ÷ 6 = 50:1.
Why is picture lock important?
Show answer
The grade, effects and mix depend on exact timing; changes later waste work.
What should the DP bring to the grade?
Show answer
Look book, test report and stills, CDLs or set notes, scene notes and hero shots.
80 shots at 4 minutes per shot plus 60 minutes review: how long is the grade?
Show answer
320 + 60 = 380 minutes, about 6.3 hours.
A close-up reads 0.09 lower than the master where one stop is about 0.09. How far off is it?
Show answer
About one stop.
Why watch the grade in real time?
Show answer
To catch jumps in continuity that still frames hide.
Name three common capstone clean-up fixes.
Show answer
Any three of boom in frame, crew reflection, uncleared logo, cable on floor, flicker.
How can the DP support sound on set?
Show answer
Quiet lights, framing that allows a boom and time for room tone.
What should the final master review check?
Show answer
Picture, sound, clearances and written approval of the final version.
Lesson quiz · 5 questions
Score 60% or more to complete this lesson.
Create a free account to save your progress, take quizzes and earn a certificate.