
CRE-211 · Lesson 6 of 12 · 25 min
Filming setups for long-form
Long-form videos put more demands on filming than short clips. Viewers watch for many minutes, often on large screens, so image and sound quality matter more; long recording sessions test equipment, power and storage; and formats such as interviews, podcasts and documentaries require several cameras and microphones working together. CRE-130 covered phone filming, lighting and audio basics. This lesson covers building filming setups for long-form: choosing cameras for long recordings, the A-camera talking-head setup, multi-camera setups for interviews and podcasts, designing a set, sound for long sessions, teleprompters and presentation, screen recording and desk setups, filming on location, and running a smooth filming day.
Cameras for long recordings
Many long-form creators move from phones to dedicated cameras as their channels grow. Mirrorless cameras with good autofocus, clean HDMI output, flip-out screens and 10-bit recording are common choices, alongside camcorders and compact cinema cameras for longer sessions. Considerations specific to long-form include recording limits, since some cameras stop recording after a set time or when they overheat, a real problem for 60-minute interviews; power, since batteries run out during long takes, so dummy batteries connected to mains power or large external batteries are standard for studio setups; storage, since high-bitrate 4K files fill cards quickly, so record to large, fast cards or external recorders; and consistent image settings across cameras so that footage cuts together. Webcams and phones remain viable for simple setups, especially with good lighting and sound, which matter more than the camera.
| Concern | Long-form issue | Solution |
|---|---|---|
| Overheating | Recording stops in long takes | Cameras rated for long recording, fans, shade, lower resolution |
| Power | Batteries run out mid-take | Dummy batteries on mains or V-mount batteries |
| Storage | Cards fill during interviews | Large cards, external recorders, appropriate codecs |
| Autofocus | Hunting during long takes | Face tracking or manual focus on a locked subject |
| Matching | Cameras look different | Same white balance, picture profile and frame rate |
The A-camera talking-head setup
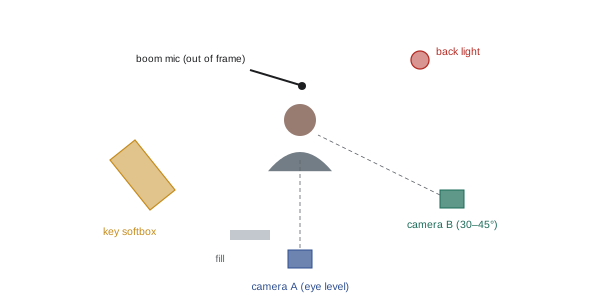
Most long-form channels rely on a primary talking-head setup: the creator speaking to an A-camera, the main camera, framed in a medium or medium close-up shot. Key elements include a camera at eye level on a sturdy tripod; a lens that gives a flattering perspective, often a 35 to 85 mm equivalent focal length, with enough distance to separate the subject from the background; a large soft key light at about 45 degrees, fill or negative fill on the other side, and a background or rim light for separation (CRE-130 Lesson 4 and CINE-220); a background with depth that reflects the channel's identity; and a microphone close to the speaker but out of frame. Many creators add a B-camera at a different angle, such as a profile or a wider shot, giving the editor cutting points to hide edits and add variety. Because long-form viewers spend many minutes looking at this setup, it is worth investing in its look and keeping it consistent across videos.
Multi-camera interviews and podcasts
Interview, podcast and conversation formats typically use one camera per person plus a wide shot showing everyone. In a two-person setup, each person faces the other at a slight angle, with a camera over the other person's shoulder or beside them framing a medium close-up, and a wide camera capturing both; the eye lines should respect the 180-degree rule so that the people appear to face each other when cut together (CRE-130 Lesson 7). For podcasts, dynamic microphones on arms in front of each speaker, close to the mouth, give clear sound and reject room noise, and are visible in shot as part of the podcast look. Each microphone is recorded on a separate track through an audio interface or recorder, allowing the editor to balance levels and reduce crosstalk. All cameras record continuously, and the editor switches between them in a multicam edit, or a live switcher cuts between them during recording, saving editing time at the cost of flexibility.
Worked problem
Planning storage for a three-camera podcast
A weekly 90-minute podcast is recorded with three cameras in 4K at about 100 Mb/s each, plus separate audio. How much storage does each episode need, and how much for a year with two backup copies?
Show solution
- Data per camera per hour: 100 Mb/s × 3,600 s = 360,000 Mb = 45,000 MB ≈ 45 GB.
- Per camera for 1.5 hours: about 67.5 GB; three cameras: about 203 GB per episode.
- Per year (52 episodes): about 10.5 TB of original footage.
- With three copies in total (original plus two backups): about 32 TB per year, before audio, project files and exports.
Answer: About 200 GB per episode and roughly 10.5 TB a year, or about 32 TB with two backup copies.
Designing a set
A set is the space a recurring video is filmed in, and it becomes part of a channel's identity. Good sets have depth, with the background a metre or more behind the subject and objects at different distances; a limited, coherent palette that complements the channel's brand and the host's clothing; practical lights such as lamps, LED strips or neon signs that add atmosphere; meaningful objects that suggest the channel's subject, such as books, tools, instruments or collectibles; and room to adjust, since cameras, lights and microphones need space. Avoid clutter, bright windows behind the subject, and reflective surfaces that show lights. Sets can be as simple as a corner of a room dressed thoughtfully, or as elaborate as a dedicated studio. Photograph the set and lighting positions so that they can be reproduced exactly for every episode.
Sound for long sessions
Viewers tolerate imperfect images far more than imperfect sound, especially in long videos, where poor audio becomes tiring. For long sessions, choose microphones that sound good for extended listening: dynamic or condenser microphones close to the speaker, or high-quality lavaliers. Treat the room with soft furnishings, curtains, rugs or acoustic panels to reduce echo (CRE-130 Lesson 8). Record with conservative levels, peaks around −12 dBFS, to leave room for loud laughs or exclamations, or use 32-bit float recorders that are very tolerant of level mistakes. Record backup audio, such as a second recorder or the camera's own microphone, in case the main recording fails. Monitor with headphones throughout, and check for hums, rustles, fans, air conditioning and notifications. Record a minute of room tone at each location.
Teleprompters and presenting
Scripted long-form videos often use teleprompters, which reflect text on a glass in front of the camera lens, so the presenter can read while looking directly at the viewer. They allow precise, efficient delivery of complex scripts, but reading can sound flat. Strategies include practising the script aloud beforehand, writing in a natural speaking style, using a remote or voice-tracking prompter to control speed, and recording in sections, allowing for natural delivery and retakes. Many creators prefer bullet points or memorized sections, with occasional glances at notes off camera, for a more conversational feel. Whatever the method, energy matters: presenting to a camera for long periods is tiring, so schedule breaks, water and food, and film the most demanding sections when fresh.
Screen recording and desk setups
Software tutorials, gaming videos and many educational channels rely on screen recordings. High-quality screen recordings use a clean desktop with notifications turned off, a resolution matching the video (such as 1920 × 1080 or 3840 × 2160), enlarged text and cursor highlighting for readability, and a frame rate suited to the content, such as 60 fps for games. Software such as OBS Studio records the screen, a webcam and microphones on separate tracks. For hands-on desk work, such as crafts, electronics, cooking or unboxing, an overhead camera on a boom arm or overhead rig captures the workspace, often combined with a face camera. Recording each source separately, rather than only a combined picture-in-picture, gives the editor flexibility to choose layouts later.
Filming on location
Documentaries, travel videos, vlogs and interviews often take place outside the studio. Location filming requires planning: scouting for light, sound, power and permissions; packing a portable kit with cameras, lenses, a compact light, wireless lavaliers, a shotgun microphone, batteries, cards and a small tripod or gimbal; obtaining permits where required for filming in parks, transit, private property or public spaces; and getting releases from people who appear prominently. On location, check background noise, such as traffic, air conditioning and wind, record extra B-roll and ambient sound, and protect equipment from weather. Back up footage every night when travelling.
Running a smooth filming day
Efficient filming days follow a plan derived from the outline (Lesson 4): a shot list grouped by setup, a schedule with time for setup, breaks and resets, and a checklist of equipment and settings. Before recording, check framing, focus, exposure, white balance, frame rate and audio on every camera, and clap or use a slate at the start of each take for syncing. Start recording all cameras and audio before speaking, and leave a few seconds of silence before and after each section. Review footage at breaks. At the end of the day, copy media to at least two drives, label everything, and note any pick-ups needed. A filming day that runs smoothly leaves energy for the performance, which is what viewers will remember.
Lenses and depth of field for long-form
Lens choice shapes the look of a talking-head or interview. Fast prime lenses at wide apertures, such as f/1.8 to f/2.8, separate the subject from the background with shallow depth of field, a look associated with professional productions, but focus becomes critical, and a presenter who leans forward may go soft. Many creators choose a moderate aperture such as f/2.8 to f/4 on full-frame cameras, combined with distance between subject and background, to balance separation and reliability. Zoom lenses offer flexibility in tight spaces. Whatever lens is used, keep it the same for the A-camera across a series, so that the look stays consistent.
Wardrobe and appearance
Clothing affects how footage looks. Solid, mid-tone colours that complement the set usually work best; very fine patterns such as thin stripes or small checks can cause moiré on camera; pure white and pure black clothing can be difficult to expose with skin tones; and clothing the same colour as the background makes the presenter blend in. For recurring formats, a consistent style of clothing becomes part of the channel's visual identity. Check glasses for reflections from lights, and powder shiny skin under strong light. These details matter more in long-form, where viewers study the frame for many minutes.
Remote recording
Interviews and podcasts increasingly include remote guests. Remote recording platforms record each participant's audio and video locally at high quality and upload it, avoiding the compression and drop-outs of live video calls. Send guests a simple checklist: a quiet room, wired headphones, a USB or external microphone if possible, a camera at eye level, a light facing them, a stable internet connection and notifications turned off. Do a short test call before recording. Even with good preparation, remote guests vary in quality, so plan the edit to accommodate differences.
Equipment budgets and priorities
Equipment choices should follow priorities. For most long-form creators, the order of importance is audio first, then lighting, then camera. A good microphone and a treated room improve perceived quality more than a new camera; soft, flattering light makes even modest cameras look good; and a camera upgrade matters most once sound and light are solved. Buy equipment to solve specific problems, such as overheating, poor low-light performance or unreliable autofocus, rather than for its own sake. Renting expensive items for occasional projects, such as cinema cameras, lenses or drones, is often cheaper than buying.
Checklists for repeatable setups
For recurring formats, a written setup checklist ensures every episode looks and sounds the same: camera positions, heights and focal lengths; exposure, white balance, frame rate and picture profile; light positions, brightness and colour temperature; microphone positions and levels; and set dressing. Photographs of the setup taped to the wall or stored with the project make rebuilding quick and consistent.
Common mistakes
MistakeIgnoring recording limits and overheating.
InsteadTest cameras for long takes and use mains power.
MistakeMixing frame rates and white balance across cameras.
InsteadMatch settings on every camera.
MistakeRecording all speakers on one track.
InsteadRecord each microphone separately.
MistakeCluttered, inconsistent sets.
InsteadDesign a deep, coherent set and document it.
MistakeRecording screen and webcam only as a combined image.
InsteadRecord sources separately for flexible editing.
Summary and key terms
- Long recordings need cameras that handle heat, power and storage.
- The A-camera talking-head setup should be flattering, consistent and well lit.
- B-cameras and multi-camera setups give editors cutting points.
- Podcasts use close dynamic microphones on separate tracks.
- Sets with depth, coherent colour and practicals build identity.
- Long sessions need careful sound, backups and monitoring.
- Plan location shoots and filming days from the outline.
- A-camera
- Primary camera in a setup.
- B-camera
- Secondary camera at a different angle.
- Dummy battery
- Adapter powering a camera from mains or external power.
- Multicam edit
- Editing by switching between synchronized cameras.
- Live switcher
- Device that cuts between cameras during recording.
- Crosstalk
- One speaker picked up in another's microphone.
- Set
- Designed filming space for recurring videos.
- Practical light
- Light source visible in the frame.
- Teleprompter
- Device displaying text in front of the lens.
- Slate
- Marker used to identify and sync takes.
Practice problems
Work each problem on paper first, then reveal the answer to check.
Name three camera concerns for long recordings.
Show answer
Overheating, power, storage, autofocus, matching.
Typical talking-head focal length range?
Show answer
About 35–85 mm equivalent.
Why add a B-camera?
Show answer
Cutting points to hide edits and add variety.
What rule governs interview eye lines?
Show answer
The 180-degree rule.
Why record each microphone separately?
Show answer
To balance levels and reduce crosstalk.
Storage per hour at 100 Mb/s?
Show answer
About 45 GB.
Name three features of a good set.
Show answer
Depth, coherent palette, practicals, meaningful objects.
Recommended recording peak level?
Show answer
About −12 dBFS.
How can teleprompter delivery sound natural?
Show answer
Practise, conversational script, speed control, sections.
What should happen at the end of a filming day?
Show answer
Copy media to two drives, label, note pick-ups.
Lesson quiz · 5 questions
Score 60% or more to complete this lesson.
Create a free account to save your progress, take quizzes and earn a certificate.