
CRE-240 · Lesson 5 of 12 · 25 min
Recording spaces and remote recording
The room you record in shapes your sound as much as your microphone. Bare walls, hard floors and large windows create reflections that make voices sound distant and hollow, and background noise from traffic, appliances and neighbours ends up on every track. At the same time, many podcasts now include guests or co-hosts in other cities and countries, recorded over the internet, which introduces its own challenges of quality, latency and reliability. This lesson covers room acoustics for speech, choosing and improving a recording space, controlling noise, recording on location, remote recording methods including double-enders and local recording platforms, preparing remote guests, and backup strategies that protect irreplaceable conversations.
Room acoustics for speech
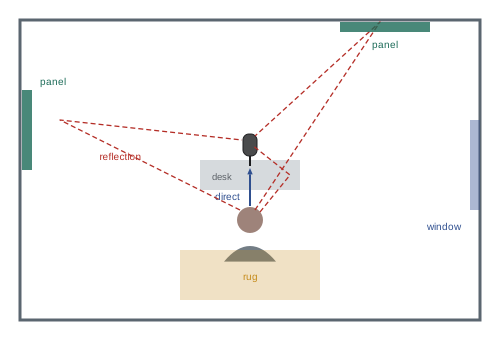
When you speak in a room, the microphone receives the direct sound from your mouth and reflected sound bouncing off walls, ceiling, floor, desk and windows. Early reflections, arriving within a few milliseconds, colour the tone, making voices sound boxy or thin; later reflections build up into reverberation, which makes speech sound distant and less intelligible. Reverberation time, RT60, is the time for sound to decay by 60 decibels; small, furnished rooms might have RT60 values around 0.3 to 0.5 seconds, while empty rooms with hard surfaces can exceed one second. For podcasting, a dry sound, with short reverberation, is ideal: reverberation recorded into a track is very hard to remove later, while a little artificial ambience can always be added.
Choosing a recording space
Start with the best available room. Good candidates are small to medium rooms with soft furnishings: bedrooms, living rooms with sofas and rugs, closets full of clothes, and offices with bookshelves. Poor candidates include kitchens, bathrooms, empty rooms, rooms with large windows and rooms next to busy streets, laundry machines or mechanical rooms. Avoid sitting in the exact centre of a room or very close to a wall, which can emphasize certain bass frequencies; sitting a short distance from walls and facing into the room or toward soft surfaces usually works best. Listen to a test recording with headphones: clap your hands and listen to the decay, and record yourself speaking to hear echo and noise before committing to a space.
Improving a room
Acoustic treatment absorbs reflections, and inexpensive measures go a long way:
- Soft furnishings: rugs, heavy curtains, upholstered furniture, cushions and blankets absorb mid and high frequencies.
- Absorption panels: panels of mineral wool or dense fibreglass, at least 5 to 10 cm thick and covered with fabric, are much more effective than thin foam. Place them at first reflection points: the wall behind the microphone, the side walls beside the speaker, and the ceiling above the desk.
- Desk reflections: a towel or soft mat on the desk, and positioning the microphone so the voice does not bounce off the desk into it.
- Portable booths and reflection filters: curved shields behind the microphone help a little; a duvet hung behind the speaker or a closet of clothes often helps more.
- Bass traps: thick panels in corners reduce boomy low frequencies in small rooms.
Thin acoustic foam reduces high-frequency flutter but does little for lower reflections and is often overused. Remember also that treatment absorbs reflections inside the room but does little to block outside noise, which requires mass and sealing.
| Measure | Cost | Effect on speech recordings |
|---|---|---|
| Closer microphone placement | Free | Large improvement |
| Choosing a furnished room | Free | Large improvement |
| Rug, curtains, blankets | Low | Moderate to large |
| Thick panels at reflection points | Moderate | Large |
| Thin foam tiles | Low | Small, mainly high frequencies |
| Soundproofing construction | High | Blocks outside noise |
Controlling noise
Background noise includes steady sounds, such as computer fans, air conditioning, refrigerators and traffic hum, and intermittent sounds, such as dogs, doors, notifications, aircraft and construction. Steady noise can be reduced in editing but not eliminated without affecting the voice; intermittent noise ruins takes. Strategies include turning off fans, heating and air conditioning during recording where safe; moving computers away from microphones or using silent laptops; silencing phones and notifications; putting a sign on the door; recording at quieter times of day; closing windows; and positioning microphones so their rejection zones face noise sources. Measure the noise floor by recording silence: a quiet room might show a noise floor around −60 dBFS or lower on a well-set recording, while a noisy one sits much higher.
Worked problem
Judging the noise floor
A host records 10 seconds of silence and the meter shows the room noise at about −52 dBFS. Speech peaks around −14 dBFS. What is the approximate signal-to-noise ratio, and is it acceptable?
Show solution
- Signal-to-noise ratio ≈ −14 − (−52) = 38 dB.
- For comfortable listening, about 50 dB or more between speech and noise is desirable, and loudness normalization will raise the noise along with the voice.
- Improve it by moving the microphone closer (raising speech relative to noise), turning off noise sources, or both.
Answer: About 38 dB, which is audible and worth improving to 50 dB or more.
Recording on location
Some podcasts record in the field: at events, in guests' homes or workplaces, outdoors or while travelling. Location recording trades control for authenticity and access. Practical techniques include using portable recorders with dynamic or lavalier microphones, keeping microphones close to mouths, finding the quietest corner and positioning people with their backs to noise sources, using windscreens outdoors, recording a short sample of room tone for editing (Lesson 8), and monitoring with headphones throughout. Ambient sound recorded separately can be valuable for narrative shows, establishing a sense of place. Ask permission before recording in private spaces and be mindful of other people who may be captured in the background.
Remote recording methods
Remote recording connects hosts and guests in different places. The main methods are:
- Recording a video call: the simplest approach, recording the conversation through a video conferencing app. Quality suffers because call apps compress audio heavily and adapt to bandwidth, producing artefacts, dropouts and mismatched levels.
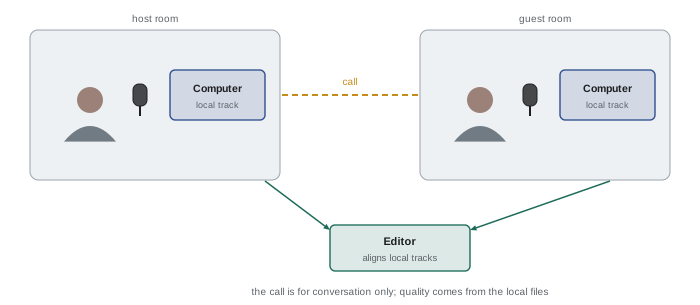
- Double-ender: each participant records their own microphone locally, on their own computer or recorder, while talking over a call; the local recordings are combined in editing. Quality is excellent because the internet connection does not affect the recordings, but it relies on each participant setting up correctly and sending files afterward.
- Remote recording platforms: browser-based services that record each participant's audio and often video locally in the browser and upload it progressively during and after the session, combining the convenience of a call with double-ender quality. Many offer separate tracks, high-resolution video, transcripts and editing tools.
- Hardware mix-minus: connecting a phone or call into a mixer with a mix-minus output, so the remote guest hears everyone except themselves, common in broadcast and live shows.
Preparing remote guests
Remote recordings succeed or fail on preparation. Send guests clear instructions in advance: use a wired connection or strong Wi-Fi, a computer rather than a phone if possible, a quiet, furnished room, headphones (wired, to avoid Bluetooth delay and compression), and a microphone, ideally a USB microphone or even a headset, positioned close; close other applications and turn off notifications. Ask guests to join 10 to 15 minutes early for a technical check: listen to their sound, adjust positioning, check for echo, fans and room noise, and confirm the platform is recording. For important guests without good equipment, some shows ship a microphone and headphones in advance or arrange a local studio.
| Guest checklist item | Why it matters |
|---|---|
| Wired headphones | Prevents echo and Bluetooth delay |
| Microphone close to the mouth | Cleaner voice, less room |
| Quiet, furnished room | Less echo and noise |
| Wired internet or strong Wi-Fi | Fewer dropouts and upload failures |
| Notifications off, apps closed | No interruptions or CPU strain |
| Join early for a sound check | Fix problems before recording |
Latency and conversation
Internet calls introduce latency, a delay between speaking and being heard, typically a few hundred milliseconds. Latency causes people to talk over each other or leave awkward pauses. Hosts can manage it by agreeing on gestures in video calls, pausing slightly before responding, avoiding rapid back-and-forth, and editing overlaps later, which is easy when each person is on a separate track. Explain to guests at the start that the delay may cause overlaps and that you will edit them.
Backups
Recordings of guests can be impossible to repeat, so redundancy is essential. Use at least two independent recordings of every session: for example, the remote platform's local tracks plus a backup recording of the call; or a multitrack interface recording to the computer plus a portable recorder recording a mix. Check that recording has actually started, a surprisingly common failure. Ask remote guests not to close their browser until uploads finish. Copy files to a second location immediately after the session, and keep raw recordings until the episode is published and archived (Lesson 11).
Building a small home studio
Many podcasters eventually set up a dedicated corner or room. A practical home studio might include a desk placed away from walls and windows, thick absorption panels on the wall behind the host and the side walls, a rug, heavy curtains, a bookshelf filled with books to scatter reflections, microphones on boom arms, a quiet computer or a computer placed outside the room with long cables, and lighting for video (Lesson 10). Doors and windows are the main paths for outside noise; weatherstripping and heavy curtains help, though true soundproofing requires building work. A closet full of clothes can make an excellent voiceover booth for solo narration. Test the result by recording silence and speech and comparing them with recordings from before the changes.
Professional and shared studios
Renting a studio by the hour, through local recording studios, co-working spaces, libraries or community radio stations, can be cost-effective for occasional high-quality sessions, important guests or video episodes. Some libraries and universities offer free podcast studios to members. Before booking, ask about equipment, the number of microphones and cameras, whether an engineer is included, file formats and delivery, and accessibility. Bring a checklist and backup storage, and visit or test the space beforehand where possible.
Recording in cars, hotels and temporary spaces
Creators who travel often record in hotel rooms or temporary spaces. Useful tricks include recording in the most furnished part of the room, surrounding the microphone with pillows or a duvet, closing curtains, turning off the air conditioning and refrigerator where possible, and recording at quiet times. A parked car is a surprisingly good emergency voice booth, because its upholstered interior absorbs reflections, as long as the engine and outside noise are off. A portable kit with a dynamic microphone, a small recorder or interface, headphones and a microfibre blanket covers most situations.
Platform settings and audio processing
Video conferencing apps apply processing such as noise suppression, echo cancellation and automatic gain control, which helps calls but can make recorded voices sound watery or pumping. When recording calls directly, look for settings that disable these effects or offer an "original sound" or music mode, and test them. Remote recording platforms usually capture audio before such processing. For guests who must join by phone, a phone call recorded through a hybrid or interface sounds far worse than a local recording, so reserve it for emergencies or for a deliberately phone-like effect.
File management after recording
Immediately after a session, rename files clearly with the date, show and speaker, copy them to project folders and backup storage, and note any problems or timestamps of key moments while the session is fresh. For remote recordings, confirm that every participant's upload is complete before closing the session. Consistent folder structures for each episode, containing raw recordings, edit sessions, exports, artwork and show notes, make it easy to find material for clips, re-edits and archives later.
Checking a new space
Whenever you record in a new space, run a quick check: record 10 seconds of silence and listen for hum, traffic or ventilation noise; clap and listen for echo; record a short sample of speech at your normal distance and compare it with a recording from your usual space. Small changes, such as moving away from a wall, closing a door or adding a blanket, can make a large difference.
Common mistakes
MistakeRecording in an empty, hard-surfaced room.
InsteadChoose a furnished room and add soft treatment.
MistakeRelying on thin foam tiles.
InsteadUse thick panels at first reflection points and soft furnishings.
MistakeRecording the video call as the only source.
InsteadUse a double-ender or local-recording platform.
MistakeGuests on speakers or Bluetooth earbuds.
InsteadAsk guests to use wired headphones.
MistakeOnly one recording of a session.
InsteadKeep at least two independent recordings.
Summary and key terms
- Reflections and reverberation make voices distant; dry recordings are best.
- Choose small furnished rooms away from noise sources.
- Thick absorption at reflection points beats thin foam.
- Control steady and intermittent noise and measure the noise floor.
- Location recording needs close microphones, windscreens and room tone.
- Double-enders and local-recording platforms give the best remote quality.
- Prepare guests, manage latency and always keep backups.
- Direct sound
- Sound travelling straight from source to microphone.
- Early reflections
- First reflections that colour the tone.
- Reverberation
- Build-up of reflections decaying over time.
- RT60
- Time for sound to decay by 60 dB.
- First reflection point
- Surface where the first reflection reaches the listener or microphone.
- Noise floor
- Level of background noise in a recording.
- Room tone
- Recording of a space's background sound.
- Double-ender
- Remote recording with local tracks at each end.
- Mix-minus
- Feed of everyone except the remote participant.
- Latency
- Delay in transmitting audio.
Practice problems
Work each problem on paper first, then reveal the answer to check.
Why is a dry recording preferred?
Show answer
Reverberation is hard to remove; ambience can be added.
Name two good recording spaces.
Show answer
Bedroom, furnished living room, closet of clothes, bookshelf office.
Where should absorption panels go first?
Show answer
First reflection points: behind the microphone, side walls, ceiling.
Minimum effective panel thickness?
Show answer
About 5–10 cm.
SNR with speech at −12 dBFS and noise at −62 dBFS?
Show answer
50 dB.
Why record room tone on location?
Show answer
To fill gaps in editing.
What is a double-ender?
Show answer
Each participant records locally while talking on a call.
Why wired headphones for guests?
Show answer
Avoids echo and Bluetooth delay.
How can hosts manage latency?
Show answer
Pause before responding, avoid rapid exchanges, edit overlaps.
How many independent recordings?
Show answer
At least two.
Lesson quiz · 5 questions
Score 60% or more to complete this lesson.
Create a free account to save your progress, take quizzes and earn a certificate.