
FILM-220 · Lesson 4 of 12 · 29 min
Continuity editing in practice
FILM-101 introduced the rules of continuity: the 180-degree line, eyeline matches, match on action and shot-reverse-shot. Knowing the rules is one thing; applying them to a bin full of real coverage is another. Real footage contains mismatched props, actors who move differently on each take, a camera that drifted across the line, and coverage that the director planned for one rhythm while the scene now needs another. This lesson is about the practical work of building a continuous scene from fragments. It covers how coverage is organized, how editors read the script supervisor's notes, how to choose cut points inside movement, how to handle line crossings and mismatches, and how to cheat continuity without the audience noticing.
How coverage is organized
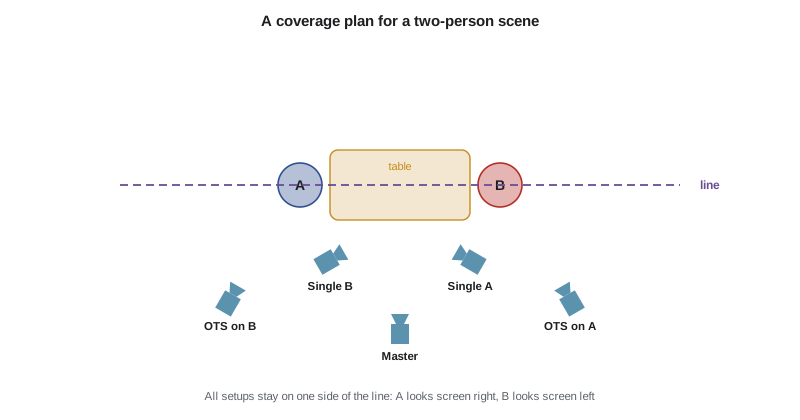
Most dramatic scenes are shot as a master shot, which covers the whole scene in a wide frame, followed by closer setups such as mediums, over-the-shoulders, singles and inserts. Each setup is usually filmed in several takes, and each take may cover all or part of the scene. The result is many overlapping versions of every line. The editor's job is to choose, for each moment, which setup and which take best serves the scene.
| Setup | Framing | Purpose |
|---|---|---|
| Master | Wide two-shot, whole scene | Geography, blocking, safety |
| Medium two-shot | Both characters, waist up | Relationship, shared reactions |
| Over-the-shoulder A | Favouring A over B's shoulder | Dialogue with spatial anchor |
| Over-the-shoulder B | Favouring B over A's shoulder | Reverse of the above |
| Close single A | A alone, chest up or tighter | Emotion, emphasis |
| Close single B | B alone | Reverse of the above |
| Inserts | Hands, objects, details | Information, cutting points |
Worked problem
How much footage does coverage create?
A two-page dialogue scene is expected to run about 2 minutes on screen. The director shoots seven setups with an average of four takes each, and each take covers the whole scene. How many minutes of footage reach the editor, and what is the shooting ratio for this scene?
Show solution
- Number of takes: \( 7 \times 4 = 28 \).
- Footage: \( 28 \times 2 = 56 \) minutes, plus slates and resets, so call it about 60 minutes.
- Shooting ratio: \( 60 / 2 = 30 \), or 30:1.
Answer: About an hour of material for two minutes of screen time. Even a modest scene asks the editor to review and choose among dozens of performances, which is why organization and notes matter so much.
Reading the lined script and camera reports
On set, the script supervisor records what each take covers and how it went. The result is the lined script: a copy of the screenplay with vertical lines drawn through the lines of dialogue that each setup covers, labelled with the scene and setup. Straight lines show where the character is on camera; wavy lines show where the character is off camera or not seen. The script supervisor also keeps notes on each take, such as preferred takes circled by the director, timings, lens choices and continuity details.
Assistant editors use these notes to organize bins. Many systems allow a script-based workflow in which each take is linked to the lines it covers, so the editor can click a line and see every take that includes it. Whatever the system, the principle is the same: know what you have before you choose.
- Circled takes show the director's preference on the day, but the editor should still review all takes.
- Notes about props, wardrobe and hand positions help predict mismatches.
- Timings show which takes ran fast or slow, a clue to pacing differences.
- Notes on partial takes, called pickups, show where an actor restarted mid-scene.
Cutting on action
Match on action hides a cut inside a movement. The audience's attention follows the motion, so the change of angle passes unnoticed. The key practical question is where in the movement to cut. Many editors cut a few frames after the movement begins in the outgoing shot, so the viewer registers the start of the action, and then pick up the incoming shot slightly later in the movement. Some editors overlap the action by a frame or two because viewers seem to lose a little time at each cut; others trim it by a frame or two. There is no single rule, which is why editors judge at full speed.
Worked problem
Matching a door opening across two angles
In a wide shot, a hand reaches the door handle at 00:00:12:08 and the door is fully open at 00:00:13:20 (24 fps). In the close-up, the hand reaches the handle at 00:00:44:02 and the door is fully open at 00:00:45:10. You want to cut one third of the way into the opening. Where do you cut in each shot?
Show solution
- Wide shot movement length: from 12:08 to 13:20 is \( (13 \times 24 + 20) - (12 \times 24 + 8) = 332 - 296 = 36 \) frames. One third is 12 frames, so cut out at 00:00:12:20.
- Close-up movement length: from 44:02 to 45:10 is \( (45 \times 24 + 10) - (44 \times 24 + 2) = 1090 - 1058 = 32 \) frames. One third is about 11 frames, so cut in at 00:00:44:13.
- Watch at full speed and adjust by a frame or two if the movement seems to stutter or jump.
Answer: Out at 12:20 in the wide, in at 44:13 in the close-up. Because the actor moved slightly faster in the close-up, matching proportionally gives a smoother result than matching identical frame offsets.
The line, screen direction and recovering from crossings
The 180-degree line runs through the main axis of action, often between two characters. Keeping the camera on one side preserves screen direction: if A looks right in one shot, A looks right in the next. When coverage crosses the line, the characters appear to swap sides and the audience can lose orientation. Editors have several ways to recover.
- Cut through a neutral shot, such as a profile or a shot along the line, which resets the axis.
- Show the camera or a character moving across the line within a shot, so the audience sees the new geography.
- Use a wide shot to re-establish positions after the crossing.
- Cut on a strong distraction, such as a loud sound or sudden movement, so the jump is absorbed.
- Flip the image horizontally as a last resort, checking for text, logos, hair partings and other giveaways.
Screen direction also matters across scenes. If a character leaves one location moving left to right, audiences expect them to arrive in the next location moving the same way. Reversing direction can suggest a return journey. Chase sequences depend heavily on consistent screen direction so that the pursuer and pursued remain clearly related.
Mismatches and how to cheat them
Every film has continuity errors: a cigarette that grows longer, a glass that refills, a collar that changes. Editors cannot fix them all, and as lesson 2 showed, performance usually matters more. But many mismatches can be hidden. The skill is knowing where the audience is looking.
| Problem | Technique |
|---|---|
| Prop in different hand | Cut on movement or to a closer shot that hides the hand |
| Glass level changes | Keep the glass out of frame or in soft focus at the cut |
| Hair or costume shift | Use an insert or reaction shot to separate the two shots |
| Actor in a different position | Cut during a turn or step so position is ambiguous |
| Background extra jumps | Rely on depth of field, or crop slightly if resolution allows |
| Line delivered differently | Play the line off camera over a reaction shot |
Playing a line off camera is one of the editor's most powerful tools. If a performance is perfect in one take but the picture is unusable, the audio of that line can play over a reaction shot of the listener. This also tends to improve scenes generally, because audiences learn as much from watching listeners as from watching speakers. Lesson 6 develops this technique.
Worked problem
Reframing to hide a mismatch
A project shot in 4K UHD (3840 by 2160) is finishing in HD (1920 by 1080). A background mismatch sits near the right edge of a medium shot. How far can you punch in without upscaling, and roughly what share of the frame width can you remove?
Show solution
- Ratio of capture to delivery width: \( 3840 / 1920 = 2 \). You can scale to a 1920-wide crop of the original at 100 per cent, which is a punch-in of up to 2 times.
- A modest push of 1.2 times removes \( 1 - 1/1.2 \approx 0.17 \), about 17 per cent of the width, split as needed between the edges.
- Shift the crop left so most of the removed area is on the right edge, hiding the mismatch.
Answer: Up to 2 times without upscaling; a 1.2 times push is usually invisible and removes about a sixth of the frame width. Check that the new framing still feels intentional and matches neighbouring shots. Reframing should be agreed with the director and noted for the online, as lesson 11 explains.
Building a scene: a practical order
Editors develop personal methods, but a common approach to cutting a scene from coverage is to work from wide to close and from structure to detail.
- Watch every take of every setup, making notes on performances and problems.
- Assemble the scene loosely, often starting in the master, to see the overall shape.
- Choose the key moments, such as revelations or turns, where closer coverage will have the most impact.
- Build the shot-reverse-shot sections, choosing the best reading of each line.
- Refine cut points on action and on dialogue, then look for mismatches.
- Watch at full speed, then watch again with fresh eyes the next day.
A common guideline is to save the tightest close-ups for the most important moments. If a scene starts in close-ups, there is nowhere to go when the emotion peaks. Moving gradually closer as tension rises, and then pulling back to a wide shot at a moment of isolation or release, gives the scene a visual arc that supports the drama.
Continuity across scenes
Continuity is not only about adjacent shots within a scene. Editors also track continuity across scenes: a wound that must heal gradually, a costume that should not change within one story day, weather that should match between interior and exterior scenes, and the time of day suggested by light through windows. Script supervisors' notes and story-day breakdowns help, but when scenes are moved in the edit, new continuity problems can appear. A scene moved from day three to day five may show a character with a bandage they no longer need. Editors check these knock-on effects whenever the structure changes.
Common mistakes
MistakeChoosing takes only from circled notes
InsteadReview every take, since the best moment may be in an uncircled take
MistakeCutting on action at the same frame offsets in each shot
InsteadMatch the movement proportionally and judge at full speed
MistakeIgnoring line crossings in coverage
InsteadRecover with a neutral shot, visible camera move or re-establishing wide
MistakeTrying to fix every mismatch
InsteadHide what you can and let performance win where it cannot be hidden
MistakeUsing close-ups from the start of every scene
InsteadBuild gradually so the closest shots land on the key moments
Summary and key terms
- Coverage usually includes a master, mediums, over-the-shoulders, singles and inserts, each in several takes.
- The lined script shows what each setup covers and who is on camera.
- Cutting on action hides cuts; the exact cut point is judged by feel and proportion.
- Screen direction keeps audiences oriented within and between scenes.
- Line crossings can be recovered through neutral shots, visible moves or re-establishing wides.
- Many mismatches can be hidden through cut placement, inserts, off-camera lines or reframing.
- Scenes are often built wide to close, structure first and detail second.
- Master shot
- A wide shot covering the whole scene
- Coverage
- The set of setups and takes filmed for a scene
- Lined script
- A script marked to show which lines each setup covers
- Circled take
- A take marked as preferred by the director on set
- Screen direction
- The left or right direction of movement and looks on screen
- Neutral shot
- A shot along the line of action that resets screen direction
- Off-camera line
- Dialogue played over a shot where the speaker is not seen
- Pickup
- A partial take that restarts from within a scene
- Reframing
- Scaling or repositioning an image in the edit
- Cheating
- Hiding a continuity problem so the audience does not notice
Practice problems
Work each problem on paper first, then reveal the answer to check.
Five setups, three full takes each, of a 90-second scene: how much footage?
Show answer
15 takes times 1.5 minutes is 22.5 minutes.
What is the shooting ratio in that case?
Show answer
22.5 divided by 1.5 is 15:1.
What does a wavy line on a lined script mean?
Show answer
The character is off camera for that part of the take.
Name two ways to recover from a line crossing.
Show answer
Cut through a neutral shot, or show the camera move across the line.
Why might you play a line off camera?
Show answer
To use the best audio performance when the picture is unusable, or to show the listener.
A movement lasts 30 frames; where is the halfway cut point from its start?
Show answer
15 frames after the movement begins.
How much can you punch into 5760-pixel-wide footage for a 1920-wide master without upscaling?
Show answer
3 times, since 5760 divided by 1920 is 3.
Why save close-ups for key moments?
Show answer
So the scene has somewhere to go as emotion peaks.
What should be checked before flipping a shot horizontally?
Show answer
Text, logos, hair partings and other asymmetric details.
Why review uncircled takes?
Show answer
A moment in an uncircled take may be better for the edit as it evolves.
Lesson quiz · 5 questions
Score 60% or more to complete this lesson.
Create a free account to save your progress, take quizzes and earn a certificate.