
PHOT-102 · Lesson 1 of 12 · 27 min
Seeing light
Photography means "drawing with light", and the single most important skill that separates experienced photographers from beginners is not camera handling but the ability to see light: to notice where it comes from, how hard or soft it is, what colour it is, and how it shapes the subject in front of the lens. PHOT-101 taught you to control the camera so that it records light faithfully. This course teaches you to observe, choose and shape the light itself, first natural light and then reflectors, flash and continuous lights, ending with portrait and product lighting and a lighting portfolio. This first lesson introduces the vocabulary used throughout the course: the quantity, quality, direction, colour and contrast of light, and how each affects the way a subject looks in a photograph.
The plan of the course is straightforward. Lesson 2 explains the physical behaviour of light that every lighting decision depends on. Lessons 3 to 5 cover natural and available light and the tools for modifying it. Lessons 6 to 8 cover flash, from the basics to off-camera setups, and Lesson 9 continuous light. Lessons 10 and 11 apply everything to portraits and to products and still life, and Lesson 12 deals with safety and the final portfolio project.
Why the camera sees differently from your eye
Your visual system is remarkably good at ignoring light. It adapts to brightness, so that a room lit by a single lamp seems adequately bright; it adapts to colour, so that a white shirt looks white under tungsten bulbs, fluorescent tubes or blue shade; and it sees detail in both deep shadow and bright highlight, because your eyes scan the scene and the brain combines the views. A camera does none of this unless told to. It records a single, fixed exposure with a fixed white balance and a limited dynamic range (PHOT-101, Lessons 5, 6 and 8). The result is that a scene that looked pleasant to the eye may appear dull, too contrasty, or strangely coloured in a photograph.
Learning to see light therefore partly means learning to see like the camera: to notice the shadows under a person's eyes at noon that your brain had smoothed over, the green cast reflected from a lawn onto a face, or the bright window behind a subject that will turn them into a silhouette. A useful habit is to squint at a scene: squinting reduces the detail you see and exaggerates contrast, giving a rough preview of how the camera will render highlights and shadows.
Five properties of light
Photographers describe any light by five properties, each of which can be observed and, to varying degrees, controlled:
- Quantity (intensity): how much light falls on the subject, which determines the exposure settings needed and affects how you can use aperture, shutter speed and ISO.
- Quality (hardness or softness): whether the light produces sharp-edged shadows and crisp highlights (hard light) or gradual transitions and gentle shadows (soft light).
- Direction: where the light comes from relative to the subject and the camera, which determines which parts are lit and which are in shadow, and therefore how shape and texture are revealed.
- Colour: the spectral content of the light, usually described by colour temperature in kelvins and by tint, and how pure or mixed it is.
- Contrast: the difference in brightness between the lit and shadowed parts of the subject, and between the subject and its surroundings, which depends on the quality of the main light and on how much light reaches the shadows from other sources.
These properties interact. The sun at noon on a clear day is high in quantity, hard in quality, from directly above, neutral to slightly cool in colour, and high in contrast. The same sun behind thin cloud an hour before sunset is lower in quantity, softer, from the side, warm in colour, and moderate in contrast. Most of this course is about recognizing these combinations and changing them when they do not suit the picture.
Quantity
The quantity of light matters creatively as well as technically. Bright light allows small apertures for depth of field, fast shutter speeds to freeze motion, and low ISO for clean files. Low light forces compromises: wide apertures, slower shutter speeds or higher ISO (PHOT-101, Lesson 5). Equally important is the relative quantity of light on different parts of the scene. Our attention goes to the brightest part of a picture, so the subject usually needs to be at least as bright as its surroundings, or to stand out by contrast. When the light on the subject is weaker than the light on the background, the photographer has three options: move the subject, add light to the subject, or reduce the light on the background.
The quantity of light is measured in exposure values (EV), each step being a doubling or halving, the same stops used for aperture, shutter speed and ISO. A difference of one stop between two areas of a scene means one receives twice as much light as the other. Thinking in stops makes it easy to compare lights and to plan corrections, for example adding a reflector that brings a shadow up by one stop.
Quality: hard and soft light
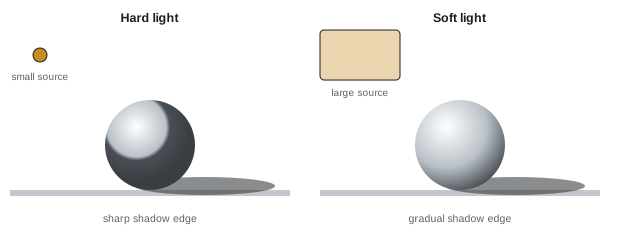
Quality is the property that photographers discuss most, because it most strongly affects the mood and flattery of a picture. A light source that is small relative to the subject, such as the sun in a clear sky, a bare flash or a bare bulb, produces hard light: shadows have sharp edges, highlights on shiny surfaces are small and bright, and texture is emphasized. A source that is large relative to the subject, such as an overcast sky, a large window or a softbox close to the subject, produces soft light: shadows have gradual, wrapping edges (a wide penumbra), highlights are broad, and texture is subdued.
The key is apparent size: how large the source looks from the subject's position. The sun is enormous but so distant that it subtends only about half a degree, making it a small, hard source. A 60 cm softbox one metre from a face subtends about 33°, a large, soft source; the same softbox five metres away subtends only about 7° and gives noticeably harder light. Lesson 2 explains this relationship in detail. Neither hard nor soft light is better: hard light suits drama, strong graphic shapes, texture, and sunny moods; soft light suits gentle portraits, products with smooth surfaces, and calm moods.
Direction
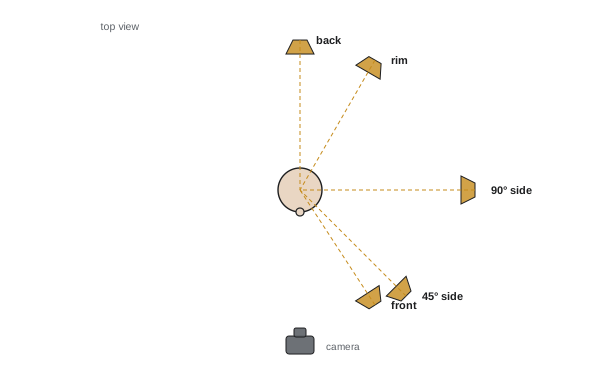
The direction of light relative to the camera shapes how the subject appears:
- Front light, from behind or beside the camera, illuminates the side of the subject facing the lens, filling in shadows and showing colour and detail clearly, but flattening shape and texture because the shadows fall behind the subject where the camera cannot see them. On-camera flash is the extreme case.
- Side light, from 45° to 90° to the side, shows the form of a subject through the gradation from light to shadow across it, and reveals texture by casting tiny shadows from every bump and wrinkle. Side light is the basis of most portrait and still-life lighting.
- Back light, from behind the subject toward the camera, outlines the subject with a rim of light, makes translucent materials such as leaves, hair and glass glow, and can produce silhouettes. It needs care with exposure and lens flare.
- Top light, from directly above, casts shadows down the subject: under eyebrows, noses and chins in portraits. Midday sun and overhead office lighting are common examples.
- Under light, from below, is rare in nature and looks unnatural or sinister on faces, the classic "campfire story" effect, though gentle fill from below with a reflector is common in beauty photography.
A useful exercise is to walk around a subject in sunlight and photograph it from many angles: the light does not change, but its direction relative to the camera does, and so does the picture.
Colour
Light sources differ in colour. Daylight varies from the warm orange of sunrise and sunset (2,000 to 3,500 K) through the roughly neutral light of the midday sun (about 5,000 to 5,500 K) to the blue of open shade and overcast sky (6,500 to 10,000 K). Tungsten bulbs are about 2,700 to 3,200 K, and LEDs and fluorescent lamps vary widely, often with a green or magenta tint and incomplete spectra that render some colours poorly (PHOT-101, Lesson 8). Photographers use colour in two ways: they correct it, choosing a white balance so that neutral objects look neutral, or they exploit it, keeping the warmth of a sunset or contrasting warm light on a subject with the cool blue of twilight in the background. Mixed lighting, with different colour temperatures falling on different parts of the subject, is difficult to correct because a single white balance cannot neutralize both; it can be solved by changing or gelling one source, or embraced as part of the look (Lessons 4 and 7).
Colour also arrives by reflection. Light bouncing off a red wall, a green lawn or a blue sea carries that colour onto the subject, which can create unflattering casts on skin or, used deliberately, a warm glow from a gold reflector or a wooden floor.
Contrast
Contrast describes the range of brightness in a scene. Lighting contrast on a subject depends on the relationship between the main light, which photographers call the key light, and the fill light that reaches the shadows. Outdoors on a clear day, the fill comes from the blue sky and from light reflected by the ground and nearby surfaces; indoors, from walls and ceilings. A face lit by direct sun with dark surroundings may have shadows four or five stops darker than the lit side, more than a camera can record with detail in both. On an overcast day, the light is nearly all fill, and shadows may be less than one stop darker.
Photographers measure and describe this as a lighting ratio, the ratio of the light on the lit side of the subject to the light on the shadow side. A 2:1 ratio (one stop) looks soft and open; 4:1 (two stops) is moderate, with clear modelling; 8:1 (three stops) is dramatic. Lesson 10 explains how ratios are set in portrait lighting. Scene contrast also includes the subject against the background: a dark subject against a bright sky, for example, may exceed the camera's dynamic range regardless of how the subject itself is lit.
Worked problem
Describing a lighting situation
A person stands under a tree on a sunny afternoon. Patches of sun fall through the leaves onto their face and shirt, and the background is a brightly lit field. Describe the light using the five properties and suggest an improvement.
Show solution
- Quantity: uneven; sun patches are several stops brighter than the shaded parts of the face, and the background is brighter than the subject.
- Quality: mixed; the shade is soft, but the dappled patches are hard.
- Direction: mostly from above (skylight through gaps) with random spots of top light.
- Colour: mixed; shaded areas are cool and possibly green from the leaves, sunlit patches warm and neutral.
- Contrast: very high, both within the face and between the subject and the bright field.
Answer: Move the person into full, even shade at the edge of the tree, facing toward the open sky or a sunlit wall, so that the face is lit by soft, directional light; choose a camera position with a darker background or add a reflector or fill flash to bring the subject closer to the background brightness. Recognizing each property makes the fix obvious.
How to practise seeing light
Seeing light is a skill developed by deliberate practice. Effective exercises include:
- Light journal: photograph the same object, such as a white cup or an egg, at the same place at several times on several days, noting the five properties each time.
- Shadow study: look at the shadows rather than the subject. Are their edges sharp or soft? Where do they point? How dark are they, and what colour?
- Catchlights: look at the reflections in people's eyes, which show the shape, size and position of the main light sources. Studying catchlights in published portraits is a quick way to work out how they were lit.
- Rotating subject: place a person or a bust in one position and turn them, or walk around them, photographing the changes in direction.
- Copying: choose a photograph whose light you admire and try to reproduce the lighting, starting by identifying the five properties.
Throughout this course, every assignment will ask you to describe the light you used as well as show the result. The goal is that, before raising the camera, you have already noticed the light and decided whether to use it as it is, wait for it to change, move, or modify it.
Common mistakes
MistakeAssuming the camera sees what your eye sees.
InsteadSquint and check the histogram; expect the camera to show more contrast and colour casts.
MistakeJudging softness by the physical size of the source.
InsteadJudge by its apparent size from the subject's position.
MistakeUsing front light for everything.
InsteadMove the subject or yourself to use side or back light that shows form.
MistakeIgnoring reflected colour from nearby surfaces.
InsteadCheck skin tones near coloured walls, grass and foliage.
MistakeLetting a bright background overpower the subject.
InsteadChange position, add light to the subject or reduce the background.
Summary and key terms
- Seeing light is the core skill of photography; the camera does not adapt as the eye does.
- Light is described by quantity, quality, direction, colour and contrast.
- Quantity is measured in stops; the subject should usually be at least as bright as its surroundings.
- Hard light comes from sources small relative to the subject, soft light from large ones.
- Front, side, back, top and under light each shape the subject differently.
- Colour temperature and reflected colour can be corrected or used expressively.
- Contrast depends on the balance of key and fill, described by lighting ratios.
- Quantity of light
- How much light falls on the subject, measured in stops.
- Quality of light
- How hard or soft the light is.
- Hard light
- Light from a small apparent source, giving sharp-edged shadows.
- Soft light
- Light from a large apparent source, giving gradual shadow edges.
- Apparent size
- How large a light source looks from the subject.
- Key light
- The main light that shapes the subject.
- Fill light
- Light that reaches and lightens the shadows.
- Lighting ratio
- The ratio of light on the lit side to the shadow side.
- Catchlight
- The reflection of a light source in the subject's eyes.
- Back light
- Light from behind the subject toward the camera.
Practice problems
Work each problem on paper first, then reveal the answer to check.
Name the five properties of light.
Show answer
Quantity, quality, direction, colour and contrast.
Why does a scene that looks fine to the eye often look contrasty in a photograph?
Show answer
The eye adapts and combines views; the camera records one exposure with limited dynamic range.
Why is the sun a hard source despite its size?
Show answer
It is so far away that its apparent size is only about half a degree.
Which light direction best reveals texture?
Show answer
Side light.
What does back light do to translucent subjects?
Show answer
It makes them glow.
What is the approximate colour temperature of open shade?
Show answer
About 6,500 to 10,000 K, bluish.
A face's lit side receives 2 stops more light than its shadow side. What is the lighting ratio?
Show answer
4:1.
What can catchlights tell you about a portrait?
Show answer
The shape, size and position of the light sources.
Name three ways to deal with a background brighter than the subject.
Show answer
Move the subject, add light to the subject, reduce light on the background (or change viewpoint).
Why is mixed lighting hard to correct?
Show answer
A single white balance cannot neutralize sources of different colour temperatures.
Lesson quiz · 5 questions
Score 60% or more to complete this lesson.
Create a free account to save your progress, take quizzes and earn a certificate.