
PHOT-102 · Lesson 10 of 12 · 25 min
Portrait lighting: patterns, ratios and setups
Portrait lighting has a long tradition, developed by painters and refined by studio photographers in the twentieth century, with names for the standard patterns of light and shadow on a face. Knowing these patterns gives you a shared language with other photographers and clients, a set of reliable starting points, and an understanding of how small changes in the position of a light change the character of a face. This lesson covers the key light patterns (butterfly, loop, Rembrandt and split), broad and short lighting, the height of the key and catchlights, lighting ratios and how to set them, adding separation and background light, high-key and low-key styles, lighting different skin tones, glasses, groups, and corrective lighting.
The key light patterns
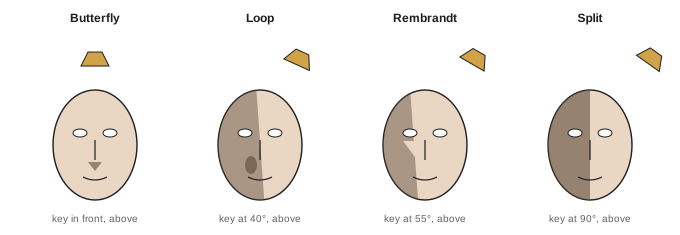
The classic patterns are defined by the shadow cast by the nose, and they progress as the key light moves from in front of the face around to the side, at a height above the eyes:
- Butterfly (Paramount) lighting: the key is directly in front of the face, above the camera, angled down. The nose casts a small, symmetrical shadow below it, shaped like a butterfly. It emphasizes cheekbones and is glamorous and flattering for many faces, associated with Hollywood studio portraits of the 1930s. A reflector below the chin often fills the shadows (clamshell, Lesson 5).
- Loop lighting: the key moves 30° to 45° to one side, still above eye level. The nose shadow becomes a small loop on the cheek, pointing down toward the corner of the mouth without touching the cheek shadow. Loop lighting is the most commonly used portrait pattern: flattering, natural and suitable for most faces.
- Rembrandt lighting: the key moves further to the side, about 45° to 60°, and higher, so that the nose shadow joins the shadow on the far cheek, leaving a small inverted triangle of light under the eye on the shadow side. Named after the Dutch painter, it gives a moody, sculptural look.
- Split lighting: the key is at 90° to the face, lighting exactly one half and leaving the other in shadow. Dramatic and strong, it can suggest mystery or tension, and it narrows the face.
Moving the key further, behind the subject, produces rim or profile lighting, where only the edge of the face is lit. Note that what matters is the light's position relative to the face, not the camera: the subject turning their head changes the pattern just as much as moving the light.
Broad and short lighting
When the subject's face is turned partly away from the camera, one side of the face (the side turned toward the camera) appears broader, and the other narrower. Broad lighting places the key on the side turned toward the camera, lighting the broad side and leaving the narrow side in shadow; it makes the face appear wider and flatter, and can suit thin faces. Short lighting places the key on the side turned away from the camera, lighting the narrow side and leaving the broad side in shadow; it makes the face appear slimmer and more sculpted, and is more commonly used. Short lighting combined with loop or Rembrandt pattern is a classic flattering portrait.
Height of the key and catchlights
The key light is normally above the eyes and angled down, imitating the sun. Too low, and the light becomes flat or unnatural, with catchlights in the middle of the eye; too high, and the eye sockets fall into shadow and the catchlights disappear. A good starting point is a key about 30° to 45° above the eyes, adjusted until both eyes show catchlights at about ten or two o'clock. Catchlights give eyes life; their shape reveals the modifier (square for softboxes, round for octaboxes and beauty dishes) and their size its proximity. A portrait in which neither eye has a catchlight often looks lifeless.
Lighting ratios
The contrast between the lit and shadow sides of a face is described by the lighting ratio. With a fill light near the camera that lights both sides of the face equally, and a key that adds light to the lit side only, the ratio is:
where K and F are the amounts of light from the key and the fill measured separately. If key and fill meter the same, the ratio is (1 + 1) ÷ 1 = 2:1; if the key is one stop brighter than the fill (K = 2F), the ratio is 3:1; two stops gives 5:1; three stops 9:1.
| Key brighter than fill by | Lighting ratio | Effect |
|---|---|---|
| 0 stops | 2:1 | Very soft, open; high-key, beauty, children |
| 1 stop | 3:1 | Natural modelling; the standard portrait ratio |
| 1.5 stops | about 4:1 | Noticeable shape, mild drama |
| 2 stops | 5:1 | Strong modelling, moody |
| 3 stops or no fill | 9:1 or more | Dramatic, low-key, film noir |
With natural light and reflectors, the same idea applies: meter the lit side and the shadow side with an incident meter (pointing the dome toward the key, then toward the shadow side) and express the difference in stops. On camera, judge ratios from the histogram and the brightness of skin on each side. Higher ratios show more shape and drama but demand accurate exposure; low ratios are forgiving and flattering.
Worked problem
Setting a 3:1 ratio with one light and a reflector
A portrait is lit by a key softbox at 45° camera left. The incident meter at the face, pointed at the key, reads f/8; pointed at the shadow side, with only the room's reflected light, it reads f/2.8. What is the ratio, and how can it be brought to about 3:1?
Show solution
- f/2.8 to f/8 is 3 stops: the shadow side receives one-eighth of the light on the lit side, a ratio of about 8:1 to 9:1 (dramatic).
- For 3:1, the shadow side should be about 1.6 stops darker than the lit side, around f/4.5 to f/5.
- Add a large white reflector on the right, moving it closer until the shadow side meters f/4.5 to f/5.
Answer: The original ratio is about 9:1; a reflector close on the shadow side brings it to about 3:1. If the reflector cannot provide enough fill, use a second light at low power or a silver reflector.
Separation and background
A well-lit face against a background of similar tone can merge into it, especially dark hair against a dark background. Separation comes from:
- A rim or hair light from behind, outlining hair and shoulders (Lesson 8).
- A background light: a light aimed at the background, often with a grid for a soft pool of light behind the subject's head, or evenly lighting a backdrop to a chosen tone.
- Distance: moving the subject away from the background reduces the key light reaching it (inverse square law) and throws it out of focus.
- Tonal and colour contrast: a light subject against a dark background, or the reverse, or complementary colours.
Background tone is controlled independently of the subject: a grey backdrop can become white, mid-grey or near black depending on how much light falls on it. White seamless backgrounds for high-key portraits are typically lit one to one and a half stops brighter than the subject, so they record pure white without spilling excessive light back onto the subject's edges.
High-key and low-key
High-key portraits are dominated by light tones: white or pale backgrounds and clothing, low lighting ratios, soft and plentiful light, minimal shadows. They feel bright, clean, optimistic and youthful, and are common in beauty, fashion, family and corporate work. Low-key portraits are dominated by dark tones: dark backgrounds and clothing, high lighting ratios, small or controlled sources, and deep shadows, with light used sparingly to reveal only important features. They feel dramatic, serious, intimate or mysterious, and are common in character portraits and fine art. Both depend on controlling spill: for low key, grids and flags keep light off the background; for high key, enough light reaches every area to avoid grey patches.
Lighting different skin tones
Skin varies enormously in tone and in reflectance, from very light to very dark, with undertones that may be warm, neutral or cool. Good portrait lighting renders each person's skin accurately and beautifully. Historically, photographic film and early digital systems were calibrated on light skin tones, and darker-skinned subjects were often underexposed or rendered with poor detail, a bias photographers should actively avoid. Practical guidance:
- Expose for the skin, not the scene: an incident meter gives the correct exposure regardless of skin tone, while reflected meters push darker skin toward mid-grey and lighter skin toward grey, so check skin on the histogram and adjust.
- Darker skin shows specular highlights more prominently; larger, softer sources make these highlights broad and flattering rather than shiny spots, and slight powder or blotting reduces shine.
- Use enough fill and avoid excessive contrast, unless the drama is intended; shadows on darker skin lose detail quickly.
- Watch colour: coloured reflections from walls, foliage or clothing show strongly on skin; use a grey card or colour checker and white balance carefully, and avoid lights with poor R9 (Lesson 9).
- When photographing people of different skin tones together, meter for the darker skin and protect highlights on lighter skin, use broader light, and position people so the key falls more on those who need it.
Glasses, groups and corrective lighting
Glasses reflect lights directly into the lens when the light is within the lenses' family of angles (Lesson 2). To avoid reflections, raise the key light higher, move it further to the side, ask the subject to tilt the glasses slightly down by lifting the arms off the ears, or turn the face slightly. Check every frame, because a small head movement brings reflections back.
Groups need broad, even light. Use a large source (a big umbrella, softbox or bounced light) placed further away and higher, so that the falloff across the group is small (Lesson 2), or feather the light toward the far side. Arrange the group so no one is shadowed by another, and check that every face has light and catchlights.
Corrective lighting uses lighting to emphasize or minimize features, always with sensitivity and respect for how the person wishes to be seen. Short lighting slims a round face; broad lighting fills out a thin one. Soft, frontal light minimizes skin texture and wrinkles, while hard side light emphasizes them. A higher key and chin slightly forward reduce the appearance of a double chin; turning a prominent nose toward the key reduces its shadow. A bald head may need a flag or a lower top light to avoid shine.
A one-light portrait workflow
A reliable workflow for a one-light studio or location portrait:
- Place the subject at least 1.5 to 2 m from the background.
- Set ambient: in a studio, ambient should be negligible at the working settings (for example f/8, 1/200 s, ISO 100 gives a black frame without flash).
- Place a softbox at about 45° to the side and 30° to 45° above the eyes, close enough for soft light, aimed slightly in front of the face so that the face is lit by the feathered edge.
- Choose the pattern (loop or Rembrandt) by moving the light or turning the face, checking the nose shadow and catchlights.
- Meter or test to correct exposure on the lit side of the face.
- Add a reflector on the shadow side for the chosen ratio.
- Check background tone and separation; move the subject or add a second light if needed.
Each change should be small, followed by a test frame. With practice, this sequence takes only a few minutes.
Common mistakes
MistakePlacing the key at eye level or below.
InsteadRaise it 30° to 45° above the eyes and check for catchlights.
MistakeIgnoring which side of the face is turned to the camera.
InsteadChoose broad or short lighting deliberately.
MistakeExposing darker skin by reflected metering of the whole scene.
InsteadUse incident metering or check skin on the histogram.
MistakeFighting glasses reflections by editing later.
InsteadRaise or move the key, or tilt the glasses.
MistakeLighting a group with a small, close light.
InsteadUse a large source further away and higher.
Summary and key terms
- Butterfly, loop, Rembrandt and split patterns are defined by the nose shadow as the key moves to the side.
- Short lighting slims the face; broad lighting widens it.
- The key normally sits 30° to 45° above the eyes, giving catchlights at ten or two o'clock.
- Lighting ratio = (key + fill) ÷ fill: one stop of difference gives 3:1.
- Rim, hair and background lights and distance create separation.
- High-key and low-key styles depend on tone, ratio and spill control.
- Light every skin tone accurately with incident metering, soft sources and careful colour.
- Butterfly lighting
- Key in front and above, giving a symmetrical shadow under the nose.
- Loop lighting
- Key at 30° to 45° giving a small loop shadow from the nose.
- Rembrandt lighting
- Key further to the side, leaving a triangle of light under the far eye.
- Split lighting
- Key at 90°, lighting half the face.
- Broad lighting
- Lighting the side of the face turned toward the camera.
- Short lighting
- Lighting the side of the face turned away from the camera.
- Lighting ratio
- The ratio of light on the lit side to the shadow side.
- High-key
- A style dominated by light tones and low contrast.
- Low-key
- A style dominated by dark tones and high contrast.
- Corrective lighting
- Lighting chosen to emphasize or minimize facial features.
Practice problems
Work each problem on paper first, then reveal the answer to check.
Which pattern leaves a triangle of light under the far eye?
Show answer
Rembrandt lighting.
Where is the key for butterfly lighting?
Show answer
Directly in front of the face, above the camera.
Which lighting slims a round face: broad or short?
Show answer
Short lighting.
Where should catchlights appear?
Show answer
At about ten or two o'clock in the eyes.
Key and fill meter the same. What is the ratio?
Show answer
2:1.
The key is two stops brighter than the fill. What is the ratio?
Show answer
(4 + 1) ÷ 1 = 5:1.
How bright is a white seamless background usually lit for high key?
Show answer
About one to one and a half stops brighter than the subject.
Why are incident meters useful for darker skin?
Show answer
They measure the light falling on the subject, independent of skin reflectance.
Name two ways to remove reflections in glasses.
Show answer
Raise or move the key to the side; tilt the glasses down.
How should a large group be lit?
Show answer
With a large source further away and higher, or feathered for even light.
Lesson quiz · 5 questions
Score 60% or more to complete this lesson.
Create a free account to save your progress, take quizzes and earn a certificate.