
PHOT-210 · Lesson 1 of 12 · 25 min
The studio and the language of light
A studio is a place where the photographer controls everything: the light, the background, the subject's position and the camera. Outdoors and on location, photographers adapt to the light they find; in the studio, they build the light from nothing, deciding where every source goes, how large and how bright it is, and what it should reveal or hide. This control makes the studio the best place to learn how light works, because each change can be seen, measured and repeated. This course introduces studio lighting for portraits and simple subjects: the equipment, the physics of light, metering, modifiers, classic portrait patterns, ratios, backgrounds, multiple-light setups, safety and a capstone project. PHOT-211 builds on it with advanced setups, high-key and low-key work, gels and still life. This first lesson describes the studio space, the language photographers use to describe light, and the way of thinking that lets you see and control it.
What a studio needs
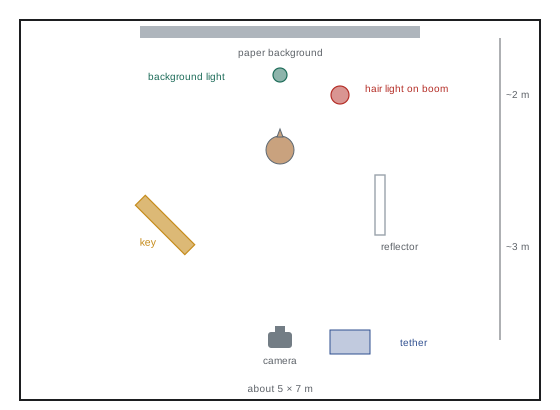
A studio does not have to be large or expensive. Many professional portraits are made in a spare room, a garage or a rented space with a few lights. What matters is enough space to control the relationships between subject, lights, background and camera. Useful features include:
- Space: a room at least about 5 m long lets you place a subject 1.5 to 2 m in front of a background, with room for lights around them and for the camera at a flattering distance with a short telephoto lens. Larger spaces allow full-length portraits, groups and more separation from the background.
- Ceiling height: at least about 2.7 m allows lights above the subject's head, which is needed for many portrait patterns and for hair lights. Low ceilings limit overhead lights and full-length work.
- Neutral surfaces: white walls and ceilings reflect light everywhere, which can be useful as fill but reduces control; dark or neutral grey walls absorb stray light, giving more contrast and control. Many studios have black curtains or flags to control reflections.
- Light control: the ability to darken the room, with blinds or curtains, so that only the lights you add affect the image, especially for continuous lighting.
- Power: enough electrical outlets and circuits for lights, computers and chargers, safely arranged (Lesson 11).
- Backgrounds: paper rolls, fabric, painted walls or collapsible backdrops, with a support system (Lesson 9).
- Stands, booms, clamps, sandbags and storage to keep everything safe and organized.
- A tethering station or monitor for reviewing images, and somewhere for subjects to prepare.
Seeing light
The most important studio skill is seeing what light is doing. Beginners tend to look at the subject; experienced photographers look at the light on the subject: where the brightest highlight is, how quickly brightness falls off into shadow, the shape and edge of every shadow, the colour of the light and the reflections in the eyes. A useful exercise is to light a simple object, such as a white egg, a ball or a plaster bust, with one light and move the light slowly around it, watching how the shape, shadows and highlights change. Every portrait lighting pattern is simply a particular position of a light relative to a face, and learning to recognize the patterns in photographs, films and paintings trains the eye.
The qualities of light
Photographers describe light with a small vocabulary that is worth learning precisely:
- Intensity: how much light reaches the subject, which determines exposure and depends on the source's power and its distance (Lesson 5).
- Direction: where light comes from relative to the subject and camera, described as front, side, back, top or under light, and by angles such as 45 degrees to the side and 45 degrees above.
- Quality: whether light is hard, producing crisp shadows with sharp edges, or soft, producing gradual shadow edges, and everything between. Quality depends on the apparent size of the source as seen from the subject (Lesson 5).
- Colour: the colour temperature and tint of the light, which should usually match between sources or be deliberately mixed.
- Contrast: the difference in brightness between the lit and shadow sides, controlled by fill and described as a ratio (Lesson 8).
- Fall-off: how quickly light becomes darker across the subject and background, which depends on distance.
| Quality | Controlled by | Effect on the image |
|---|---|---|
| Intensity | Power setting, distance | Exposure, depth of field |
| Direction | Light position | Shape, mood, pattern |
| Hard or soft | Apparent size of the source | Shadow edges, texture |
| Colour | Light type, gels, white balance | Mood, accuracy |
| Contrast | Fill light, reflectors, flags | Drama, depth |
| Fall-off | Distance from subject and background | Separation, gradients |
Highlights, shadows and transitions
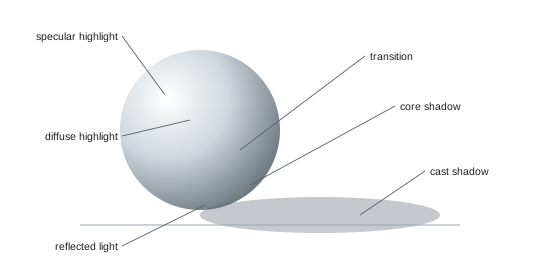
Every lit object has a few distinct zones. The specular highlight is a reflection of the light source itself, bright and often white, visible on shiny surfaces such as eyes, lips, foreheads and glass. The diffuse highlight is the brightest area of the surface that is not a direct reflection, where the object's true colour and texture are best seen. The transition or shoulder is the area where light gradually turns into shadow; its width depends on the softness of the light. The core shadow is the darkest part of the object, facing away from the light. The cast shadow is the shadow the object throws onto other surfaces. Fill light and reflected light lighten the shadow areas. Learning to see these zones, and to control the size and brightness of each, is the foundation of studio lighting, and painters and illustrators use the same vocabulary.
Catchlights
Catchlights are the reflections of light sources in the subject's eyes. They give eyes life and sparkle; eyes without catchlights look dull and lifeless. Their shape and position reveal the lighting: a square or rectangular catchlight from a softbox, a round one from an umbrella or beauty dish, a ring from a ring light, an octagon from an octabox. Photographers often place the main light so that the catchlight sits at about the ten or two o'clock position in each eye, which looks natural because it suggests light from above, like the sun or a window. Multiple catchlights from several lights can look distracting, so fill lights are often placed or sized so that their catchlights are small or removed in retouching.
One light at a time
The most important discipline in studio lighting is to build a setup one light at a time. Start with the main or key light alone, place it, shape it and expose for it until it creates the look you want. Only then add a fill light or reflector, checking its effect on its own and in combination; then a hair light, background light or other accents, each switched on and evaluated individually. Turning lights on and off one by one, and photographing each, reveals what each contributes and prevents the common beginner's mistake of switching everything on and trying to understand the confused result. Many professional setups use only one or two lights; adding more should always have a clear purpose.
Studio lighting and other light
Studio lights do not work in isolation. Ambient light from windows, ceiling fixtures and screens adds to the image, especially with continuous lights and with slower shutter speeds. With flash, the ambient contribution can usually be eliminated by choosing a shutter speed at or near the flash sync speed and an aperture suited to the flash, then taking a test shot with the flashes switched off: if the frame is black or nearly black, the ambient light has no effect (Lesson 3). Reflections from walls, floors and ceilings also add fill light, which may be welcome or may need blocking with black flags. Even the colour of the walls and the photographer's clothing can tint the light on a subject at close range.
Worked problem
Checking for ambient light
A photographer is shooting portraits with flash in a room with windows. Settings are 1/200 s, f/8, ISO 100. A test frame with the flashes turned off shows a faint image of the subject lit by the window. Will this affect the portraits, and how can it be removed?
Show solution
- A faint image means ambient light contributes some exposure, perhaps three or four stops below the flash.
- This may add slight warmth, fill or motion blur from the longer ambient exposure.
- Options: close the curtains, choose a smaller aperture such as f/11 and raise flash power by one stop, or lower ISO if possible.
- Repeat the flash-off test until the frame is black.
Answer: The ambient light adds a little exposure; close curtains or stop down and raise flash power until a flash-off frame is black.
The working relationship
Studio photography is also about people. Subjects often feel exposed in a studio, surrounded by lights and stands and facing a camera with nowhere to hide. A comfortable, well-organized studio, a lighting setup prepared before the subject arrives, music, conversation and clear, kind direction all help people relax, which matters more to a portrait than any lighting technique. Assistants, if you have them, should know the setup and work quietly. Show subjects a few images early in the session to build confidence. PHOT-220 covers working with portrait subjects in depth.
Course overview
Lesson 2 compares strobes and continuous lights; Lesson 3 covers flash power, duration, sync and triggers; Lesson 4 covers metering and exposure in the studio; Lesson 5, the physics of hard and soft light and distance; Lesson 6, modifiers; Lesson 7, classic portrait lighting patterns; Lesson 8, ratios, fill and contrast; Lesson 9, backgrounds and separation; Lesson 10, multi-light setups and colour; Lesson 11, safety, power and the studio as a workplace; and Lesson 12, a lighting portfolio capstone.
A short history of studio lighting
Early portrait studios of the 1840s and 1850s were built under glass roofs and north-facing windows, because the long exposures of daguerreotypes and wet collodion plates demanded as much daylight as possible. Photographers controlled the light with blinds, curtains and reflectors, and clamped sitters' heads in hidden stands to keep them still. Flash powder, introduced in the 1880s, made indoor photography possible without daylight but was dangerous and smoky; flashbulbs replaced it in the 1930s, and electronic flash, developed by Harold Edgerton at MIT in the 1930s, became practical for photographers in the following decades. Hollywood studios in the 1930s and 1940s developed the sophisticated tungsten lighting of glamour portraiture, using hard Fresnel spotlights to sculpt faces. Modern studios combine electronic flash, LED light and digital capture, but the principles of direction, quality and contrast remain those that portrait painters and early photographers explored.
Learning from painters
Painters were masters of light long before photography. Rembrandt's portraits show directional light from a high window, deep shadows and a small triangle of light on the far cheek; Johannes Vermeer's interiors show soft, wrapping window light; Caravaggio's dramatic chiaroscuro uses hard light emerging from darkness. Studying paintings in galleries or reproductions, noticing where the light comes from, how soft it is and how deep the shadows are, trains the eye in ways that transfer directly to the studio. Many photographers keep collections of paintings and photographs they admire and try to recreate their light as exercises.
Keeping a lighting journal
Many photographers keep a lighting journal: a notebook or digital file recording each setup they try, with a diagram, settings, a small print or screenshot of the result and notes on what worked. Over months, the journal becomes a personal reference library of lighting looks that can be recalled for clients, and it reveals patterns in your own preferences and habits that help you develop a recognizable style.
Common mistakes
MistakeSwitching on all lights at once.
InsteadBuild setups one light at a time.
MistakeLooking at the subject rather than the light.
InsteadStudy highlights, shadows and transitions.
MistakeIgnoring ambient light in a flash studio.
InsteadTake a flash-off test frame.
MistakePlacing subjects against the background.
InsteadLeave 1.5 to 2 m for separation.
MistakeLeaving eyes without catchlights.
InsteadPlace the key so catchlights appear at ten or two o'clock.
Summary and key terms
- A studio gives full control over light, background, subject and camera.
- Space, ceiling height, neutral surfaces, power and backgrounds define a usable studio.
- Light is described by intensity, direction, quality, colour, contrast and fall-off.
- Objects show specular highlights, diffuse highlights, transitions, core and cast shadows.
- Catchlights reveal and enliven the lighting.
- Build setups one light at a time.
- Control ambient light and reflections, and care for the subject.
- Key light
- The main light that defines the lighting pattern.
- Fill light
- Light that lightens shadows from the key.
- Specular highlight
- Reflection of the light source on a surface.
- Diffuse highlight
- Brightest non-reflective area of a surface.
- Core shadow
- Darkest area of an object facing away from the light.
- Cast shadow
- Shadow thrown onto another surface.
- Transition
- Gradual change from light to shadow.
- Catchlight
- Reflection of a light in the eyes.
- Ambient light
- Existing light not added by the photographer.
- Fall-off
- Decrease of light with distance.
Practice problems
Work each problem on paper first, then reveal the answer to check.
Minimum useful studio length for portraits?
Show answer
About 5 m.
Why are dark walls useful?
Show answer
They absorb stray light and give control.
Name the six qualities of light.
Show answer
Intensity, direction, quality, colour, contrast, fall-off.
What determines hardness or softness?
Show answer
Apparent size of the source.
What is a specular highlight?
Show answer
A reflection of the light source.
What is the core shadow?
Show answer
The darkest part facing away from the light.
Where are catchlights usually placed?
Show answer
At about ten or two o'clock.
Why build lighting one light at a time?
Show answer
To see what each light contributes.
How do you check for ambient light?
Show answer
Take a test frame with flashes off.
Why show subjects images early?
Show answer
To build confidence and relaxation.
Lesson quiz · 5 questions
Score 60% or more to complete this lesson.
Create a free account to save your progress, take quizzes and earn a certificate.