
PHOT-211 · Lesson 11 of 12 · 25 min
Lighting for composites, passes and plates
Many professional studio images are not single exposures. Advertising photographs of cars, bottles, watches and food are often built from many frames, each lit to show one part of the subject perfectly, then combined in post-production. Portrait and fashion composites place subjects into backgrounds photographed separately. Planning the lighting with compositing in mind makes post-production faster and results more convincing. This lesson covers why photographers shoot in passes, planning a multi-pass shoot, keeping the camera and subject locked, lighting individual passes, light painting with flash and continuous light, shooting plates and backgrounds, matching light for composited subjects, references for retouchers and CGI, and file management.
Why shoot in passes
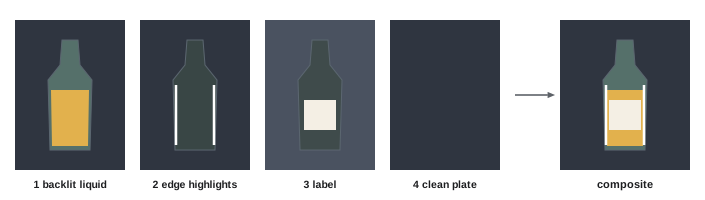
A single lighting setup rarely shows every part of a complex subject at its best. A bottle's label needs soft frontal light, its glass needs backlight or edge highlights, its liquid needs light through it, and its cap needs a gradient reflection; lighting all of these at once creates conflicting reflections and compromises. Shooting separate exposures, called passes, each optimized for one element, and combining them with masks in Photoshop gives control that a single exposure cannot. Passes also allow the photographer to remove stands, hands and supports from the final image, to add elements such as splashes or steam that were captured separately, and to provide the retoucher with options. The approach is standard in product, automotive, architecture and food advertising.
Planning a multi-pass shoot
Planning starts with the final image: a sketch or layout, often supplied by an art director, showing composition, background and mood. From this, list the elements that need separate treatment and the lighting each requires. Decide the order of passes, starting with the main exposure that defines the overall look, then detail passes. Consider whether elements such as liquids, splashes, steam, smoke or hands will be shot separately, and whether the background will be photographed in camera, separately or created digitally. Discuss the plan with the retoucher, who can advise on what they need, such as overlap between passes, clean plates and reference frames. A shot list for each image, recording each pass and its lighting, keeps the shoot organized.
Keeping the camera and subject locked
Passes can be combined easily only if the camera and subject do not move between them. Use a heavy, stable tripod or camera stand, lock all controls, and trigger the camera remotely or tethered, never touching it. Set manual focus, manual exposure and a fixed white balance, and keep the same aperture across passes so that depth of field and lens characteristics match; change light, not camera settings, wherever possible. Secure the subject with putty, clamps or supports that can be removed in retouching. Avoid bumping the table or stands when adjusting lights, and check alignment by overlaying passes at intervals during the shoot. If focus stacking is needed, plan it so that each focus position has the same lighting passes, which can multiply the number of frames considerably.
| Keep locked | Why |
|---|---|
| Camera position and framing | Passes must align pixel for pixel |
| Focus | Sharpness and magnification must match |
| Aperture | Depth of field and lens rendering must match |
| White balance | Colours must combine consistently |
| Subject position | Edges and details must align |
| Background, unless shot separately | Seamless blending |
Lighting individual passes
Each pass is lit for its purpose without worrying about the rest of the image. A label pass may use a soft front light that would create unwanted reflections on the glass, because those areas will not be used. A glass pass may use strip lights that would leave the label in shadow. An edge pass may use a single small light moved to several positions, each creating a highlight in a different place. Exposures can differ between passes, by changing flash power rather than camera settings, so that each element is ideally exposed. Overlap between passes, where adjacent areas are well lit in more than one frame, helps the retoucher blend them smoothly. Keep notes of what each pass is for, and name the files clearly.
Worked problem
Planning passes for a watch
An advertising image of a steel watch requires a clean dial, sparkling indices, gradient reflections on the polished case, a sharp textured strap and a soft shadow on a dark surface. What passes might be shot?
Show solution
- Main pass: overall light from a large softbox above, establishing the gradient on the case and the shadow.
- Dial pass: soft front light through diffusion, angled so the crystal does not reflect it, possibly with a polarizer.
- Indices and hands pass: small hard sources or mirrors to create sparkle on the indices.
- Case edge passes: a strip light moved to two or three positions for highlights along the case edges.
- Strap pass: raking side light to reveal texture.
- Clean plate: the surface without the watch, and a pass with any supports removed or repositioned.
Answer: A main gradient and shadow pass, separate dial, indices, case edge and strap passes, and a clean plate, combined in retouching.
Light painting with flash and continuous light
Light painting builds an image from many exposures, each lit by a single source moved to a different position, or from a single long exposure in which a continuous light is moved across the subject. With flash, the photographer fires a single strobe or speedlight from many positions around the subject, often handheld with a softbox or strip, capturing a frame for each; the frames are layered in Photoshop with the lighten blend mode or masks, choosing the best-lit parts of each. With continuous light, a light wand or small LED panel is moved across the subject during an exposure of several seconds in a dark studio, creating smooth highlights and gradients that would require very large softboxes otherwise. Light painting is widely used for cars, furniture, architecture and products, allowing a single photographer with one light to achieve the look of a large lighting crew. It requires a locked camera, a dark studio and patience.
Shooting plates and backgrounds
A plate is a photograph of a background or environment, shot separately to be combined with a subject. Plates may be locations, sets, skies, textures or empty versions of the studio set. For a convincing composite, plates should be shot with the same camera height, angle, focal length and perspective as the subject will be, and with the lighting direction and quality recorded, so that the subject can be lit to match. Shoot plates with extra space around the intended crop, at high resolution, and with a range of exposures for flexibility. Clean plates, the same frame without the subject, people, stands or supports, are invaluable for removing unwanted elements. Recording the time of day, sun direction and weather for outdoor plates helps match studio lighting later.
Matching light for composited subjects
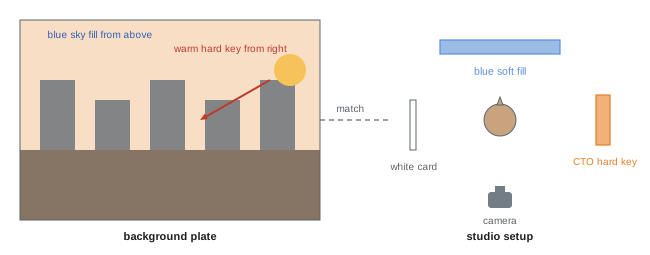
When a subject is photographed in the studio to be placed into a separately shot background, the studio lighting must match the plate. Consider the direction of the main light in the plate, such as the sun's position, and place the studio key to match; the quality of light, hard sunlight or soft overcast; the colour temperature, warm evening light or cool shade; the ambient fill level and colour, such as blue sky fill outdoors; and any rim or reflected light from surfaces in the scene, such as a bright wall or water. Shadows on the ground must also match; shooting the subject on a surface similar to the plate's ground, or providing a separate shadow pass, helps. Camera height and focal length must match the plate so that perspective is consistent. Mismatched light is the most common reason composites look fake.
References for retouchers and CGI
Composites increasingly combine photography with computer-generated imagery (CGI). Products may be rendered digitally and placed into photographed scenes, or photographed products placed into rendered environments. Photographers can support this by providing references: grey and chrome spheres photographed in the set, which show the direction and quality of light and the reflections of the environment; colour charts and grey cards; HDR panoramas of the set or location captured with bracketed exposures, used by 3D artists to light virtual objects; measurements of camera height, distance and focal length; and notes or diagrams of the lighting. These references allow retouchers and CGI artists to match light, colour and perspective accurately.
File management for composites
Multi-pass shoots can produce hundreds of frames per final image. Organize them carefully: name files by image, pass and version; keep selects and notes in the capture software; process all passes for one image with identical raw settings, synchronized from one frame, so that they blend consistently; export layered files or organized folders for the retoucher; and record the purpose of each pass in a document or in metadata. Back up every frame, since passes that seem unnecessary during the shoot may be needed during retouching. Clear organization reduces retouching time and cost, which is a significant part of commercial budgets.
Compositing people into scenes
Portrait and fashion composites place people photographed in the studio into backgrounds such as landscapes, cityscapes or fantasy environments. In addition to matching light, consider the subject's pose and gaze in relation to the scene, the depth of field and focus of the background plate, the scale of the subject relative to objects in the scene, and contact with the ground, such as feet on a surface and their shadows. Shooting the subject on a background similar in tone to the plate, such as grey for neutral scenes, reduces colour spill on edges and simplifies masking. Hair and semi-transparent elements such as veils are the most difficult to composite, so lighting them with clear separation from the background helps.
Green and grey screen in stills
Green and blue screens are used in stills as in film, but many stills photographers prefer neutral grey or white backgrounds for compositing, because they produce less colour spill and are easier to mask with modern AI tools. Where green screen is used, light it evenly and separately from the subject, keep the subject well away from it to avoid green spill, and add a rim light to separate edges. Neutral backgrounds lit slightly brighter than the subject's edges give clean outlines for masking.
Automotive and large-product composites
Cars and large products are among the most complex composite subjects. They may be photographed in large studios with enormous overhead softboxes, called light banks, or on location with light painting at dusk, combining dozens of frames for reflections along each panel. Automotive retouchers combine passes for the body, wheels, interior, lights and background, often adding CGI elements. The principles, controlling reflections, shooting passes and matching light, are the same as for small products, on a much larger scale.
Planning time and cost for composites
Composites require more time in both shooting and retouching, so they must be budgeted accordingly. Clients should understand the number of passes and retouching hours involved, and approve the approach before the shoot. Efficient planning, clear communication with the retoucher and well-organized files reduce costs and ensure that the final images meet the brief.
Testing a composite before the full shoot
Before committing to a complex composite, shoot a quick test: a rough version of each pass, combined loosely in Photoshop, reveals problems with alignment, perspective, light matching and edges early, when they are easy to fix. Showing the rough composite to the client or art director confirms the direction before time is invested in polished passes and retouching. Testing in this way often saves hours later.
Common mistakes
MistakeTouching the camera between passes.
InsteadLock the camera and trigger remotely or tethered.
MistakeChanging aperture between passes.
InsteadChange light power, not camera settings.
MistakeLighting every element in one exposure.
InsteadLight each element in its own pass.
MistakeStudio light that ignores the plate.
InsteadMatch direction, quality, colour and perspective.
MistakeDisorganized pass files.
InsteadName, sync and document every pass.
Summary and key terms
- Passes light each element of a complex subject at its best.
- Plan passes from the final layout with the retoucher.
- Lock camera, focus, aperture, white balance and subject.
- Light each pass for its purpose and overlap adjacent areas.
- Light painting with flash or continuous light simulates large sources.
- Plates and clean plates support composites; studio light must match them.
- References and organized files support retouchers and CGI artists.
- Pass
- Separate exposure lit for one element.
- Composite
- Image combined from several frames.
- Clean plate
- Frame without the subject or supports.
- Plate
- Background photographed separately.
- Light painting
- Building light from many positions or a moving source.
- Lighten blend mode
- Blend keeping the brighter pixels.
- Light wand
- Handheld continuous light for light painting.
- Chrome sphere
- Reference showing reflections of the environment.
- HDR panorama
- Bracketed panoramic capture used to light CGI.
- CGI
- Computer-generated imagery.
Practice problems
Work each problem on paper first, then reveal the answer to check.
Why shoot a product in passes?
Show answer
To light each element at its best without conflicts.
What should the retoucher advise on?
Show answer
Overlap, clean plates and references needed.
Name four things to keep locked.
Show answer
Camera, focus, aperture, white balance, subject.
How should exposure differ between passes?
Show answer
By flash power, not camera settings.
Why overlap passes?
Show answer
For smooth blending.
Which blend mode combines light-painting frames?
Show answer
Lighten.
What is a clean plate?
Show answer
The frame without the subject or supports.
Name three things to match to a plate.
Show answer
Light direction, quality, colour, fill, perspective.
What do chrome spheres show?
Show answer
Light direction and environment reflections.
How should passes be processed?
Show answer
With identical synchronized raw settings.
Lesson quiz · 5 questions
Score 60% or more to complete this lesson.
Create a free account to save your progress, take quizzes and earn a certificate.