
PHOT-211 · Lesson 6 of 12 · 25 min
Freezing motion and high-speed flash
Some of the most striking studio photographs capture moments the eye cannot see: a splash of milk frozen in mid-air, a dancer suspended at the top of a leap, flour exploding from clapping hands, a water balloon at the instant it bursts. These images depend on light: short flash durations freeze movement, precise timing captures the moment, and careful lighting reveals the shapes of liquids, powders and bodies in motion. This lesson covers how flash freezes motion, flash duration measurements and how to shorten them, calculating motion blur, lighting moving people, liquids and splashes, powders and smoke, timing and triggering, safety and protection, and planning high-speed shoots.
How flash freezes motion
In a dark studio with no ambient light, the effective exposure time of a flash photograph is the duration of the flash, not the shutter speed. A flash burst may last from a few thousandths of a second to less than one ten-thousandth, far shorter than any practical mechanical shutter speed for flash sync. If the subject moves only a tiny distance during the flash, it appears sharp. Freezing motion therefore requires short flash durations and very little ambient light, which would otherwise add a blurred ghost image during the longer shutter time. Shooting at the sync speed in a dark studio, or at a narrower aperture with more flash power, suppresses ambient light.
Flash duration measurements
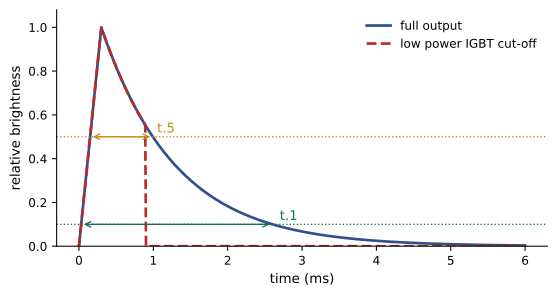
Flash output rises rapidly to a peak and then decays more slowly. Manufacturers quote flash duration using two common measurements: t.5, the time during which the flash is above half its peak brightness, and t.1, the time during which it is above one tenth of its peak. The t.1 value is longer, typically about three times the t.5 value, and much more relevant for freezing motion, because the tail of the flash still exposes the image and can cause blur. A flash quoted at 1/2,000 s t.5 might be about 1/700 s t.1. Comparing lights requires comparing the same measurement.
How flash duration changes with power depends on the flash design. In many traditional studio flashes that reduce power by lowering the capacitor voltage, the flash duration actually becomes longer as power is reduced, while pack systems that switch capacitors out of the circuit may become shorter; most modern IGBT-controlled flashes, including speedlights and many monolights, cut the flash off early at low power, so lower power settings produce much shorter durations, sometimes 1/10,000 s t.1 or shorter at minimum power. Some monolights offer a freeze or action mode optimized for short durations, often with slight colour shifts. Check the manufacturer's data for t.1 at each power level.
| Subject | Approximate speed | Flash duration (t.1) to freeze |
|---|---|---|
| Pouring liquid, slow | 0.5–1 m/s | 1/2,000 s or shorter |
| Splashing water, drops | 2–5 m/s | 1/5,000 – 1/10,000 s |
| Dancer's leap, hair flip | 2–5 m/s at extremities | 1/2,000 – 1/5,000 s |
| Thrown powder, exploding objects | 5–20 m/s | 1/10,000 s or shorter |
| Bursting balloon, shattering glass | 10 m/s or more | 1/20,000 s or shorter |
Calculating motion blur
The amount of blur in the image depends on how far the subject moves during the flash, scaled by the magnification of the image onto the sensor. A useful approach is to estimate blur in the subject plane and compare it with the detail you need to resolve:
Here \(v\) is the subject speed and \(t\) the effective flash duration (t.1). If the image covers a width \(W\) of the scene and has \(N\) pixels across, blur in pixels is approximately \(v t N / W\).
Worked problem
Will this splash be sharp?
Water droplets move at about 3 m/s. The frame covers 30 cm of the scene across 6,000 pixels. The flash has a t.1 duration of 1/1,000 s at the chosen power, or 1/8,000 s at minimum power. How much blur results in each case?
Show solution
- At 1/1,000 s: blur in subject = 3 m/s × 0.001 s = 3 mm.
- Pixels per millimetre: 6,000 / 300 mm = 20 pixels per mm, so blur ≈ 60 pixels: clearly blurred.
- At 1/8,000 s: blur = 3 × 0.000125 = 0.375 mm ≈ 7.5 pixels: much sharper, acceptable for most uses.
- To freeze completely, use shorter durations, such as 1/20,000 s, or accept slight blur as a sense of motion.
Answer: About 60 pixels of blur at 1/1,000 s and about 7.5 pixels at 1/8,000 s; shorter durations are needed for complete sharpness.
Because lower power gives shorter durations on IGBT flashes, high-speed work often uses several flashes at low power rather than one at full power, combined with higher ISO or wider apertures to make up the light. Moving the lights closer also allows lower power.
Lighting moving people
Dancers, athletes, models jumping, and hair or fabric in motion are popular studio subjects. Considerations include providing a large, even lit area so that the subject remains correctly exposed wherever they are at the peak of the action, using large sources such as big softboxes or umbrellas set back from the subject, or strip boxes on each side; rim lights from behind to define the body and the edges of fabric and hair; enough space and a safe, non-slip floor; and short flash durations, especially for hands, feet and hair, which move fastest. Fast recycling times allow bursts or multiple attempts. A fan or assistant throwing fabric adds movement to clothing and hair. Dark backgrounds make movement stand out and hide ambient blur; white backgrounds give an energetic, clean look but require more care with flare.
Liquids and splashes
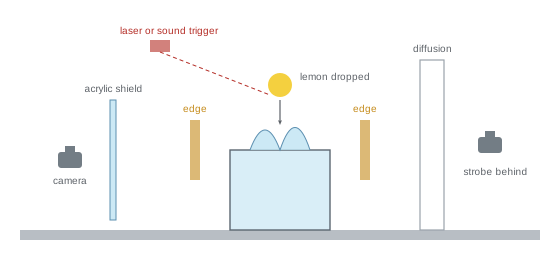
Liquids are lit for their transparency and shape. Clear liquids and glass are usually backlit, either through a diffused panel behind the subject, which makes the liquid glow and shows its outline against a bright field, or with lights from behind the sides against a dark background, which outlines the edges of splashes with bright highlights. Coloured liquids such as juice, wine and coffee are often backlit to reveal their colour, with frontal fill for surfaces and labels. Splashes can be created by dropping objects such as fruit or ice into a container, pouring from a height, throwing liquid from a cup, or using devices that release droplets on a timed schedule. Many attempts are normal, and composite images combining the best splash from several frames are standard in advertising. Protect lights and cameras from liquid with clear acrylic sheets, plastic covers and careful positioning.
Powders, smoke and particles
Flour, coloured powders, glitter, smoke and dust reveal their shapes best when lit from behind or the side, against a dark background, where particles scatter light toward the camera and glow. Front lighting tends to make powder look flat. A strip box or gridded light behind and to the side, with black flags to keep light off the lens, is a common setup. Powders are messy and can be a respiratory hazard; use food-grade or purpose-made powders, ventilate the studio, protect equipment with plastic, and consider masks for the subject and crew. Smoke and haze, from smoke machines or incense, make light beams visible and add atmosphere; check that the studio's smoke detectors and fire safety rules allow them, and inform building management.
Timing and triggering
Capturing the decisive moment in fast action requires timing. Options include:
- Human timing: pressing the shutter at the moment of action, which works for predictable movements such as a dancer's leap, with practice and many attempts.
- Burst shooting: possible with fast-recycling flashes at low power, though the frame rate is limited by recycling.
- Open-shutter technique: in a dark studio, open the shutter on bulb or a long exposure, and fire the flash at the right moment with a trigger; the flash defines the exposure.
- Electronic triggers: sound triggers fire the flash when they detect a noise, such as a balloon popping or glass breaking; laser or infrared beam triggers fire when an object breaks the beam, such as a falling drop; delay settings let you fire a fixed time after the event.
- Drop controllers: devices that release liquid drops with programmable timing and fire the camera and flash, allowing repeatable drop collisions.
Electronic triggers and open-shutter techniques remove the camera's shutter lag from the timing, which matters at millisecond scales.
Safety and protection
High-speed work involves water, breaking objects, powders and moving people near electrical equipment. Keep liquids away from power packs, cables and outlets; use ground fault protection on circuits near water; cover lights and cameras; use safety glasses when breaking glass or popping objects; sweep up debris and dry floors immediately; provide safe flooring and warm-ups for dancers and athletes; and never ask subjects to perform movements beyond their training. Strobe flashes fired repeatedly can be uncomfortable, and rapid flashing can trigger seizures in people with photosensitive epilepsy; ask subjects and crew about sensitivity before rapid sequences.
Planning a high-speed shoot
High-speed shoots benefit from careful planning: a sketch or reference of the intended image; a list of props, liquids and spares, since many objects will be destroyed or spoiled; protection and cleaning materials; a test plan for flash duration, triggering and lighting; and enough time for many attempts. Shoot tethered to review sharpness at full size. Keep notes on what worked, including trigger delays and flash settings, since small changes in timing make large differences. Expect to composite the best elements from several frames in post-production for advertising work.
Stroboscopic and multiple-flash effects
Some flashes offer a stroboscopic or multi mode, firing several low-power bursts at a set frequency during one exposure. A golfer's swing, a dancer's turn or a bouncing ball photographed in a dark studio with a stroboscopic flash appears as a sequence of frozen positions in one image, a technique pioneered by Harold Edgerton at the Massachusetts Institute of Technology in the 1930s and 1940s. Settings include the number of flashes, the frequency in hertz, and the power of each flash, limited by the flash's capacity. The subject should move across a dark background so that the positions do not overlap too much, and the exposure time must be long enough to include all the flashes.
High-speed flash and colour
Very short flash durations at low power can shift colour temperature slightly on some flashes, and some freeze modes produce cooler or warmer light than normal modes. When combining several flashes at different power levels, check colour consistency with a grey card, and correct in raw processing if needed. For product splashes where colour accuracy matters, such as branded drinks, colour charts photographed with the same flash settings help match colours exactly.
Practising high-speed photography
High-speed photography rewards practice with simple setups: drops of water falling into a bowl, a balloon filled with water, a pencil dropped onto a table, or flour thrown against a dark background. Start with a dark studio, manual focus on a pre-set point, a small aperture for depth of field, low flash power for short durations, and the open-shutter technique or a simple sound trigger. Keep notes of timing and settings, and make many attempts; even professionals expect many frames for each successful image.
Lighting for the moment
For high-speed work, light the space where the action will happen, not just the subject at rest. A splash rises above the glass, a dancer leaps above the floor and powder spreads outward, so lights must cover the full area of the peak moment. Pre-focus on that area, mark it for the subject or the drop, and test with a stand-in object such as a hand or a falling ball before the real attempt.
Common mistakes
MistakeRelying on shutter speed to freeze flash images.
InsteadUse short flash durations in a dark studio.
MistakeComparing t.5 with t.1 figures.
InsteadUse t.1 values to judge motion freezing.
MistakeUsing full power on IGBT flashes for action.
InsteadUse lower power, more lights or closer placement.
MistakeFront-lighting splashes and powders.
InsteadBacklight or edge-light them against dark backgrounds.
MistakeNeglecting protection from liquids.
InsteadCover equipment and keep liquids away from power.
Summary and key terms
- In a dark studio, flash duration sets the effective exposure time.
- t.1 durations are longer and more relevant than t.5.
- IGBT flashes give shorter durations at lower power.
- Blur equals subject speed times flash duration, scaled to pixels.
- People in motion need large, even light and rim definition.
- Liquids, powders and smoke are lit from behind or the side.
- Triggers, safety measures and planning make high-speed shoots succeed.
- Flash duration
- Length of the flash burst.
- t.5
- Time the flash is above half its peak.
- t.1
- Time the flash is above one tenth of its peak.
- IGBT
- Switch that cuts the flash off early at low power.
- Freeze mode
- Flash mode optimized for short durations.
- Open-shutter technique
- Long exposure in darkness with the flash timed to the moment.
- Sound trigger
- Device firing the flash when a sound is detected.
- Beam trigger
- Device firing when an object breaks a light beam.
- Drop controller
- Device releasing timed liquid drops.
- Backlighting
- Lighting from behind the subject.
Practice problems
Work each problem on paper first, then reveal the answer to check.
What sets exposure time in a dark-studio flash image?
Show answer
The flash duration.
Which is longer, t.5 or t.1?
Show answer
t.1, typically about three times t.5.
How do IGBT flashes behave at low power?
Show answer
Their duration becomes much shorter.
Blur of a subject at 2 m/s with 1/4,000 s?
Show answer
0.5 mm.
Why use several flashes at low power for action?
Show answer
Shorter durations while keeping enough light.
How are clear liquids usually lit?
Show answer
From behind through diffusion or with edge lights.
How are powders best lit?
Show answer
Backlit or side-lit against a dark background.
Name two electronic triggers.
Show answer
Sound trigger, laser or infrared beam trigger.
What does the open-shutter technique remove?
Show answer
Shutter lag from the timing.
Name two safety precautions.
Show answer
Keep liquids from power, GFCI, safety glasses, covers, ask about photosensitivity.
Lesson quiz · 5 questions
Score 60% or more to complete this lesson.
Create a free account to save your progress, take quizzes and earn a certificate.