
PHOT-220 · Lesson 5 of 12 · 25 min
The face: angles, eyes and expression
The face is the centre of almost every portrait, and small changes in its angle, tilt and expression change how a person is perceived. A chin a few centimetres too high looks arrogant; too low, it creates a double chin and hides the eyes. Eyes that are slightly squinted look confident and warm; wide eyes look startled. A genuine smile transforms a face, while a forced one is immediately recognizable. This lesson covers face angles relative to the camera, the jawline and the "forehead forward" technique, head tilts, eye direction and catchlights, the difference between genuine and forced smiles, serious and neutral expressions, drawing out authentic expression, glasses, and recognizing the decisive moment in a sequence of expressions.
Face angles
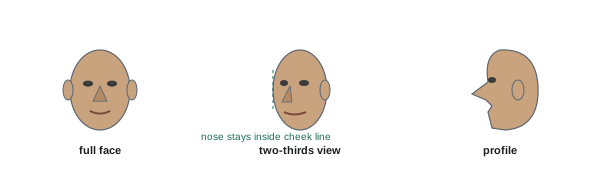
Portrait photographers describe the angle of the face relative to the camera with a few standard terms:
- Full face or frontal: the face points directly at the camera, both ears often visible, symmetrical. It is direct and engaging, used in passports, many headshots and strong editorial portraits.
- Two-thirds or three-quarter view: the face turns partly away, so the far ear disappears and the far cheek narrows, while both eyes remain visible. It is the most common and generally most flattering portrait angle, adding depth and shape.
- Profile: the face turns 90 degrees, showing one side, with only one eye visible. It emphasizes the outline of forehead, nose, lips and chin and can be striking and graphic.
When turning the face away, watch the far eye: if the tip of the nose crosses or touches the outline of the far cheek, or the far eye nearly disappears behind the nose, the turn has gone too far for a three-quarter view; either turn back slightly so that some cheek shows beyond the nose, or go fully to profile. The nose should break the line of the cheek, or stay clearly within it, not just touch it.
The jawline and "forehead forward"
The camera flattens the face, and the area under the chin can merge with the neck, creating a soft or double chin even in slim people. A well-known technique, popularized by headshot photographers, is to ask the subject to push the forehead slightly forward toward the camera and then tilt the chin very slightly down. This stretches the skin under the jaw and creates a defined jawline, separating the chin from the neck with a shadow. Done subtly, it looks natural and confident; overdone, it looks like a turtle stretching its neck, so it works best with a slight high camera position and gentle direction ("bring your forehead toward me a little, now chin down just a touch"). Lifting the chin, by contrast, exposes the neck and nostrils and can look haughty, though it suits some confident poses.
Head tilts
Tilting the head changes mood. Tilting toward the higher shoulder, sometimes called a masculine tilt in older posing manuals, looks strong and assertive; tilting toward the lower shoulder, traditionally called feminine, looks softer and more open. These labels reflect old conventions rather than rules, and today photographers choose tilts by the feeling they want for each person rather than by gender. Tilts should be subtle; strong tilts look staged. A head held perfectly vertical with shoulders level can look stiff, and a small tilt combined with a body angle creates a natural, relaxed look. In group portraits, tilting heads toward each other suggests connection.
The eyes
Viewers look at the eyes first, so they need special attention. Make sure the eyes are sharp and, in most portraits, well lit, with catchlights: small reflections of the light source in the eyes that make them look alive. Catchlights from a window or a large source above eye level, positioned around the ten or two o'clock position, look natural; catchlights below the pupils, from low light, can look odd unless intentional. Eye direction carries meaning: eyes looking into the lens create direct connection with the viewer; eyes looking away suggest thought, distance or a candid moment, and the direction of the gaze leads the viewer's eye through the frame, so leave space in that direction. When subjects look away, make sure enough of the iris and white of the eye shows; eyes turned too far to the side show mostly white and look uneasy. Ask subjects to look at a specific point rather than "off to the side".
Slightly narrowing the lower eyelids, sometimes described as "squinching" after headshot photographer Peter Hurley's term, makes subjects look more confident and engaged than wide-open eyes, which can look startled. Practise it in a mirror to explain it well: it is a slight lift of the lower lids, not a squint.
Genuine and forced smiles
In the nineteenth century, the French neurologist Guillaume Duchenne observed that genuine smiles involve not only the muscles around the mouth but also the muscles around the eyes, which crease the corners of the eyes and lift the cheeks. Smiles produced on demand often involve only the mouth, so they look polite rather than happy. These are sometimes called Duchenne and non-Duchenne smiles. Viewers are very good at distinguishing them, even without knowing why. "Say cheese" produces mouth-only smiles; genuine smiles come from genuine amusement, warmth or recognition, which is why conversation, humour and prompts work (Lesson 3). Some people have a natural closed-mouth smile; others smile broadly showing teeth; both are fine if genuine. A smile that has been held too long freezes and looks forced, so capture smiles as they arrive and fade rather than asking subjects to hold them.
| Feature | Genuine smile | Forced smile |
|---|---|---|
| Eyes | Crinkled corners, narrowed | Unchanged, wide |
| Cheeks | Lifted | Little movement |
| Timing | Arrives and fades naturally | Held, frozen |
| Symmetry | Usually symmetrical | Often asymmetric or tense |
| Trigger | Humour, warmth, memory | Instruction to smile |
Serious, neutral and other expressions
Not every portrait needs a smile. Serious, thoughtful or neutral expressions can convey strength, intelligence, determination or introspection, and many editorial and fine art portraits avoid smiles entirely. A neutral expression is not a blank one: the eyes should be engaged and the face relaxed, with a sense of thought behind it. Directions such as "think about something you are proud of", "imagine you are looking at someone you trust" or "let your face relax, now give me a tiny smile with just your eyes" help produce engaged neutral expressions. Capture a range: a broad smile, a soft smile, a neutral look and perhaps a laugh, then choose with the client which best suits the purpose. Corporate clients often want approachable but professional expressions between a soft smile and a neutral look.
Drawing out authentic expression
Authentic expression comes from a genuine internal state. Techniques include:
- Conversation about topics the subject cares about, shooting as they speak and react.
- Humour: a joke, a silly instruction or the photographer laughing at themselves.
- Memory prompts: "think of the last time you laughed so hard you cried".
- Interaction: with a partner, child, pet or friend behind the camera.
- Movement: walking, turning, looking away and back, which interrupts frozen expressions.
- Breath: a deep breath and exhale before the shot relaxes the face.
Shooting in short bursts during these moments captures the transitions where expressions are most natural. Expressions change in fractions of a second, so continuous shooting or a high frame rate helps in fast-changing moments, though constant shutter noise can make some subjects self-conscious; silent electronic shutters help.
Worked problem
Getting a genuine smile from a serious subject
A doctor needs a warm headshot for a clinic website but produces only a polite, mouth-only smile. What could the photographer try?
Show solution
- Stop shooting and chat about what drew them to medicine or a recent patient success (without details).
- Ask them to look down, think of someone they love seeing, and then look up into the lens.
- Use light humour, for example asking for their "most serious, terrifying doctor face", then catching the laugh that follows.
- Shoot short bursts as the expression arrives, and ask for a softer smile "with your eyes" after the laugh.
Answer: Use conversation, a memory prompt with a look down and back up, and humour that triggers a real laugh, shooting the transitions.
Glasses
Glasses are part of many people's identity and should usually stay on, but they create challenges: reflections of lights and windows, distortion of the eyes, and frames that cut across the eyes. Reduce reflections by raising lights higher, moving them farther to the side, or asking the subject to tilt the glasses slightly downward by lifting the arms a little above the ears; the angle of reflection then moves the reflection below the camera. Turning the face slightly away from the main light also helps. Check that frames do not cut across the pupils, and that the eyes are sharp through the lenses. Thick lenses for strong prescriptions can make the face edge appear indented behind the lens; slightly changing the angle reduces it. Some photographers take one frame with glasses removed to composite the eyes in retouching if needed (PHOT-202), but discuss this with the subject first.
The decisive moment in portraiture
In a sequence of frames of the same pose, expressions vary greatly: eyes half-closed, mouth mid-word, a smile just beginning, a laugh peaking, a look of thought. The best frame is often the one just before or after the obvious moment, when the expression is genuine but not exaggerated. Reviewing sequences carefully, often at 100 % on the eyes and mouth, reveals these differences. Over time, photographers learn to anticipate expressions, pressing the shutter as a smile begins rather than at its peak, and to recognize the small signals, such as a breath or a softening around the eyes, that precede a genuine expression.
Expressions for different purposes
Different uses call for different expressions. A dating profile, a school photograph and a company headshot benefit from warm, approachable smiles; an editorial portrait of an artist may call for intensity or introspection; a campaign portrait of a politician may need confidence and openness; and a fashion image may need cool detachment. Discuss the purpose with the subject and photograph a range of expressions within it. Show subjects a few options during the session so that they understand what you are aiming for and can adjust.
The eyes in different light
Eyes behave differently in different light. Bright light shrinks pupils, making irises more visible and colourful; dim light enlarges pupils, which can make eyes look darker and softer. Asking the subject to look briefly toward a bright area before a frame, or adding light near the camera, shrinks the pupils and adds catchlights. Squinting in bright sun is common; turning the subject away from the sun, using shade or asking them to close their eyes until a count of three avoids it. Very light eyes can wash out under strong light, and very dark eyes can disappear in shadow, so check them closely on the camera's screen.
Practising expressions in a mirror
Photographers who practise expressions in a mirror can explain and demonstrate them better. Try the difference between a smile with and without the eyes, a squinch, forehead forward and chin down, and different head tilts. Notice how small changes affect your own face; this builds the vocabulary and empathy needed to guide others confidently.
Reviewing expressions with the subject
Showing subjects a small selection of expressions on the camera screen, and asking which they prefer, helps them participate and often relaxes them further.
Common mistakes
MistakeTurning the face until the nose touches the cheek line.
InsteadStay clearly in three-quarter view or go to profile.
MistakeLifting the chin to avoid a double chin.
InsteadBring the forehead forward and chin slightly down.
MistakeEyes looking away showing mostly white.
InsteadGive a specific point that keeps the iris visible.
MistakeAsking subjects to hold a smile.
InsteadCapture smiles as they arrive and fade.
MistakeIgnoring reflections in glasses.
InsteadRaise or move the light and tilt the frames slightly.
Summary and key terms
- Full face, two-thirds view and profile each have characteristic effects.
- In three-quarter view, keep the nose clearly within or beyond the cheek line.
- Forehead forward and chin slightly down defines the jaw.
- Head tilts change mood; choose them by feeling, not gender.
- Eyes need sharpness, catchlights and purposeful direction.
- Genuine smiles involve the eyes; draw them out with conversation and humour.
- Manage glasses carefully and choose the decisive frame in each sequence.
- Full face
- Face pointing directly at the camera.
- Two-thirds view
- Face turned partly away with both eyes visible.
- Profile
- Face turned 90 degrees, showing one side.
- Forehead forward
- Technique defining the jaw by pushing the forehead toward the camera.
- Head tilt
- Inclining the head toward one shoulder.
- Catchlight
- Reflection of a light source in the eyes.
- Squinch
- Slight lifting of the lower eyelids.
- Duchenne smile
- Genuine smile involving the eye muscles.
- Neutral expression
- Relaxed, engaged face without a smile.
- Decisive moment
- The frame capturing the strongest expression.
Practice problems
Work each problem on paper first, then reveal the answer to check.
Name the three face angles.
Show answer
Full face, two-thirds view, profile.
What is the most common flattering angle?
Show answer
Two-thirds or three-quarter view.
What signals the turn has gone too far?
Show answer
The nose touches the far cheek line.
How do you define the jawline?
Show answer
Forehead forward, chin slightly down.
Where should catchlights usually appear?
Show answer
Around ten or two o'clock, above the pupils.
What is a squinch?
Show answer
A slight lift of the lower eyelids.
What distinguishes a Duchenne smile?
Show answer
It involves the eyes and cheeks.
Why avoid "say cheese"?
Show answer
It produces mouth-only smiles.
How do you reduce reflections in glasses?
Show answer
Raise or move the light, tilt the frames slightly down.
When is the best frame often found?
Show answer
Just before or after the obvious peak.
Lesson quiz · 5 questions
Score 60% or more to complete this lesson.
Create a free account to save your progress, take quizzes and earn a certificate.