
PHOT-301 · Lesson 4 of 12 · 25 min
Monitors: choice, calibration and profiling
The monitor is the window through which every editing decision is made. If it is too bright, prints will look dark; if it is too blue, prints will look warm; if it cannot show the colours in the file, you will edit blind. A good monitor, properly calibrated and profiled, is the single most important investment in a colour-managed workflow. This lesson covers display technologies, the specifications that matter for photography, uniformity, calibration targets for brightness, white point and tone response, the difference between calibration and profiling, hardware and software calibration, colorimeters and spectrophotometers, verification and maintenance, laptops, tablets and HDR displays, and setting up a second monitor.
Display technologies
Most photo editing monitors are liquid crystal displays (LCDs) with LED backlights. In-plane switching (IPS) panels are preferred because their colour and brightness change little with viewing angle; vertical alignment (VA) panels offer higher contrast but more angle shift; twisted nematic (TN) panels are unsuitable for colour work. Wide-gamut LCDs use special backlights, such as quantum-dot or phosphor-converted LEDs, to cover Adobe RGB or Display P3. Mini-LED backlights with many local dimming zones increase contrast and HDR brightness but can show blooming around bright objects. OLED displays emit light from each pixel, giving true blacks, very high contrast and wide gamuts; they are increasingly used in laptops and reference monitors, though some exhibit automatic brightness limiting, and burn-in is a consideration for static editing interfaces. Glossy screens show deeper blacks but reflect the room; matte screens diffuse reflections, slightly reducing contrast.
Specifications that matter
For photography, the most important monitor characteristics are:
- Gamut coverage: the percentage of sRGB, Adobe RGB or Display P3 the monitor can display. For print work, high coverage of Adobe RGB (95 % or more) lets you see most printable colours.
- Uniformity: how evenly brightness and colour are distributed across the screen. Many monitors are noticeably darker or tinted at the edges; professional models include uniformity compensation.
- Bit depth and internal processing: monitors with high-bit internal look-up tables and 10-bit input paths show smoother gradients after calibration.
- Hardware calibration support: the ability to store calibration inside the monitor, explained below.
- Brightness range: the ability to run stably at low brightness, around 80 to 120 cd/m², for print editing.
- Screen size and resolution: 27 inches at 2560 × 1440 or 3840 × 2160 is common; higher pixel density shows fine detail but small interface elements may need scaling.
- Hood: a hood shields the screen from room light, improving perceived contrast and colour.
Monitors designed for photography and video, from manufacturers such as EIZO, BenQ, ASUS ProArt and others, typically emphasize these features. Consumer gaming monitors often prioritize refresh rate and brightness instead.
| Feature | Why it matters | What to look for |
|---|---|---|
| Panel type | Viewing angle stability | IPS or OLED |
| Gamut | Seeing printable colours | 95 % or more of Adobe RGB or P3 |
| Uniformity | Even judgement across the image | Uniformity compensation, low Delta E across zones |
| Internal LUT | Smooth gradients after calibration | 14- or 16-bit internal LUT |
| Hardware calibration | Accurate, stable calibration | Calibration stored in the monitor |
| Hood | Reduces glare | Included or available |
Calibration targets
Calibration adjusts the monitor to a known state. Three targets are central:
- Luminance (brightness) of white: for print editing, typically 80 to 120 cd/m², chosen so that the screen white matches the brightness of paper under your viewing light. For web and general work, 120 to 160 cd/m² is common. Very bright screens are the most common cause of dark prints.
- White point: D65 (about 6,500 K) is standard for screen and video work and is a good default; for print matching, many photographers use D50 or a custom white point measured from their viewing booth, or D65 with a booth. The best choice is the one that makes the screen white look like paper under your print viewing light.
- Tone response: gamma 2.2 or the sRGB curve for general work; some print workflows use L* (perceptually uniform lightness). Modern colour-managed applications compensate for whatever tone response the profile describes, so consistency matters more than the specific choice.
Some calibration software also sets a target black level or contrast ratio, lifting the black slightly to simulate the limited contrast of prints, which can help soft proofing on monitors with very deep blacks.
Worked problem
Matching screen brightness to a print
A photographer views prints in a booth that illuminates the print at about 500 lux, and uses mostly bright white papers reflecting about 90 % of light. What screen luminance would roughly match the paper white?
Show solution
- For a matte (Lambertian) surface, luminance \(L \approx \frac{E \times \rho}{\pi}\).
- \(L \approx \frac{500 \times 0.90}{3.14} \approx 143\) cd/m².
- Many photographers find a slightly lower screen luminance, around 100 to 120 cd/m², matches better because a self-luminous screen appears brighter than reflective paper of the same luminance.
- Set the calibration target near 110 cd/m² and adjust after comparing a test print with the screen.
Answer: Roughly 140 cd/m² by calculation; in practice about 100–120 cd/m², refined by comparing prints and screen.
Calibration and profiling
Calibration and profiling are two different steps, usually performed together by the same software. Calibration changes the monitor's behaviour to meet the targets: adjusting the backlight, the white point and the tone curve. Profiling then measures the calibrated monitor, recording its actual primaries, white point and tone response in an ICC display profile. The operating system and colour-managed applications use the profile to convert images from their colour spaces to the monitor, so that colours display correctly. Without the profile, a calibrated monitor still shows incorrect colour in wide-gamut files, because applications do not know its gamut; without calibration, the profile describes an arbitrary state that may drift or be far from neutral.
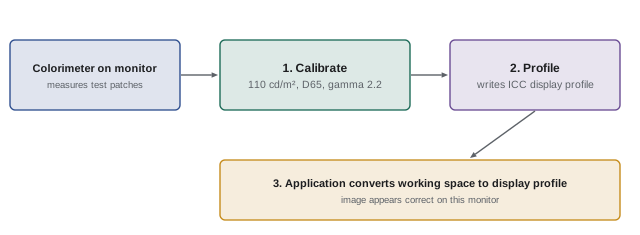
Hardware and software calibration
With software calibration, the calibration software adjusts the monitor's on-screen controls where possible and loads correction curves into the computer's graphics card, which modify the signal sent to the monitor. Because the graphics card usually works in 8 bits per channel, these corrections can reduce the number of distinct levels and cause banding. With hardware calibration, available on professional monitors, the calibration is written into the monitor's own high-bit internal look-up table, so the signal from the computer is unchanged and gradients remain smooth. Hardware calibration also stores multiple calibration presets, such as print editing, web and video, and some monitors have built-in calibration sensors that recalibrate on a schedule.
Measurement instruments
Monitors are calibrated with colorimeters or spectrophotometers. Colorimeters, such as models from Calibrite and Datacolor, are fast, sensitive at low light levels and well suited to displays, but they need corrections for different backlight types, which good calibration software applies using spectral correction data for specific display technologies. Spectrophotometers measure full spectra and are needed for profiling printers; they can measure displays too, but are slower and less accurate in deep shadows. Many professionals use a colorimeter for displays and a spectrophotometer for prints. Open-source software such as DisplayCAL, built on ArgyllCMS, supports many instruments and offers detailed control and verification; manufacturer software is simpler and often required for hardware calibration.
Verification and maintenance
After calibration, verification measures a set of colour patches and reports how accurately the monitor reproduces them, as average and maximum Delta E 2000. Good professional monitors typically achieve average values below 1 to 2. Verification also checks greyscale neutrality and uniformity. Monitors drift as backlights age and electronics warm up, so recalibrate every two to four weeks for critical work, or monthly at minimum, after warming the monitor up for at least 30 minutes. Keep room lighting consistent while editing, avoid direct light on the screen, and set the operating system's automatic brightness, night shift and true tone features to off, since they change the display in ways the profile does not know about.
| Task | Frequency |
|---|---|
| Warm up before critical work | At least 30 minutes |
| Recalibrate (critical print work) | Every 2–4 weeks |
| Verify accuracy | After each calibration |
| Check uniformity | Every few months |
| Disable automatic brightness and colour shifting | Once, and after system updates |
Laptops, tablets, phones and HDR displays
Many photographers edit on laptops and review images on tablets and phones. High-quality laptops often have wide-gamut, factory-calibrated displays, and can be calibrated with a colorimeter, but their small size, viewing angle sensitivity and glossy screens make critical judgement harder; an external calibrated monitor is preferable for print work. Tablets and phones are useful for checking how images will appear to audiences, but they apply their own processing and brightness adjustments. HDR displays can show images with highlights far brighter than paper white; when editing for print, set the editing application to standard dynamic range or limit highlight brightness, since prints cannot show HDR highlights. Some applications now support HDR photo editing, which is valuable for screen output but must be handled separately from print versions (PHOT-201).
Setting up the editing environment around the monitor
The monitor works within a room. Neutral grey or white walls, controlled ambient light of moderate level and constant colour, no coloured light falling on the screen and a neutral grey interface theme all help. Many photographers place a viewing booth beside the monitor so that prints can be compared directly with the screen under standard light (Lesson 5). A second monitor can display palettes and tools, but if it is used for colour judgement, calibrate it to the same targets, and remember that two different models will never match exactly; reserve critical decisions for the better display.
Monitor resolution, scaling and sharpness judgements
Higher pixel density makes on-screen detail look sharper than it will in print. A 27-inch 4K monitor has about 163 pixels per inch, so viewing an image at 100 % shows it at 163 ppi, much smaller than a print at 300 ppi. Viewing at 50 % or 66.7 % on such displays approximates how detail and sharpening will appear in print at normal viewing distances. Operating system scaling, used to make interfaces readable on high-density displays, can also affect how applications display images at "100 %". Many printers judge sharpening and noise reduction at the zoom level that matches the print's apparent size on screen, then confirm with test prints.
Matching multiple monitors and devices
Studios with several editing stations need monitors to match closely, so that retouchers, art directors and clients see the same image. Use the same monitor model where possible, calibrate all to the same targets with the same instrument and software, and verify them against each other with a common test image. Slight differences in white point appearance are common even when measurements agree, because of observer metamerism between narrow-band backlights and the instrument's assumptions; some calibration software allows visual white-point matching adjustments. Document targets and calibration dates for each station.
Monitor gamut and what you can see
A monitor can only display colours within its gamut. If the monitor covers only sRGB, colours in an Adobe RGB or ProPhoto RGB file that are outside sRGB are clipped on screen, even though they remain in the file and may print. You may unknowingly edit colours you cannot see, for example pushing saturation in cyan areas that look unchanged on screen but become garish in print. Wide-gamut monitors reduce this risk, and soft proofing with gamut warnings for the monitor itself helps.
Signs that a monitor needs attention
Watch for warning signs between calibrations: neutral grey interface elements that look tinted, gradients that show banding that was not there before, prints that suddenly look darker or warmer than the screen, or verification results that drift above your tolerance. Backlight ageing usually reduces maximum brightness and shifts white point slowly; a monitor that can no longer reach your target luminance at its maximum setting is nearing the end of its useful life for critical work. Recalibrate first, then consider replacement if problems persist.
Finally, keep a simple log of each calibration: date, targets, measured luminance, white point and verification results. Over months, the log shows how the monitor is ageing and gives early warning when performance is slipping.
Common mistakes
MistakeEditing for print at maximum screen brightness.
InsteadCalibrate to about 80–120 cd/m² for print work.
MistakeCalibrating without profiling.
InsteadCalibrate and profile so applications know the display.
MistakeLeaving automatic brightness and night modes on.
InsteadDisable features that change the display.
MistakeCalibrating a cold monitor.
InsteadWarm up for at least 30 minutes.
MistakeNever recalibrating.
InsteadRecalibrate every few weeks and verify.
Summary and key terms
- IPS and OLED panels suit colour work; wide-gamut panels show more printable colours.
- Gamut, uniformity, internal LUTs and hardware calibration matter most.
- Calibrate luminance, white point and tone response to known targets.
- Match screen brightness to paper under the viewing light.
- Calibration adjusts the monitor; profiling describes it for applications.
- Hardware calibration in the monitor avoids banding from graphics card corrections.
- Verify, recalibrate regularly and control the room around the monitor.
- IPS
- In-plane switching LCD panel with stable viewing angles.
- OLED
- Self-emissive display with true blacks.
- Uniformity
- Evenness of brightness and colour across the screen.
- Luminance
- Brightness measured in candelas per square metre.
- White point
- Colour of the display's white.
- Calibration
- Adjusting a device to defined targets.
- Profiling
- Measuring a device and recording its behaviour.
- Hardware calibration
- Calibration stored in the monitor's internal LUT.
- Colorimeter
- Filter-based instrument for measuring displays.
- Verification
- Measuring accuracy after calibration.
Practice problems
Work each problem on paper first, then reveal the answer to check.
Which panel types suit photo editing?
Show answer
IPS and OLED.
What gamut coverage helps print work?
Show answer
About 95 % or more of Adobe RGB or P3.
Typical luminance for print editing?
Show answer
About 80–120 cd/m².
Luminance of paper reflecting 90 % under 400 lux?
Show answer
About 115 cd/m².
What does profiling record?
Show answer
The calibrated display's primaries, white point and tone response.
Why does software calibration risk banding?
Show answer
Corrections in an 8-bit graphics card reduce levels.
Which instrument is needed for printers?
Show answer
A spectrophotometer.
What verification result is good?
Show answer
Average Delta E 2000 below about 1–2.
How long should a monitor warm up?
Show answer
At least 30 minutes.
Name two OS features to disable.
Show answer
Automatic brightness, night shift, true tone.
Lesson quiz · 5 questions
Score 60% or more to complete this lesson.
Create a free account to save your progress, take quizzes and earn a certificate.