
PHOT-301 · Lesson 7 of 12 · 25 min
Printer profiles and custom profiling
A printer profile describes how a specific printer, with specific inks, paper and driver settings, turns colour values into colour on paper. It is the most important single component of a fine printing workflow: with a good profile and correct settings, prints match the soft proof closely; with the wrong profile, or the right profile used with the wrong settings, colour goes astray no matter how carefully the image was edited. This lesson covers what a printer profile contains, canned profiles from printer and paper manufacturers, the settings a profile depends on, linearization and printer calibration, creating custom profiles with target charts and spectrophotometers, profile quality and evaluation, profiles for labs and print services, and keeping profiles up to date.
What a printer profile contains
Printers are complex devices. Their output depends on the ink set, the amount of ink laid down, how inks interact on the paper surface, the paper's whiteness and absorbency, and the driver's internal processing. A printer profile is a look-up table (LUT) profile that maps between device values and the profile connection space in both directions. The forward tables (device to PCS) describe what colour each combination of RGB or CMYK values produces; the reverse tables (PCS to device), one for each rendering intent, tell the colour management system which device values to send to reproduce a requested colour. The profile also describes the printer's gamut, used for gamut warnings and soft proofing, and the paper's white point and darkest black.
Canned profiles
Printer manufacturers supply profiles for their own papers, installed with the printer driver; paper manufacturers such as Hahnemühle, Canson, Ilford, Moab, Red River and others publish profiles for their papers on popular printers. These are often called canned or generic profiles. They are made by measuring prints from a representative printer of each model, and modern printers are consistent enough from unit to unit that canned profiles from reputable sources usually work well. Each canned profile comes with specific instructions: the media type setting to choose in the driver, the print quality, any special settings such as platen gap or drying time, and the rendering intent recommendations. A canned profile is valid only when these settings are followed exactly.
The settings a profile depends on
A profile describes the printer's behaviour under particular settings, so the printing settings must match those used to make the profile. The critical settings include:
- Media type or paper type in the driver, which controls how much ink is laid down and which black ink is used (photo black for glossy and lustre papers, matte black for matte papers on printers with both).
- Print quality or resolution setting, which affects dot patterns and ink density.
- Colour management in the driver: when the application manages colour with the profile, the driver's colour management must be turned off ("no colour management", "off" or "application managed"). Leaving it on causes a double conversion.
- High-speed bidirectional printing, which can slightly change colour and sharpness.
- Ink set and firmware, if the printer model has variants.
Recording these settings with each profile, and saving them as driver presets, prevents mistakes.
| Setting | Why it matters | Typical practice |
|---|---|---|
| Media type | Controls ink limits and black ink choice | Use the type named in the profile instructions |
| Quality or resolution | Changes dot structure and density | Match the profiling setting |
| Driver colour management | Prevents double conversion | Off when the application manages colour |
| Black ink | Photo black vs matte black | Matte black for matte papers |
| Bidirectional printing | Can shift colour and sharpness | As used for profiling |
Linearization and printer calibration
Some professional printers and raster image processors (RIPs) include calibration: measuring the printer's current output with a built-in or external instrument and adjusting it to a reference state, so that the printer behaves consistently over time and matches other units of the same model. Linearization makes equal steps in device values produce perceptually equal steps in density for each ink. In a profiling workflow with a RIP, the printer is first linearized and ink limits are set for the paper, then the profile is built on top. Desktop photo printers usually manage this internally through the driver and media settings, and their consistency is good enough that photographers rarely need separate calibration.
Creating custom printer profiles
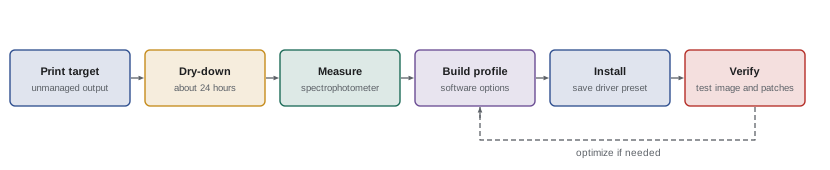
Custom profiles are made for papers without good canned profiles, for unusual settings, for printers with different inks, or for the highest accuracy on a particular printer. The process is:
- Print a target chart: hundreds to thousands of colour patches generated by profiling software, printed from a utility that sends the values to the printer without any colour management, using the exact settings that will be used for printing.
- Let the chart dry: inks change colour as they dry, a phenomenon called dry-down; most inkjet prints stabilize within a few hours, but some papers need 24 hours.
- Measure the patches with a spectrophotometer, either a handheld strip-reading instrument or an automated table scanner.
- Build the profile in software, choosing options such as perceptual rendering style, gamut mapping, and black generation for CMYK devices, and the measurement condition for papers with optical brighteners (Lesson 5).
- Install the profile and save the printer settings as a preset.
- Evaluate the profile with test images and verification patches.
Larger charts, such as 1,000 to 3,000 patches, describe the printer more precisely, especially in subtle neutrals and dark tones; many profilers also add an optimization pass, printing a second chart focused on areas that need improvement.
Worked problem
Planning a custom profile
A photographer wants a custom profile for a cotton rag paper on a 17-inch printer. The profiling software offers a 1,617-patch chart that prints on three sheets of A3 paper costing $9 each, and the spectrophotometer reads a strip of patches in about 10 seconds with 33 patches per strip. Approximately how long does measurement take, and what are the paper costs?
Show solution
- Strips needed: 1,617 / 33 = 49 strips.
- Measurement time: 49 × 10 s ≈ 490 s, about 8 minutes, plus handling time.
- Paper cost: 3 × $9 = $27, plus ink.
- Allow a 24-hour dry-down before measuring, and keep a spare sheet for an optimization chart.
Answer: About 8–15 minutes of measuring and about $27 in paper, after a 24-hour dry-down.
Profile quality and evaluation
A good profile reproduces neutrals as neutral, gradients smoothly, saturated colours without obvious shifts, and shadows with detail. Evaluation methods include:
- Printing a standard test image containing skin tones, neutral grey ramps, saturated colours, pastels, deep shadows and fine detail, and viewing it under D50 light.
- Printing and measuring a verification chart, then calculating Delta E 2000 between expected and measured values; good profiles typically achieve averages around 1 to 2 for in-gamut colours.
- Comparing the print with the soft proof on a calibrated monitor.
- Checking neutrals under different light sources for metameric tints.
Common problems include colour casts in neutral greys, especially in shadows; banding or bumps in gradients from noisy measurements; poor dark-tone separation; and unexpected hue shifts in blues and purples. Many of these indicate mismatched settings rather than a bad profile, so check settings first.
Profiles for labs and print services
Professional labs printing on chromogenic papers, inkjet systems or other processes often publish profiles for soft proofing, along with instructions on whether to convert files to their profile or send them in a standard space such as sRGB or Adobe RGB. Some labs apply their own colour management and prefer unconverted files; others print exactly the values received and expect files converted to their profile. Using the wrong approach causes double conversions or none. Ask labs for their profiles and instructions, soft proof with their profiles, and order test prints of a reference image before large orders. Consumer labs often apply automatic corrections; professional labs usually offer an option to turn them off.
Keeping profiles current
Profiles can become outdated when ink formulations, firmware or paper batches change, when the printer ages, or after printhead replacement. Signs include casts in neutrals or shifts compared with earlier prints of the same file. Periodic checks with a verification chart or a reference print, compared under the same light, detect drift. Paper manufacturers sometimes change coatings without changing product names, so new batches may need new profiles. Store profiles with clear names including printer, paper, settings and date, for example "P900_PhotoRag308_UltraPremiumMatte_2026-10.icc", and archive older versions so that earlier prints can be reproduced.
Profiling for different printers of the same model
Studios with several identical printers, or labs with many, need prints from each to match. Modern printers are often close enough for one profile, but small differences can matter for critical work. Approaches include using printer calibration features to bring each unit to the same reference state, building a profile on one calibrated printer and using it for all, or building individual profiles. Comparing prints of the same test image from each printer under standard light, and measuring a verification chart, shows whether separate profiles are necessary.
Profiling with RIPs and ink limits
When profiling with a RIP, the printer is first linearized for each paper and ink limits are set to the maximum amount of ink the paper can absorb without bleeding, pooling or bronzing. Total ink limits are expressed as a percentage of full coverage. Setting limits correctly avoids muddy shadows and drying problems and maximizes gamut. The RIP then prints a profiling target through the linearization, which is measured and used to build the profile. RIP profiling gives fine control but requires more expertise than profiling through the manufacturer's driver.
Profiling services
Many photographers use profiling services instead of buying a spectrophotometer. The service sends a target chart file with instructions; the photographer prints it with colour management off and the intended settings, lets it dry and mails it back; the service measures it and returns a custom profile. This is an economical way to obtain custom profiles for a few papers, provided the instructions are followed exactly. Paper manufacturers sometimes offer free custom profiling for their papers.
Common printer profile pitfalls
Some problems recur. Printing the target with colour management on produces a profile that corrects the wrong behaviour. Printing at a different quality or media setting than intended for real prints produces mismatches. Measuring under different measurement conditions than used for viewing causes problems with OBA papers. Using the profile with a different paper size or roll versus sheet rarely matters, but different paper batches sometimes do. Changing printer firmware can alter dot placement or ink usage. Keeping a checklist for profiling prevents most of these issues.
Choosing between canned and custom profiles
For most photographers, high-quality canned profiles from the paper or printer maker give excellent results. Custom profiles are worth the effort when a paper lacks a good profile, when the printer uses third-party inks, when you need the highest neutrality for black-and-white printing through colour profiles, or when you need to match several printers or prints made years apart. Test the canned profile first, with a reference image and verification chart, before investing in custom profiling.
Naming and organizing profile files
Profiles accumulate quickly: display profiles for each calibration, printer profiles for each paper, lab profiles and custom versions. Store them in the system profile folders where applications can find them, but keep a separate organized archive with descriptive names, dates and notes on settings. Remove outdated or duplicate profiles from the active folders to avoid choosing the wrong one in print dialogues.
Remember, too, that profiles describe a printer and paper at one point in time. A short verification print each month, compared with an archived reference print, keeps confidence high without the cost of reprofiling.
Common mistakes
MistakeUsing a profile with different media settings.
InsteadFollow the media type and quality instructions exactly.
MistakeLeaving driver colour management on.
InsteadTurn it off when the application manages colour.
MistakeMeasuring charts while still wet.
InsteadAllow dry-down, often 24 hours.
MistakePrinting target charts with colour management.
InsteadPrint targets without any colour management.
MistakeBlaming the profile before checking settings.
InsteadVerify settings, then evaluate the profile.
Summary and key terms
- Printer profiles are LUT profiles describing a printer, ink, paper and settings.
- Canned profiles work well when their settings are followed exactly.
- Media type, quality, black ink and driver colour management must match the profile.
- Professional printers and RIPs may be linearized before profiling.
- Custom profiles come from printing and measuring target charts after dry-down.
- Evaluate profiles with test images, verification charts and soft proofs.
- Follow lab instructions and keep profiles named, dated and current.
- Printer profile
- ICC profile for a printer, ink and paper combination.
- Canned profile
- Generic profile supplied by a printer or paper maker.
- Media type
- Driver setting controlling ink and handling for a paper.
- Double conversion
- Colour converted by both application and driver.
- Linearization
- Adjusting device output to even density steps.
- RIP
- Raster image processor controlling a printer.
- Target chart
- Printed patches used to build a profile.
- Dry-down
- Colour change as ink dries.
- Spectrophotometer
- Instrument measuring spectral reflectance.
- Verification chart
- Patches printed to check profile accuracy.
Practice problems
Work each problem on paper first, then reveal the answer to check.
What does the forward table of a printer profile describe?
Show answer
Colour produced by each device value.
Who supplies canned profiles?
Show answer
Printer and paper manufacturers.
Name three settings tied to a profile.
Show answer
Media type, quality, black ink, driver colour management.
Why turn off driver colour management?
Show answer
To avoid double conversion.
What is dry-down?
Show answer
Colour change as ink dries.
How should target charts be printed?
Show answer
Without colour management, with the working settings.
Strips for 990 patches at 33 per strip?
Show answer
30.
What average Delta E suggests a good profile?
Show answer
About 1–2 for in-gamut colours.
What should you ask a lab?
Show answer
For profiles and whether to convert files.
When might profiles need rebuilding?
Show answer
After ink, firmware, paper batch or printhead changes.
Lesson quiz · 5 questions
Score 60% or more to complete this lesson.
Create a free account to save your progress, take quizzes and earn a certificate.