
PHOT-310 · Lesson 3 of 12 · 29 min
The product studio and equipment
A product studio is a controlled environment where every photon that reaches the product is placed there deliberately. Unlike portrait or event photography, where the photographer adapts to people and places, product photography usually means building a small world from nothing: a surface, a background, a few carefully shaped light sources, reflectors and flags, and a camera locked in position. The equipment does not need to be expensive, but it does need to be stable, precise and suited to the size and surface of the products being photographed. This lesson describes the spaces, cameras, lenses, supports, shooting tables, lights, modifiers and grip used in commercial product work, and explains how to choose a lens and working distance with simple calculations. PHOT-220 covered the basic behaviour of strobes, continuous lights and modifiers; here the focus is on how those tools are adapted to tabletop and product work.
The studio space
Product studios range from a corner of a room with a table and two lights to purpose-built facilities with drive-in doors for cars and furniture. For small and medium products, the essential requirements are:
- Control of ambient light: blackout blinds or windowless rooms, so that only the studio lights affect the product. Daylight leaking in will add uncontrolled colour and reflections.
- Neutral surroundings: walls and ceilings painted neutral grey, black or white, depending on whether you want the room to add fill light or not. Brightly coloured walls reflect coloured light onto shiny products.
- Space around the set: room for light stands, booms and flags on all sides of the table, and enough distance behind the product to light the background separately.
- Ceiling height: at least 3 metres helps with overhead lights and booms; larger products and overhead flat-lay work need more.
- Power and safety: enough circuits for strobes, continuous lights, computers and monitors, with cables run safely and taped down or covered.
- Product handling: clean storage for products before and after the shoot, gloves, lint-free cloths, compressed air, cleaning supplies and a workbench for preparation. Handling marks, dust and fingerprints are the most common causes of retouching time.
- Secure storage: unreleased products often require locked storage and a log of who handled them.
Larger studios add a cyclorama (a curved, seamless wall), a drive-in door, overhead rigging, a kitchen for food work and separate areas for clients, styling and retouching.
Cameras
Most commercial product photography is shot on high-resolution digital cameras: full-frame mirrorless or DSLR bodies with 45 to 60 megapixels, or medium-format cameras and digital backs with 50 to 150 megapixels. High resolution gives retouchers room to work, allows large prints and crops, and captures fine detail in textures, fabrics and labels. For e-commerce, where images are displayed at a few thousand pixels, 24 to 45 megapixels is often more than enough, and speed, reliability and tethering stability matter more than maximum resolution.
Useful features for product work include reliable tethering over USB or network, live view with magnification for precise focus, electronic shutter or electronic first curtain to reduce vibration, focus bracketing for focus stacking, and pixel-shift modes that combine several frames to increase colour accuracy and resolution for static subjects. Technical cameras and view cameras with movements are still used for some high-end still life, architecture and packaging work because they allow precise control of the plane of focus and perspective.
Lenses and working distance
The choice of lens affects perspective, working distance and the way reflections behave. For product photography, longer focal lengths are generally preferred because they let the camera sit further from the product. A greater distance reduces perspective distortion, so that rectangular boxes look rectangular and the front and back of a product appear in natural proportion. It also leaves room around the product for lights, flags and reflectors, and reduces the chance of the camera itself reflecting in shiny surfaces.
Common choices on full-frame cameras include 90 to 120 mm macro lenses for small and medium products, 70 to 200 mm zooms for larger objects and flexible framing, and 50 to 85 mm lenses for large items or room sets where space is limited. Macro lenses are popular for all product work, not just extreme close-ups, because they are optimized for close focusing distances, have flat fields and minimal distortion, and can photograph small details without accessories. Tilt-shift lenses allow the photographer to tilt the plane of focus along a product or shift the lens to correct converging lines without moving the camera, which is useful for tall bottles, boxes and packaging.
The working distance needed for a given framing can be estimated from the thin lens equation. Magnification m is the ratio of the image size on the sensor to the real size of the subject. For a lens of focal length f, the distance from lens to subject u is approximately:
Worked problem
Choosing a working distance
A 30 cm wide product must fill about 85 percent of the width of a full-frame sensor (36 mm). How far from the product will the camera be with a 100 mm lens, and with a 50 mm lens?
Show solution
- Frame width needed: 30 cm / 0.85 ≈ 35.3 cm = 353 mm.
- Magnification: m = 36 / 353 ≈ 0.102.
- With 100 mm: u = 100 × (1 + 1/0.102) ≈ 100 × 10.8 ≈ 1,080 mm, about 1.1 m.
- With 50 mm: u = 50 × 10.8 ≈ 540 mm, about 0.54 m.
Answer: About 1.1 m with the 100 mm lens and about 0.54 m with the 50 mm lens. The longer lens gives more room for lights and a more natural perspective on the product's depth.
Perspective depends on distance, not on focal length itself. At 54 cm, the front of a product 15 cm deep is about 28 percent closer to the camera than the back (54 versus 69 cm), so the front looks noticeably larger. At 108 cm, the difference is about 14 percent (108 versus 123 cm). This is why longer lenses make products look more solid and true to their proportions. Very long lenses can flatten products too much, so many photographers choose a distance that gives a natural, slightly dimensional look and then choose the focal length that frames the product at that distance.
Camera supports
Product photography demands absolute stability and repeatability. A camera that moves even slightly between frames makes focus stacking, compositing and consistent e-commerce series impossible.
- Studio stands (column stands) with heavy bases and counterbalanced arms are the standard in professional studios. They allow quick height changes, overhead positions and precise locking, and they do not get in the way of lights like tripod legs do.
- Heavy tripods with geared heads allow fine, repeatable adjustments in each axis. Geared heads are preferred over ball heads for product work because they move one axis at a time without slipping.
- Focusing rails move the camera forward and backward in precise steps for macro and focus stacking work; motorized rails automate the process.
- Overhead rigs, booms and copy stands support the camera directly above the set for flat lays, food from above and documents.
Mark camera positions with tape or record column heights and head angles so that setups can be repeated across days, which is essential for e-commerce consistency and for reshoots.
Shooting tables and surfaces
The surface the product sits on is part of the lighting. Common options include:
- Seamless paper sweeps: rolls of paper curved from a vertical support down onto a table, so that the background has no visible horizon line. White, grey and black are standard; coloured papers are used for creative work.
- Translucent shooting tables: curved sheets of frosted acrylic on a frame, which can be lit from below and behind to create bright, shadowless white backgrounds or glowing bases for glass and jewellery.
- Acrylic sheets: black or white gloss acrylic gives a clean reflection under the product; frosted or matte acrylic gives soft, diffused bases.
- Real surfaces: wood boards, stone tiles, concrete, metal sheets, linen and paper for lifestyle and food tabletop work. Photographers and prop stylists build libraries of surfaces, often painted boards that are cheaper and lighter than real materials.
- Light tents and cubes: enclosed fabric boxes that diffuse light evenly around small products. They are quick and forgiving for simple e-commerce, but they reduce control of highlights and shape.
A product can also be suspended on fishing line, supported on clear acrylic blocks or rods, or held in place with museum putty, wax, glue dots or hidden clamps. Hidden supports are then removed in retouching if they cannot be concealed.
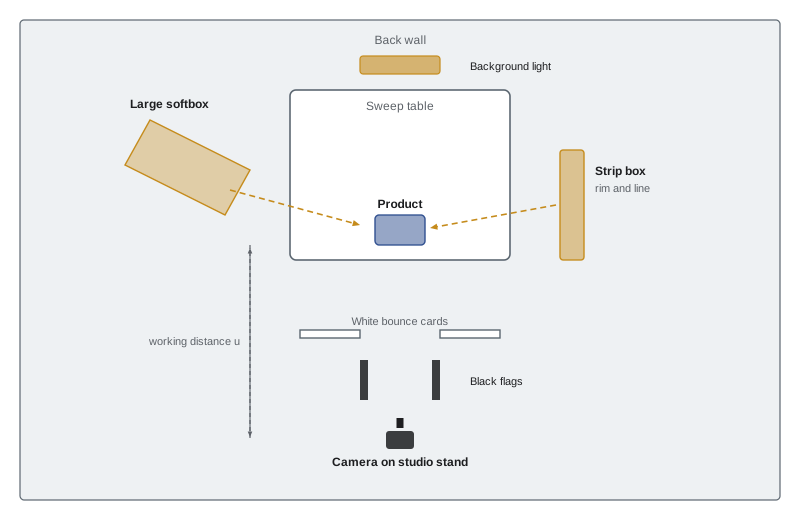
Lights for product work
Both strobes (flash) and continuous lights are used in product studios, and many studios use both.
Studio strobes, in monolights or pack-and-head systems, provide large amounts of light in a very short burst. Their advantages for product work include high power for small apertures and large modifiers, short flash durations that freeze splashes and falling objects, low heat that does not melt chocolate or wilt lettuce, and consistent colour from flash to flash when the units are of good quality. The main disadvantage is that the effect cannot be seen directly; modelling lamps approximate it, but photographers rely on test captures and tethered review.
Continuous LED lights show exactly what the camera will record, which makes it easier to see and place reflections and gradients on shiny products. They are also essential for video. Their limits are lower power, which may require slower shutter speeds or higher ISO, and the possibility of colour inaccuracy. Look for high colour fidelity metrics such as a high CRI with good R9 (deep red) values, or high TLCI and TM-30 scores, and avoid mixing lights of different types without testing.
Flash duration matters for liquids and action shots. Many strobes have a longer flash duration at full power and a shorter one at lower power; some units have special freeze modes. Manufacturers often specify t0.1 (the time the flash is above 10 percent of its peak), which is a more useful measure for freezing motion than the shorter t0.5 figure. Lesson 6 uses flash duration for splash and pour shots.
Modifiers and grip
Product lighting is shaped as much by what blocks and reflects light as by the lights themselves.
- Softboxes and strip boxes provide large, controllable sources. Strip boxes, long narrow softboxes, are particularly important in product work because they create clean, defined highlights along bottles, cans and curved surfaces.
- Scrims and diffusion frames: large panels of diffusion fabric placed between a light and the product to create a broad, soft source whose size and edges can be controlled.
- Reflectors and bounce cards: white, silver and gold cards and foam boards that redirect light into shadows or create highlights.
- Flags and black cards: black foam board, cloth flags and black wrap that block light, cut spill, darken edges and add definition to glass and white products.
- Snoots, grids and barn doors that restrict light to small areas, and optical spot projectors that create sharp shapes and patterns.
- Grip: C-stands with arms and knuckles, magic arms, super clamps, booms, sandbags and gaffer tape that hold modifiers precisely in place.
A common principle in product lighting is to control light by subtraction as well as addition: begin with a broad source, then use flags and black cards to define edges and remove unwanted light. Every C-stand in the studio should be sandbagged, with the arm positioned so that its weight sits over the tallest leg.
| Item | Main use in product work | Notes |
|---|---|---|
| 90–120 mm macro lens | Small and medium products, details | Flat field, close focus, natural perspective |
| Tilt-shift lens | Packaging, bottles, tall products | Controls plane of focus and converging lines |
| Studio stand | Stable, repeatable camera positions | Faster and safer than a tripod |
| Strip softbox | Line highlights on bottles and cans | Often fitted with grid |
| Translucent table | White or glowing backgrounds | Light from below and behind |
| Black flags and cards | Definition, edge control, cutting spill | As important as lights |
| Colour target | Accurate colour and profiling | Shoot at the start of each setup |
Tethering and on-set workflow
Commercial product shoots are almost always tethered: the camera is connected to a computer running capture software, so that each frame appears immediately on a large, calibrated display. Tethering lets the photographer and client check focus, reflections, colour and composition at full size, apply crop overlays and layouts, and name files correctly at capture. Capture One is widely used in commercial studios, and Lightroom Classic and manufacturer software are also common. The digital technician, or the photographer on smaller jobs, applies a camera profile, white balance from a grey card and a consistent style, and backs up files to at least two locations during the shoot.
Shoot a colour target, such as a 24-patch colour checker, at the start of each setup and whenever the lighting changes. The target allows white balance, exposure and colour profiling to be set accurately and documented. For colour-critical products, such as clothing, cosmetics and paint, the target is essential because the client will compare the image to the physical product. PHOT-301 explained colour profiling in detail.
Worked problem
Checking whether a lens choice fits the studio
A studio has 4.2 m from the back wall to the front of the space. A sweep table is 1.5 m deep, positioned 0.8 m from the wall to leave room for a background light. The product sits 0.3 m behind the front edge of the table. The photographer wants to frame a 50 cm wide product at 85 percent frame width with a 120 mm lens on full frame. Is there enough room for the camera and photographer, needing about 1 m behind the camera?
Show solution
- Frame width: 50 / 0.85 ≈ 58.8 cm = 588 mm; m = 36 / 588 ≈ 0.061.
- Working distance: u = 120 × (1 + 1/0.061) ≈ 120 × 17.4 ≈ 2,090 mm ≈ 2.1 m.
- Product position from wall: 0.8 + 1.5 − 0.3 = 2.0 m.
- Camera position: 2.0 + 2.1 = 4.1 m from the wall, leaving only 0.1 m behind the camera.
Answer: There is not enough room. Options include using a 90 mm lens (about 1.6 m working distance), moving the table closer to the wall if the background light can be repositioned, or accepting a slightly looser framing and cropping.
Common mistakes
MistakeUsing a wide lens close to the product to save space.
InsteadUse a longer lens from further away for natural proportions and room for lights.
MistakeShooting near coloured walls or windows.
InsteadControl ambient light and use neutral surroundings.
MistakeRelying on a ball head for repeatable positions.
InsteadUse a geared head or studio stand and mark positions.
MistakeMixing light sources of unknown colour quality.
InsteadUse high-fidelity lights and test before mixing types.
MistakeLeaving C-stands without sandbags.
InsteadSandbag every stand and position arms over the tallest leg.
Summary and key terms
- A product studio needs ambient light control, neutral surroundings, space, power and clean handling.
- High-resolution cameras with stable tethering suit most commercial product work.
- Longer lenses from greater distances give natural perspective and room for lighting.
- Working distance can be estimated from u = f(1 + 1/m).
- Studio stands and geared heads provide stable, repeatable positions.
- Sweeps, translucent tables, acrylic and real surfaces form part of the lighting.
- Strip boxes, scrims, flags and grip shape light by addition and subtraction.
- Sweep
- A seamless curved background from wall to table.
- Cyclorama
- A permanent curved wall giving a seamless background.
- Magnification
- Image size on the sensor divided by real subject size.
- Macro lens
- Lens optimized for close focusing and flat field.
- Tilt-shift lens
- Lens that can tilt the plane of focus and shift the image.
- Geared head
- Camera head moved by gears one axis at a time.
- Strip box
- A long narrow softbox for line highlights.
- Flag
- An opaque panel that blocks light.
- Tethering
- Connecting the camera to a computer for immediate review.
- t0.1
- Flash duration above 10 percent of peak output.
Practice problems
Work each problem on paper first, then reveal the answer to check.
Why control ambient light in a product studio?
Show answer
To avoid uncontrolled colour and reflections.
Why do longer lenses help product photography?
Show answer
Natural perspective and room for lights.
Working distance for m = 0.2 with a 100 mm lens?
Show answer
600 mm.
What does a strip box create on a bottle?
Show answer
A clean line highlight.
Why use a geared head?
Show answer
Precise, repeatable single-axis adjustment.
What is a translucent shooting table for?
Show answer
White or glowing bases lit from below and behind.
Name an advantage of strobes for food.
Show answer
Little heat and short flash duration.
Name an advantage of LED for shiny products.
Show answer
You see reflections exactly as recorded.
Why shoot a colour target at each setup?
Show answer
To set white balance and colour accurately.
Which flash duration figure is better for freezing motion?
Show answer
t0.1.
Lesson quiz · 5 questions
Score 60% or more to complete this lesson.
Create a free account to save your progress, take quizzes and earn a certificate.