
PHOT-310 · Lesson 6 of 12 · 29 min
Food and beverage photography
Food and beverage photography is one of the largest areas of commercial work. It appears on packaging, menus, delivery apps, recipe books and websites, supermarket flyers, restaurant advertising, social media and television. Its goal is simple to state and hard to achieve: to make food look delicious, fresh and true. Food is perishable, it changes by the minute under lights, and viewers judge it instinctively, so food photography rewards preparation, speed and teamwork with specialist stylists. This lesson covers the food photography team, the lighting that makes food appetizing, camera angles and composition, styling techniques, beverages, pours and splashes, food safety on set, and the legal and ethical rules that distinguish food advertising from food editorial work.
Kinds of food photography
Food work falls into several markets with different needs:
- Packaging and advertising for food manufacturers and restaurant chains, where the product shown must represent the real product and images are heavily planned and retouched.
- Editorial food photography for magazines, cookbooks and recipe websites, where the emphasis is on appetite appeal and storytelling, often with natural-looking light and props.
- Restaurant and hospitality photography for menus, websites, delivery platforms and social media, frequently shot on location in a restaurant with the chef's real dishes.
- Beverage photography for drinks brands, from soft drinks and beer to spirits and coffee, often studio-based with precise control of glass, liquid and condensation.
- Food packaging and ingredient photography: raw ingredients, cut-outs on white for packaging and e-commerce grocery images.
Each market has its own budgets and expectations. A cookbook may have 80 images shot over two weeks with a single photographer, food stylist and prop stylist. A national burger advertisement may involve a full day, a team of stylists and a carefully selected hero burger built from dozens of buns, patties and lettuce leaves.
The food team
The food stylist is the most important collaborator in food photography. Food stylists are trained cooks who prepare, select and arrange food so that it looks its best on camera. They shop for perfect ingredients, cook and undercook to the right point, build dishes in layers, keep food looking fresh, and know the tricks that make food photograph well. On larger jobs, a lead food stylist may have assistants preparing stand-ins and backups in a kitchen near the set.
The prop stylist sources dishes, cutlery, linens, surfaces and backgrounds that suit the brief: rustic boards for an artisan bakery, sleek white plates for a modern restaurant, retro patterned dishes for a nostalgic brand. Props should support the food, not compete with it. Matte surfaces and neutral colours are popular because they avoid reflections and colour conflicts, but the choice depends entirely on the story.
The photographer coordinates the set, lighting, composition and timing. A typical rhythm uses a stand-in: a version of the dish, often imperfect, placed on set while lighting, composition and props are refined. When everything is ready, the food stylist brings the hero food, the best, freshest version, and the photographer captures it within minutes. This way the hero food spends as little time as possible under lights.
Lighting food
Food looks most appetizing when light reveals its texture, freshness and translucency. The most widely used direction is backlight or side-backlight: the key light behind or to one side of the food, slightly above it. Backlight makes sauces and glazes shine, picks up steam, reveals the texture of bread and grains, makes drinks and fruit glow, and creates attractive highlights on moist surfaces. Front fill from white cards then opens the shadows on the side facing the camera.
Window light is popular in editorial and cookbook work because it gives a natural, soft, directional feel. In the studio, the same effect is created with a large softbox or a diffusion scrim at the side or back of the set, sometimes with a flag shaping the light to imitate a window. Hard light is used for bold, graphic styles with sharp shadows, often for summer drinks, fast food advertising or modern editorial looks. The choice of light should be consistent across a series, such as a cookbook or menu.
Colour temperature and white balance matter. Food is very sensitive to colour casts: a slight green tint makes meat look spoiled, while too much warmth makes everything look orange. Use a grey card or colour target at the start of each setup and avoid mixed light sources. Flash is generally preferred to continuous light for perishable food because it emits little heat, though cool LED panels are also widely used, particularly when video is shot on the same set.
Camera angles and composition
The camera angle depends on the dish and on the medium.
- Overhead (flat lay): the camera looks straight down. Best for flat foods such as pizza, salads, bowls, table spreads and recipe step sequences, and for layouts with text. Popular on social media.
- Three-quarter angle (about 30 to 45 degrees): the angle of a diner looking at a plate. Works for most plated dishes, showing both the top and some of the side.
- Eye level (straight on or nearly so): best for tall foods with layers, such as burgers, sandwiches, cakes, stacks of pancakes and drinks in glasses.
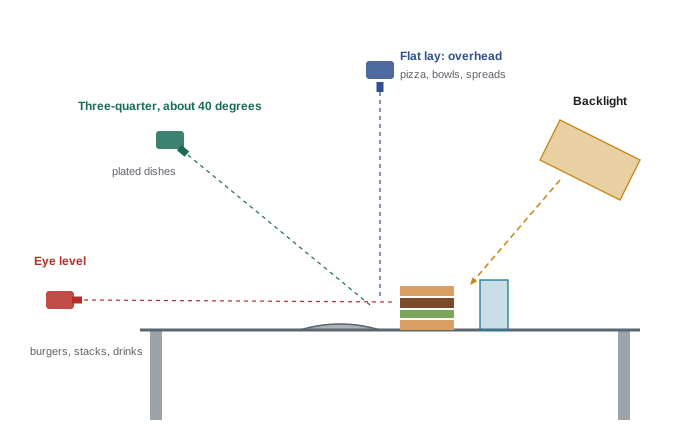
Composition in food photography often uses odd numbers of elements, diagonal lines, layers of props and ingredients leading into the frame, and negative space for text. Garnishes, crumbs, drips and scattered ingredients can make food look real and inviting, while too much clutter distracts. Shallow depth of field is common in editorial work to focus on the hero part of a dish; packaging and advertising often need more depth of field so that the whole product is sharp.
Worked problem
Working height for an overhead shot
A recipe spread on a table measures 80 cm by 60 cm and must fill a 3:2 frame in landscape on a full-frame camera (36 × 24 mm). How high above the table must the camera be with a 50 mm lens, and with a 35 mm lens?
Show solution
- The 3:2 frame must cover 80 cm wide and at least 60 cm high; 80 cm wide at 3:2 gives 53 cm high, too small, so the height of 60 cm controls. Frame needed: 90 × 60 cm.
- Magnification: m = 24 / 600 = 0.04.
- 50 mm: u = 50 × (1 + 25) = 1,300 mm, so about 1.3 m above the table.
- 35 mm: u = 35 × 26 = 910 mm, about 0.9 m.
Answer: About 1.3 m with a 50 mm lens or 0.9 m with a 35 mm lens. Overhead rigs, a boom arm or a tall stand with a lateral arm are needed, and the camera must be secured so nothing can fall onto the food or crew.
Food styling techniques
Food stylists use many techniques to make real food look its best during long shoots:
- Undercooking: vegetables blanched briefly and shocked in ice water stay bright; meat may be seared on the outside and left rare inside, then browned with a kitchen torch or brushed with oil for shine.
- Freshening: misting with water or oil to restore shine, brushing with oil or glaze, replacing herbs and garnishes just before capture.
- Building: layering ingredients precisely, using toothpicks, foam blocks, cardboard or mashed potato hidden inside dishes to support and lift elements so that they are visible.
- Selecting: choosing the best-looking items from many, such as the most even sesame bun or the most perfect strawberry, and trimming or arranging them.
- Stand-ins and substitutes for non-product elements: in editorial work, ice cream may be replaced by a mixture that does not melt, or steam may be added with a steamer or in post-production.
- Timing: dishes such as soups, ice cream and fried foods deteriorate fast and are shot first or in rapid sequence.
Many of these techniques are acceptable for editorial work but are restricted in advertising when they misrepresent the product being sold. That distinction is explained below.
Beverages, pours and splashes
Beverage photography combines the glass and liquid techniques of lesson 5 with action. Cold drinks need condensation and ice that does not melt: acrylic ice cubes, glycerine mixtures sprayed on chilled glasses, and fake frost. Beer needs a stable head, which stylists create or maintain with careful pouring or additives. Coffee crema, tea and hot drinks may need steam, created live or in post.
Pours and splashes create energy and drama. A pour shot freezes liquid flowing from a bottle into a glass; a splash shot freezes droplets after something falls into a liquid. Both need very short flash durations, precise timing and many attempts. Photographers often use a trigger such as a light beam, sound trigger or high-speed burst, and shoot dozens or hundreds of frames to get one perfect splash. The best elements of several frames are often combined in post.
The motion blur of a moving object depends on its speed and the exposure time, which for flash in a dark studio is the flash duration:
Worked problem
Freezing a splash
A strawberry falls into milk, and droplets fly up at about 3 m/s. A strobe set to low power has a t0.1 flash duration of 1/5,000 s; at full power it is 1/800 s. How far does a droplet move during each flash? The product fills a 200 mm wide frame on a 36 mm sensor imaged at about 8,000 pixels wide.
Show solution
- Low power: 3 m/s × 1/5,000 s = 0.0006 m = 0.6 mm.
- Full power: 3 m/s × 1/800 s ≈ 0.0038 m = 3.8 mm.
- Pixels per millimetre of subject: 8,000 / 200 = 40 px/mm.
- Blur: 0.6 mm × 40 ≈ 24 px at low power; 3.8 mm × 40 ≈ 150 px at full power.
Answer: About 0.6 mm (24 px) at low power and 3.8 mm (150 px) at full power. The full-power flash will smear droplets visibly. Use lower power with more units, a wider aperture or higher ISO, or strobes with a dedicated short-duration mode. Even 24 px may need a shorter duration for perfectly crisp droplets.
Ambient light must be low enough that it does not create a second, blurred image during the shutter opening. Work in a dark studio with the shutter at the flash sync speed or slower, so that the flash alone defines the exposure.
Food safety and hygiene on set
Food on a photography set may be unsafe to eat. It may have sat under lights for hours, been handled repeatedly, been sprayed with glycerine or oil, or been treated with inedible materials such as fixatives or paints. Clear rules prevent illness:
- Label food that has been styled or treated as not for consumption and dispose of it properly after the shoot.
- Keep food that will be eaten, such as crew meals and leftover clean ingredients, separate from styled food.
- Follow normal kitchen hygiene: clean surfaces, hand washing, temperature control for raw meat and seafood, and separate cutting boards.
- Ask about allergies among crew and talent, especially when talent will taste or bite food on camera, and keep allergens such as nuts clearly identified.
- Talent who eat food on camera must be given food that is safe and fresh, often prepared separately from the styled hero.
Local food handling rules may apply where a set includes a professional kitchen or where food is served to people. Studio kitchens should be cleaned and maintained like any commercial food preparation area.
Truth in food advertising
Food advertising is subject to the general laws against misleading advertising, and, in the case of food, sometimes to specific labelling and representation rules. The key principle is that the product being sold must be represented truthfully. If an advertisement shows a cereal brand, the cereal in the bowl must be that cereal; if a burger chain shows its burger, the burger must be made from the ingredients and in the quantities that customers receive. Stylists may choose the best examples and arrange them carefully, but they must not use substitutes for the advertised product or exaggerate quantities or features.
In Canada, the Competition Act prohibits representations to the public that are false or misleading in a material respect, judged by their general impression, and food labels and advertisements are also subject to the Food and Drugs Act and the Safe Food for Canadians Regulations, administered by the Canadian Food Inspection Agency (CFIA). The CFIA's labelling guidance expects pictures and vignettes on food labels to represent the food accurately; where an image shows extra ingredients, garnishes or serving suggestions not included in the package, they should not mislead, and serving suggestions are commonly identified as such on the label.
In practice, food advertising photographers distinguish between the hero product, which must be genuine and representative, and the supporting elements, which can be styled more freely as long as the overall impression is not misleading. A burger advertisement can show a glistening, carefully built burger made from genuine ingredients in genuine proportions; it cannot show twice the meat the customer will receive. Ice cream in an ice cream advertisement must be real ice cream; mashed potato can stand in for ice cream only in an image that is not selling ice cream.
| Element | Editorial work | Advertising the product |
|---|---|---|
| Hero product | Can be styled, substituted or simulated | Must be the genuine product in representative form |
| Selection | Choose best items | Choose best items, but representative of what is sold |
| Quantity | Free | Must not exaggerate what the customer receives |
| Garnishes and props | Free | Allowed if not misleading; serving suggestions noted |
| Retouching | Free within editorial ethics | Must not change product characteristics |
Common mistakes
MistakeLighting food from the front, flattening texture.
InsteadUse backlight or side-backlight with front fill.
MistakePutting the hero food on set before the lighting is ready.
InsteadLight with a stand-in, then bring in the hero food.
MistakeSubstituting a different product for the one being advertised.
InsteadUse the genuine product in representative form.
MistakeUsing full-power flash for splashes.
InsteadUse low power or freeze modes for short flash durations.
MistakeLetting crew eat styled food.
InsteadLabel styled food as inedible and keep crew food separate.
Summary and key terms
- Food photography serves packaging, advertising, editorial, restaurants and beverage brands.
- Food stylists prepare and arrange food; prop stylists source surfaces and props.
- Stand-ins allow lighting before hero food arrives.
- Backlight and side-backlight reveal texture, shine and translucency.
- Overhead, three-quarter and eye-level angles suit different dishes.
- Splashes need short flash durations: blur equals speed times duration.
- Advertised products must be genuine and representative; styled food may be unsafe to eat.
- Food stylist
- A cook who prepares and arranges food for the camera.
- Prop stylist
- Specialist who sources dishes, surfaces and props.
- Stand-in
- A substitute dish used while lighting and composing.
- Hero food
- The best version of the food, photographed at the final moment.
- Backlight
- Light from behind the subject.
- Flat lay
- An overhead composition looking straight down.
- Pour shot
- An image freezing liquid being poured.
- Splash shot
- An image freezing droplets from an impact.
- Serving suggestion
- A label note showing items not included in the package.
- Net impression
- The overall message a reasonable consumer takes from an advertisement.
Practice problems
Work each problem on paper first, then reveal the answer to check.
Who is the most important collaborator in food photography?
Show answer
The food stylist.
Why use a stand-in?
Show answer
To light and compose before the hero food deteriorates.
Which light direction suits most food?
Show answer
Backlight or side-backlight.
Best angle for a burger?
Show answer
Eye level.
Best angle for pizza?
Show answer
Overhead.
Blur at 2 m/s with 1/4,000 s?
Show answer
0.5 mm.
Why is flash preferred for perishable food?
Show answer
It produces little heat.
Can mashed potato stand in for ice cream in an ice cream advertisement?
Show answer
No, the advertised product must be genuine.
What simulates condensation?
Show answer
A glycerine and water mist.
What should happen to styled food after the shoot?
Show answer
It should be disposed of, not eaten.
Lesson quiz · 5 questions
Score 60% or more to complete this lesson.
Create a free account to save your progress, take quizzes and earn a certificate.