
PHOT-440 · Lesson 3 of 12 · 30 min
Exposure, focus and stabilization for motion
In stills you can bracket, fix a slightly missed exposure in raw, refocus on the next frame and steady the camera for the instant of capture. Video gives you fewer second chances. An exposure that clips a bride's dress for twenty seconds cannot be recovered in post, a focus miss during the key line of an interview ruins the take, and a shaky handheld shot that looked fine on the camera's small screen looks seasick on a television. This lesson covers the practical tools a hybrid shooter uses to get exposure, focus and stability right during the take. CINE-202 goes deeper into waveforms, false colour and log exposure for cinema cameras, CINE-210 covers lenses and focus pulling, and CINE-230 covers camera support systems; here we concentrate on mirrorless cameras and small crews.
Exposure tools: from histogram to waveform
The histogram you already use for stills shows how many pixels fall at each brightness level, but not where in the frame they are. In video, three other tools are more useful. Zebras overlay stripes on areas above a chosen signal level, usually set in IRE or per cent of signal. Waveform monitors plot brightness on the vertical axis against horizontal position in the frame, so you can see exactly which part of the picture is bright or dark. False colour paints brightness ranges in different colours, such as pink for skin and red for clipping.
For a standard Rec. 709 profile, many shooters set one zebra at about 70 per cent for the lit side of lighter skin, and a second zebra at 95 or 100 per cent to warn of clipping. Different skin tones sit at different levels; dark skin is often well exposed between about 40 and 55 per cent, and should not be pushed up to light-skin levels, which washes it out. The goal is to expose for the subject and protect important highlights, not to hit a single number.
| Scene element | Typical level on a waveform | Notes |
|---|---|---|
| Clipped white | 100 per cent and above | Detail lost; avoid on faces, dresses, skies |
| Bright white shirt or paper | 85 to 95 per cent | Keep texture visible |
| Lighter skin, lit side | 60 to 75 per cent | Depends on desired mood |
| Darker skin, lit side | 40 to 60 per cent | Do not over-brighten |
| Middle grey card | about 40 to 45 per cent | Reference for metering |
| Deep shadows with detail | 5 to 15 per cent | Below this, noise rises in grading |
Exposing log footage
Log profiles look flat and dark on the camera screen because they map scene brightness into a compressed curve. Exposing log by eye on the camera's monitor usually leads to underexposure, which shows up as noise when the footage is converted to a normal look. Each manufacturer publishes target values for its log curve; middle grey typically sits at about 35 to 45 per cent signal level depending on the curve, and many shooters expose log one stop brighter than the manufacturer's middle-grey target in clean light to reduce noise, provided highlights are not clipped. Use the camera's display LUT, which shows a normal-looking image on screen while recording the flat log signal, but meter with zebras, waveform or false colour set to read the log signal.
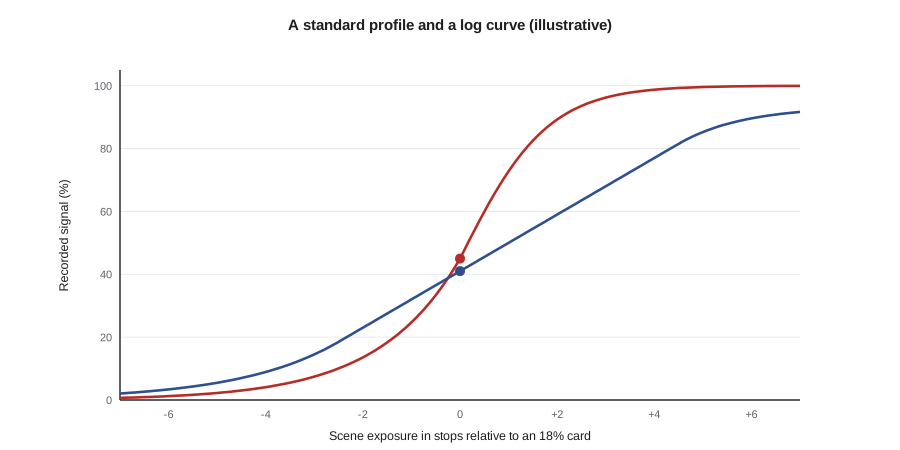
A practical log routine is: set the base ISO for the log profile, set shutter by the 180-degree rule, set aperture for the look you want, then add ND until the face or grey card reads at the target level. Check that the brightest important highlight is below clipping. If you cannot protect both the face and the window behind, either add light to the face (lesson 6), reframe, or accept clipping in an unimportant area.
Neutral density filters in practice
Neutral density filters are rated in several ways: by filter factor (ND2, ND4, ND8, where each doubling is one stop), by optical density (0.3 per stop) or directly in stops. A filter factor of \( 2^n \) reduces light by \( n \) stops, and optical density \( d \) corresponds to \( d / 0.3 \) stops.
| Filter factor | Optical density | Stops | Light transmitted |
|---|---|---|---|
| ND2 | 0.3 | 1 | 50 per cent |
| ND4 | 0.6 | 2 | 25 per cent |
| ND8 | 0.9 | 3 | 12.5 per cent |
| ND16 | 1.2 | 4 | 6.25 per cent |
| ND64 | 1.8 | 6 | 1.6 per cent |
| ND256 | 2.4 | 8 | 0.4 per cent |
| ND1000 | 3.0 | 10 | 0.1 per cent |
Worked problem
How much ND is needed for a shallow-focus shot in sunlight?
You are filming a portrait outdoors in bright sun. The sunny 16 rule gives a correct exposure of f/16 at 1/100 second at ISO 100. You want f/2.8 at 1/50 second (24 fps) using a log profile with a base ISO of 800. How many stops of ND do you need?
Show solution
- Aperture: f/16 to f/2.8 is about 5 stops more light (f/16, 11, 8, 5.6, 4, 2.8).
- Shutter: 1/100 to 1/50 is 1 stop more light.
- ISO: 100 to 800 is 3 stops more sensitivity.
- Total excess: \( 5 + 1 + 3 = 9 \) stops, so you need about 9 stops of ND, an optical density of 2.7 or a filter factor of about 512.
Answer: About 9 stops of ND. Many variable NDs top out at 6 to 8 stops and show colour shifts or cross-shaped artefacts at their strongest settings, so combine a fixed ND with a variable ND, stop down to f/4, or film the portrait in open shade where the light is about 2 to 3 stops lower.
import math
def stops_needed(base_f, base_shutter, base_iso, f, shutter, iso):
    aperture = 2 * math.log2(base_f / f)
    time = math.log2(base_shutter / shutter)
    gain = math.log2(iso / base_iso)
    return aperture + time + gain
cases = [(16, 1/100, 100, 2.8, 1/50, 800), (16, 1/100, 100, 4, 1/50, 400), (16, 1/100, 100, 2.8, 1/250, 800)]
for c in cases:
    n = stops_needed(*c)
print(f'f/{c[3]} at 1/{round(1 / c[4])} ISO {c[5]}: {n:.1f} stops of ND (density {0.3 * n:.1f}, factor about {2 ** n:.0f})')f/2.8 at 1/50 ISO 800: 7.0 stops of ND (density 2.1, factor about 131) f/4 at 1/50 ISO 400: 5.0 stops of ND (density 1.5, factor about 32) f/2.8 at 1/250 ISO 800: 9.4 stops of ND (density 2.8, factor about 653)
Focus for moving pictures
Modern autofocus with face and eye detection has transformed one-person video. For interviews, presenters and people walking toward the camera, a well-configured tracking autofocus is often more reliable than manual focus by a non-specialist. The key settings are tracking sensitivity, which controls how quickly the camera switches to a new subject when something crosses the frame, and transition speed, which controls how fast focus moves between distances. For video, slower transitions look more natural; a snap from one face to another looks like a camera hunting.
Autofocus still fails in predictable situations: low contrast and low light, subjects behind foreground objects such as wedding guests or branches, several faces at similar distances, reflections in glass, and macro work. In these cases use manual focus with peaking (coloured outlines on in-focus edges) and magnification to check critical focus before recording. Learn to rack focus deliberately: set marks for the start and end points on the lens or with tape on a follow-focus ring, rehearse the pull, then record. Many lenses for mirrorless cameras focus by wire, meaning the focus ring sends electronic signals rather than moving the glass mechanically; set the ring to linear response if your camera allows, so the same rotation always gives the same distance change.
Depth of field and the hold-ability problem
Photographers love shooting portraits at f/1.4 or f/1.8. In video, very shallow depth of field makes focus hard to hold because people move slightly as they speak. A seated interview subject who leans forward 5 cm can fall out of focus at f/1.4 with an 85 mm lens at 1.5 m. For interviews, f/2.8 to f/4 on full frame is a common compromise: background still soft, focus forgiving. For moving subjects and gimbal shots, f/4 to f/5.6 gives a margin. Lens equivalence matters: f/2.8 on full frame gives roughly the depth of field of f/1.8 on APS-C and f/1.4 on Micro Four Thirds at the same field of view. PHOT-201 covers equivalence for stills.
Worked problem
Estimating depth of field for an interview
A seated interview uses an 85 mm lens on full frame at 1.5 m. Using a circle of confusion of 0.03 mm, compare the total depth of field at f/1.8 and f/4.
Show solution
- For subject distances much smaller than the hyperfocal distance, total depth of field is approximately \( 2 N c s^2 / f^2 \), where \( N \) is the f-number, \( c \) the circle of confusion, \( s \) the distance and \( f \) the focal length.
- At f/1.8: \( 2 \times 1.8 \times 0.03 \times 1500^2 / 85^2 \approx 34 \) mm.
- At f/4: \( 2 \times 4 \times 0.03 \times 1500^2 / 85^2 \approx 75 \) mm.
Answer: About 3.4 cm at f/1.8 versus 7.5 cm at f/4. A subject leaning a few centimetres would drift out of focus at f/1.8 but stay sharp at f/4, which is why interview shooters often stop down.
Stabilization: in body, in lens, digital and in post
Most hybrid cameras combine sensor-shift stabilization (IBIS) with optical stabilization in some lenses. These systems are excellent for still or slow handheld shots. Electronic or digital stabilization crops the frame and shifts it to cancel movement, often combined with IBIS in an enhanced or active mode; it can produce very smooth walking shots at the cost of a narrower field of view and, sometimes, wobble at frame edges with wide lenses. Post-production stabilization in editing software analyses the footage and crops to stabilize. Some cameras record gyroscope data that dedicated software can use for very accurate stabilization in post, provided you shoot with a fast shutter or accept motion-blur artefacts.
Stabilization systems cannot remove all problems. They struggle with fast shutter speeds in walking shots, because stabilized footage without motion blur looks jittery, and with rolling shutter skew. For walking and moving shots, a gimbal or a shoulder rig with good technique gives more natural results. For static shots, a tripod is always better than stabilization. Use a fluid head for pans and tilts; a photo ball head cannot pan smoothly.
| Method | Best for | Limits |
|---|---|---|
| Tripod with fluid head | Interviews, locked-off shots, smooth pans | Slow to move between positions |
| Monopod with fluid base | Events, quick repositioning | Small wobble, limited movement |
| Handheld with IBIS | Short static shots, documentary feel | Walking shots look bumpy |
| Electronic stabilization | Walking shots with wide lenses | Crop, edge wobble, motion-blur artefacts |
| Gimbal | Walking, orbiting and tracking shots | Setup and balancing time, weight, fatigue |
| Shoulder rig | Observational and handheld documentary | Bulky, needs practice |
| Slider | Small reveals and product shots | Setup time, short travel |
Balancing a gimbal and staying within payload
A gimbal uses motors on three axes to keep the camera level and pointed where you want. The motors work best and use least power when the camera is balanced so that it stays put on each axis with the motors off. Balance the tilt axis first (front to back and top to bottom), then the roll axis (side to side), then the pan axis. Rebalance when you change lenses, add a microphone or ND filter, or use a lens that extends as it zooms or focuses.
Every gimbal has a rated payload. Staying well under the limit preserves battery life and allows the motors to respond quickly. A margin of about 20 to 30 per cent below the rating is a sensible working rule.
Worked problem
Will this camera setup fit the gimbal?
A gimbal is rated for 2.0 kg. The camera body with battery and card weighs 720 g, the 24 to 70 mm f/2.8 lens 690 g, the variable ND filter 60 g, the wireless microphone receiver 40 g and a quick-release plate 90 g. Is the setup within a sensible margin?
Show solution
- Total: \( 720 + 690 + 60 + 40 + 90 = 1600 \) g.
- Percentage of rating: \( 1600 / 2000 = 80 \) per cent.
- Margin: 20 per cent, at the edge of the comfortable range. The zoom also extends as it zooms, which changes balance.
Answer: The setup is within the rating but at the limit of the working margin. A lighter prime lens, such as a 35 mm f/1.8 at about 300 g, would bring the total to about 1.2 kg (61 per cent) and remove the balance shift.
Handheld technique still matters
Even with stabilization, technique makes a large difference. Hold the camera close to your body with a neck strap pulled taut or a rig with two points of contact. Walk heel to toe with bent knees ("the ninja walk"). Use wider lenses for moving shots, because shake is magnified at long focal lengths. Breathe out slowly during critical holds. Begin recording two or three seconds before the action and keep rolling two or three seconds after, so the editor has clean handles at both ends.
Common mistakes
MistakeExposing log by eye on the camera's monitor
InsteadMeter log with zebras, waveform or false colour set to the log signal, and view through a display LUT.
MistakeBrightening dark skin to the same level as light skin
InsteadExpose each skin tone for its natural level and protect texture.
MistakeSetting autofocus to the fastest transition for interviews
InsteadUse slower transitions and appropriate tracking sensitivity so focus moves naturally.
MistakeShooting interviews at f/1.4 with a long lens
InsteadStop down to about f/2.8 to f/4 so small movements stay in focus.
MistakeOverloading a gimbal or skipping rebalancing after changing lenses
InsteadKeep 20 to 30 per cent below rated payload and rebalance after every change.
Summary and key terms
- Zebras, waveforms and false colour are more useful than the histogram for video exposure.
- Log must be exposed using target values for its curve, not by the flat image on screen.
- ND filters are rated by factor, density or stops; each 0.3 of density is one stop.
- Face and eye tracking autofocus works well for many shots; manual focus with peaking handles the rest.
- Video favours slightly deeper focus than portrait stills; f/2.8 to f/4 suits interviews.
- IBIS, lens stabilization, electronic stabilization, gyro data, gimbals and tripods each have strengths and limits.
- Balance gimbals on tilt, roll and pan axes and keep a payload margin.
- Zebras
- Stripes overlaid on image areas above a chosen signal level.
- Waveform monitor
- A display of brightness against horizontal frame position.
- False colour
- An overlay that shows brightness ranges as colours.
- Display LUT
- A look-up table applied to the monitor image only, not to the recording.
- Optical density
- A logarithmic measure of filter darkness; 0.3 equals one stop.
- Focus peaking
- Coloured highlights on in-focus edges.
- Rack focus
- A deliberate change of focus from one subject to another during a shot.
- Focus by wire
- Electronic control of focus through the lens ring.
- IBIS
- In-body image stabilization by moving the sensor.
- Payload
- The maximum weight a gimbal or support is designed to carry.
Practice problems
Work each problem on paper first, then reveal the answer to check.
How many stops is an ND with optical density 1.5?
Show answer
\( 1.5/0.3 = 5 \) stops.
What filter factor gives 7 stops?
Show answer
\( 2^7 = 128 \), an ND128.
Where should the second zebra usually be set to warn of clipping?
Show answer
About 95 to 100 per cent.
Why is dark skin not exposed at 70 per cent?
Show answer
It would look washed out; darker skin is naturally exposed lower, often 40 to 60 per cent.
Why expose log by meter rather than by eye on the camera screen?
Show answer
The log image looks flat and dark, so judging by eye leads to underexposure and noise.
What autofocus setting makes focus changes look smoother?
Show answer
A slower transition speed.
Give two situations where autofocus often fails.
Show answer
Low light and low contrast; foreground obstructions; multiple faces at similar distances; reflections.
In what order should gimbal axes be balanced?
Show answer
Tilt, then roll, then pan.
A rig weighs 1.4 kg on a 2.5 kg gimbal. What percentage of the rating is used?
Show answer
56 per cent.
Why keep recording a few seconds before and after action?
Show answer
To give the editor clean handles for cuts and transitions.
Lesson quiz · 5 questions
Score 60% or more to complete this lesson.
Create a free account to save your progress, take quizzes and earn a certificate.