
CINE-210 · Lesson 12 of 12 · 25 min
Lens testing, camera prep and capstone
Lenses are precision instruments that travel between rental houses, productions and countries, and each copy can behave slightly differently. Before a production begins, the camera team tests and prepares the lenses: checking mechanics and optics, confirming that focus marks are accurate, matching sets, and gathering the data visual effects will need. Cinematographers also run creative tests to choose between lens families and filters. This final lesson covers the purposes of lens testing, mechanical inspection, projecting and collimating lenses, checking focus marks and flange focal distance, sharpness and centering tests, back focus on zooms, matching sets, creative look tests, lens grids and data for visual effects, lens care on set, and the capstone project.
Why test lenses
Lens testing serves technical and creative purposes. Technically, it confirms that every lens is sharp, centered, mechanically smooth, correctly marked and compatible with the camera and accessories, preventing expensive problems such as soft shots discovered in post-production. Creatively, tests compare lens families, filters and formats with the production's cameras, lighting and cast, so that the cinematographer and director can choose a look with confidence. Rental houses perform their own checks, but the camera team's prep, typically one to several days before principal photography, confirms that the package works together.
Mechanical inspection
Each lens is inspected for physical condition: front and rear elements free from scratches, chips, fungus, haze or separation; smooth focus, iris and zoom rotation without stiffness, play or rough spots; gears undamaged; mounts clean and secure; markings legible; and lens data contacts working. The focus ring should turn with consistent resistance across its range, and there should be no backlash, a small amount of free movement when changing direction, which would make precise pulls difficult. Accessories such as lens support brackets for heavy lenses, front adapters for matte boxes, and diopters are checked at the same time.
Lens projectors and collimators
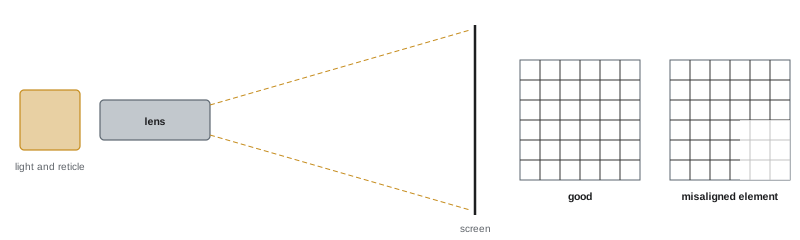
Rental houses and some camera teams use lens projectors, which shine light backward through the lens to project a test chart onto a screen, revealing sharpness across the frame, centering, flare, chromatic aberration and other defects at a glance. Collimators project an image of a target at infinity into the lens, allowing technicians to check infinity focus and flange focal distance quickly without a large space. Adjusting the lens or mount with shims, thin precision spacers, corrects flange distance so that the lens focuses at infinity and its distance marks are accurate. These checks are especially important for vintage and rehoused lenses and when using adapters.
Checking focus marks
Focus marks on cinema lenses must be accurate, because focus pullers rely on them. A simple test, called an eye-focus or witness mark check, involves placing a focus chart, such as a Siemens star, at measured distances from the focal plane, for example 1, 2, 3 and 5 m, focusing critically by eye on a magnified monitor, and comparing the lens's reading with the measured distance. If marks are consistently off, the flange focal distance may need shimming; if they are off only at some distances, the lens may need servicing or recalibration. With smart lenses, the displayed distance should match the measured distance, and motor calibration should match too.
Worked problem
Diagnosing a focus mark error
During prep, a 40 mm lens set to 2 m on its barrel gives sharpest focus on a chart measured at 2.15 m; at 5 m marked, sharpest focus is at 5.9 m; and the lens cannot reach sharp focus at infinity. What does this suggest?
Show solution
- The lens focuses farther than marked at every distance, increasingly so at longer distances, and cannot reach infinity.
- This pattern indicates that the lens sits slightly too far from the sensor: the flange focal distance is too long, or the lens mount or adapter needs shimming.
- Check the camera's flange distance with a depth gauge and compare with other lenses; if only this lens is affected, adjust its shims.
- Retest marks at several distances after adjustment.
Answer: A flange focal distance error, most likely the lens sitting too far from the sensor; shim and retest.
Sharpness and centering tests
Each lens is tested for sharpness across the frame and for centering, the alignment of its elements. A test chart filling the frame, shot at several stops, shows whether corners are equally sharp; if one side or corner is consistently softer, an element may be decentered or tilted, requiring service. Testing at wide open and at the production's working stops reveals how the lens performs in practice. Comparing lenses within a set shows whether one is noticeably softer or has different contrast. Results are recorded, and lenses that do not meet expectations are exchanged with the rental house.
Back focus and zooms
Zoom lenses must be checked for back focus, the adjustment that ensures the lens is parfocal on a particular camera (Lesson 6). The procedure, typically done with a Siemens star chart at a moderate distance, involves zooming to the longest focal length and focusing critically, then zooming to the widest focal length and checking whether focus holds; if not, the back focus adjustment, or the camera's flange shims, are set so that focus holds across the range. The check is repeated whenever the lens is moved to a different camera body, or if temperature changes significantly, since metal expands and contracts.
Matching a set
Within a set, lenses should match in color, contrast and flare so that shots cut together. A matching test frames the same scene, such as a color chart, a face and a practical light, with each lens at the same stop and similar framing, and compares the images side by side on a calibrated monitor. Small differences can be noted for the colorist; large differences may require swapping lenses. With vintage sets, matching is often the most time-consuming part of prep, because individual lenses may have been coated or modified at different times.
| Prep test | Purpose |
|---|---|
| Mechanical inspection | Condition, smoothness, backlash, markings |
| Projector or collimator | Sharpness, centering, infinity focus, flange |
| Focus mark check | Accuracy of witness marks and lens data |
| Sharpness chart at several stops | Edge performance and decentering |
| Back focus (zooms) | Parfocal performance on the camera |
| Matching test | Color, contrast and flare consistency |
| Coverage test | Vignetting in each sensor mode |
| Breathing test | Field of view change during focus |
| Lens grids | Distortion data for VFX |
Creative look tests
Creative tests compare lens families and filters to choose the production's look. Typical tests include faces of the main cast or stand-ins with different skin tones, lit as they will be in key scenes; day exteriors and night interiors with practical lights for flare and bokeh; walk-ins from far to close to see falloff and breathing; and wide, medium and close shots for perspective. Tests should use the production camera, sensor mode, exposure index, LUT and filtration, and be reviewed on a large calibrated screen with the director, producers, colorist and production designer. Notes from the tests inform the choice of lens set, diffusion and stop.
Lens grids and data for visual effects
Visual effects teams need precise information about each lens to match computer-generated elements. For each lens and focal length used on effects shots, the camera team shoots lens grids: a chart of regular squares or dots filling the frame, photographed square to the camera at several focus distances, so that distortion can be measured and modeled. Some productions also shoot flat-field white cards for vignetting and shading, and record lens metadata. For anamorphic and zoom lenses, grids are needed at multiple focal lengths and focus distances. These grids, along with camera reports listing lens, focus, stop and height for every effects shot, are delivered to the visual effects team.
Lens care on set
Good habits protect lenses during production. Lenses are kept capped and in cases when not in use, with front and rear caps on; changed quickly, with the camera mount facing down to avoid dust; cleaned only with blowers, soft brushes, lens tissue and approved fluid, never with clothing; protected from rain, sand and salt spray with covers and clear protective filters when necessary; kept out of hot vehicles and allowed to acclimatize to avoid condensation when moving from cold to warm environments; and supported with lens brackets when heavy, to avoid stress on mounts. Any knock or drop should be reported, and the lens checked before further use.
Capstone: a lens plan and test report
The capstone asks you to prepare a lens plan and test report for a short film or series episode. It should include:
- The project's visual intentions, format and aspect ratio, and a justified choice of camera and sensor mode.
- A proposed lens package: primes, zooms and specialty lenses, with focal lengths, stops, coverage checks and reasons rooted in the story.
- A lens plan for at least two scenes, with focal lengths, camera positions, stops and depth of field calculations for key shots, including at least one rack focus.
- A filtration plan, with ND, diffusion or other filters, and why.
- A test report: if equipment is available, shoot a focus mark check, a breathing test, a flare and bokeh comparison and a face test for two lenses or filters, and present the results with stills and notes; if equipment is not available, design the tests in detail.
- A prep checklist and a plan for lens data and grids for any visual effects shots.
Present your work as a document that a camera team could follow during prep and production.
Lens prep checklists
A lens prep checklist helps ensure nothing is missed. Typical items include: inventory of every lens, cap, case and accessory against the rental order; mechanical checks of every ring; projection or collimator checks; focus mark tests at several distances; sharpness and centering at wide open and working stops; back focus for every zoom on every camera body; coverage in every sensor mode; breathing and flare checks for key lenses; lens data and motor calibration; diopter and filter inspection; and notes on any lenses exchanged. The checklist and results are kept with the camera package and shared with the cinematographer.
Working with the rental house
Rental houses are partners in lens preparation. Their technicians service lenses, adjust shims, match sets, supply coverage charts and lens data, and often provide prep space and test equipment. Building a good relationship with a rental house, communicating clearly about the production's needs and reporting problems promptly, helps resolve issues quickly. If a lens is damaged during production, report it immediately; most rental agreements require it, and the rental house may be able to provide a replacement before the next shooting day.
Reviewing tests
Tests are only useful if they are reviewed carefully. Screen them on a large, calibrated display, ideally in a grading suite or screening room, with the director, cinematographer, colorist and other key collaborators. Label each clip with lens, stop, filter and settings, and present comparisons side by side or in quick succession so that differences are clear. Record decisions and share them with the camera team before production. Keeping test footage and notes provides a reference throughout the shoot, for example when matching a pickup scene weeks later or briefing a second unit cinematographer about the look.
Prep time and scheduling
Adequate prep time is essential and should be budgeted. A small production may need half a day to prep a simple package; a feature with multiple cameras, several lens sets and anamorphic lenses may need a week or more, including creative tests. Rushing prep risks discovering problems on set, where delays cost far more. Camera teams also schedule time for daily lens checks during production, especially for zooms and lenses that are frequently moved between cameras.
Common mistakes
MistakeSkipping prep and trusting the rental house entirely.
InsteadTest the full package on the production camera.
MistakeIgnoring backlash in focus rings.
InsteadCheck mechanics for smooth, play-free movement.
MistakeNot checking back focus when moving zooms between bodies.
InsteadRecheck back focus on each camera.
MistakeForgetting lens grids for VFX shots.
InsteadShoot grids for every lens and focal length used.
MistakeCleaning lenses with clothing.
InsteadUse blowers, brushes, tissue and approved fluid.
Summary and key terms
- Lens testing confirms technical quality and informs creative choices.
- Inspect mechanics, glass, gears, mounts and markings.
- Projectors and collimators reveal sharpness, centering and flange errors.
- Check focus marks against measured distances and shim if needed.
- Test sharpness, back focus, matching, coverage and breathing.
- Creative tests compare lenses and filters with faces and lighting.
- Shoot lens grids for VFX and care for lenses carefully on set.
- Camera prep
- Testing and preparing equipment before shooting.
- Backlash
- Free play when a ring changes direction.
- Lens projector
- Device projecting a test pattern through a lens.
- Collimator
- Device projecting an infinity target to check focus.
- Shim
- Precision spacer adjusting flange distance.
- Witness marks
- Distance markings on the focus barrel.
- Decentering
- Misalignment of lens elements.
- Siemens star
- Radial test chart for focus.
- Lens grid
- Chart shot to measure distortion for VFX.
- Matching test
- Comparison of lenses in a set for consistency.
Practice problems
Work each problem on paper first, then reveal the answer to check.
Name two purposes of lens testing.
Show answer
Technical quality and creative choice.
What is backlash?
Show answer
Free play when a ring changes direction.
What does a collimator check?
Show answer
Infinity focus and flange distance.
How are focus marks checked?
Show answer
Focus on charts at measured distances and compare.
A lens focusing farther than marked and missing infinity suggests what?
Show answer
Flange distance too long; shim needed.
What does one consistently soft corner suggest?
Show answer
A decentered element.
When is back focus rechecked?
Show answer
On each camera body and after temperature changes.
What does a matching test compare?
Show answer
Color, contrast and flare across a set.
What are lens grids for?
Show answer
Measuring distortion for VFX.
Name two lens care habits.
Show answer
Caps on, mount down when changing, proper cleaning, avoid condensation.
Lesson quiz · 5 questions
Score 60% or more to complete this lesson.
Create a free account to save your progress, take quizzes and earn a certificate.