
CINE-220 · Lesson 12 of 12 · 25 min
Lighting a scene: from script to set, and capstone
Lighting a scene well brings together everything in this course: fixtures, photometrics, color, control, shaping, faces, ratios and power, all organized by a clear idea of what the scene should feel like and a practical plan for achieving it within the schedule. This final lesson follows the process from reading the script to wrapping the set: developing a lighting concept, scouting locations and sets, lighting plans and plots, pre-rigging, the gaffer's package and paperwork, lighting on the day with an efficient workflow, working with other departments, adapting to problems, wrapping, and the capstone project of lighting a short scene.
From script to lighting concept
Lighting begins with the script. The cinematographer reads it for time of day, locations, mood, and the emotional arc of each scene, and discusses with the director what each scene should feel like and how the lighting should evolve through the story. Reference images, from paintings, photographs and films, help describe the look; a look book collects them into a visual plan for the whole production. The cinematographer then develops a lighting concept for each scene: the motivating sources (sun through windows, practical lamps, moonlight, street lights), the overall contrast and key level, the color palette, and how much the light should change during the scene. Good concepts are simple enough to describe in a sentence, for example "soft late-afternoon sun through the west windows, warm and low, with the room falling off into cool shade", which guides every later decision.
Scouting locations and sets
Technical scouts visit each location with the director, DP, gaffer, key grip, production designer and others. For lighting, the scout answers practical questions: which way do the windows face and where will the sun be at shooting time; how big are the windows and can they be gelled or lit from outside; what is the ceiling height and can lights be rigged from it; what practical lights exist and what color are they; how much power is available, where is the electrical panel, and where can a generator be placed; where can lighting equipment be staged; are there restrictions on rigging to walls and ceilings; and what are the access and safety issues, such as stairs, balconies and neighbors. Sun position apps (CRE-130, PHOT-330) predict sunlight. On stages, the gaffer reviews set plans with the production designer to plan rigging points, practicals built into the set, translucent windows and backings, and the overhead lighting grid.
| Scout question | Why it matters |
|---|---|
| Window direction and size | Sun path, need for gels, frames or lighting from outside |
| Ceiling height and structure | Rigging overheads, bounce, hiding lights |
| Practical lights | Replacement bulbs, dimming, color correction |
| Power available | Household, panel tie-in or generator; cable runs |
| Generator placement | Noise, fumes, distance and cable length |
| Access and staging | Moving equipment, condors and lifts |
| Restrictions | Rigging rules, neighbors, permits, heritage buildings |
Lighting plans and plots
From the concept and scout, the DP and gaffer develop lighting plans for each set and major scene: diagrams showing the set, camera positions and blocking, and the type, position, height, gel, diffusion and approximate intensity of every fixture, plus the grip equipment needed. Plans may be sketched on paper, drawn in software, or created in 3D previsualization tools. For stage builds, a full lighting plot specifies rigging positions on the grid, circuits and DMX addresses. Plans help estimate equipment and crew, schedule pre-rigging, calculate power, and communicate with the production designer, special effects and safety teams. They are starting points: real conditions on the day, the director's blocking and the actors' performances will change details.
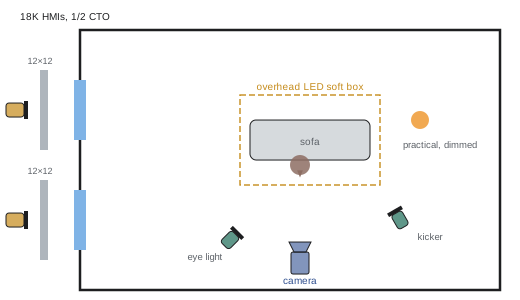
Pre-rigging
Pre-rigging installs lighting, power and grip equipment before the shooting crew arrives, often days ahead on large sets and locations. Rigging crews hang overhead soft boxes and space lights, run feeder cable and distribution, install practicals and dimmers, build frames outside windows, set up condors or lifts for large exterior units, and address and test DMX systems. On the shooting day, the main unit then needs only to fine-tune, saving hours of expensive time. After shooting, rigging crews strike (remove) the equipment. Pre-rigging requires accurate plans, communication between the rigging and shooting gaffers, and careful attention to safety for work at heights and with heavy loads.
The gaffer's package and paperwork
The gaffer and best boy electric manage a large amount of equipment and information: the lighting package and its rental order; daily equipment needs for special scenes; the electrical load and generator planning; crew calls and timecards; equipment damage and loss reports; fuel and generator logs; and records of lighting setups for continuity. Many productions use spreadsheets and apps to track equipment and plots. Good organization ensures that the right equipment is on the truck, that additional gear and crew are booked for big days, and that budgets are respected.
Lighting on the day
An efficient lighting workflow on set follows the setup cycle introduced in Lesson 1, with some practical habits:
- Watch the blocking rehearsal closely, noting where actors stop, turn and look, and where the camera will see.
- Light from big to small: establish the main motivating sources first (window light, overhead ambience), then the keys on faces, then fill, edges and accents, then details and practicals.
- Light the wide shot first in a way that also supports the closer coverage, planning which lights will move closer for close-ups.
- Use stand-ins and check on the monitor with the DIT, using false color and waveforms (CINE-202).
- Communicate clearly: the DP tells the gaffer the intention, and the gaffer translates it into specific instructions for the crew.
- Anticipate: while one setup is shooting, the gaffer and best boy prepare the next, pre-lighting where possible.
- Stay flexible: performances and blocking may change, and the lighting must follow.
Worked problem
Planning a day of coverage
A day schedule includes a dialogue scene in a kitchen at dusk: a master, two over-the-shoulder shots, two close-ups and inserts. Dusk light through the window lasts about 40 minutes. How should lighting and shooting order be planned?
Show solution
- Recreate the dusk window with a large soft LED source outside, set to a cool blue, so the window look is not limited to 40 minutes.
- Use the real dusk only for wide shots that show the sky through the window, scheduled at the right time.
- Light the master with the soft window source and warm practicals, then shoot the coverage toward the window side first, while sky shots are needed.
- Shoot the reverse angles, which do not see the window, last, when real dusk has gone, using the artificial window light.
- Record console presets and meter readings for each setup to keep continuity.
Answer: Simulate dusk with artificial window light, shoot the window-facing wide shots during real dusk, then the reverses with controlled light, documenting each setup.
Working with other departments
Lighting depends on collaboration. The production designer and set decorator choose colors and finishes that affect how light behaves, place practicals, and may build lighting into the set; the art department needs to know if walls should be darker or lights hidden in furniture. Costume and makeup affect how faces and clothes reflect light. Special effects coordinate rain, smoke and fire with lighting and electrical safety. The sound department needs quiet fixtures and generators far away, and cable runs that do not interfere with microphones. The assistant directors manage the schedule and need realistic estimates of lighting time. The DIT and colorist need to know the intended look. Regular communication, in pre-production meetings and on set, prevents conflicts and helps lighting serve the whole production.
Adapting to problems
Things go wrong: the sun disappears behind clouds, a generator fails, a location restricts rigging, the director adds a shot, or the schedule shrinks. Experienced cinematographers and gaffers prepare alternatives: artificial sunlight for when the real sun goes; battery-powered fixtures as backup; a simpler lighting plan for scenes that may need to be shot quickly; and a "cover set" in case weather prevents exterior work. They also know when to simplify: a single large soft source and good negative fill can light a scene beautifully and quickly when time is short. Calm problem-solving and clear communication keep the set moving.
Wrapping
At the end of the day, lighting equipment is wrapped: lights cooled and packed, cables coiled and stored, gels and diffusion sorted and replaced, damaged equipment tagged, and the truck organized for the next day. Distribution is shut down in a safe order. On locations, the crew restores the space, removing tape and rigging and replacing practical bulbs. Wrap is also a time to note what worked, what needs changing for tomorrow and what equipment must be ordered. Efficient wrapping depends on organized trucks and standard procedures, and protects the equipment and the crew's working hours.
Capstone: light a short scene
The capstone asks you to plan and light a short dialogue scene of one to two pages, filmed in a real or studio location. Your submission should include:
- A lighting concept for the scene, with reference images and a short written description of the mood, motivating sources, contrast and color.
- A scout report covering window direction, power, rigging and practicals.
- A lighting plot with fixture types, positions, gels, diffusion and grip equipment for the master and coverage.
- A power and distribution plan, including load calculations and safety measures.
- Exposure targets and ratios for key, fill, background and practicals, measured on the day.
- The edited scene, with stills of each setup and behind-the-scenes photographs of the lighting.
- A reflection of about 500 words on what worked, what changed on the day, and what you would do differently.
Present the capstone as you would to a director or producer considering you for a production, showing both the artistry and the planning behind your work.
Lighting under time pressure
Schedules rarely allow ideal lighting for every setup. Experienced cinematographers decide in advance which scenes deserve the most lighting time, usually emotionally important scenes and those that establish the film's look, and which can be lit simply. Simple, robust approaches, such as a single large soft source with negative fill, overhead ambience plus practicals, or available window light with a bounce, allow good images in little time. Communicating these priorities to the director and assistant directors helps the schedule reflect the lighting needs.
Building a career in lighting
Many cinematographers and gaffers begin as electricians or grips, learning on set from experienced crew. Others study cinematography and work on student and independent productions, building a reel. In either path, practical experience with fixtures, power, grip equipment and the rhythm of a set is invaluable. Attending equipment workshops at rental houses, studying the work of great cinematographers, and practicing lighting with any available equipment build skills over time.
Reviewing your work
After each shooting day, many cinematographers review dailies with the DIT or colorist, looking critically at exposure, contrast, color and continuity, and noting what to adjust in remaining scenes. Reviewing finished work, months later, with fresh eyes, also teaches valuable lessons about what lighting choices served the story best. Keeping a personal record of lighting setups, with plots, readings and stills, builds a reference library that speeds future work and helps explain your approach to directors and producers. Over a career, these records become a valuable archive of techniques, solutions and ideas that can be adapted to new projects and taught to the crews you lead.
Lighting is ultimately a craft of judgment as much as technique: knowing what the scene needs, what can be achieved in the time available, and how to guide a crew calmly and safely toward an image that serves the story. The capstone is a first step on that path.
Common mistakes
MistakeStarting to light without a concept.
InsteadDefine the mood and motivating sources first.
MistakeScouting without the gaffer.
InsteadBring the gaffer and key grip to technical scouts.
MistakeRelying on short natural light windows.
InsteadPlan artificial alternatives and schedule around them.
MistakeLighting small details before the big sources.
InsteadLight from big to small.
MistakeIgnoring other departments.
InsteadCoordinate with design, sound, effects and ADs.
Summary and key terms
- Lighting concepts start from the script, director discussions and references.
- Technical scouts answer questions about sun, power, rigging and practicals.
- Lighting plans and plots guide equipment, power and rigging.
- Pre-rigging saves time on shooting days.
- Light from big to small, plan coverage and communicate clearly.
- Collaborate with other departments and prepare alternatives.
- Wrap safely and reflect; the capstone integrates the course.
- Look book
- Collection of references defining a film's visual style.
- Lighting concept
- Summary of mood, sources, contrast and color for a scene.
- Technical scout
- Location visit to plan technical needs.
- Lighting plot
- Diagram of fixtures, positions and settings.
- Pre-rig
- Installing equipment before the shooting crew arrives.
- Strike
- Removing equipment after shooting.
- Cover set
- Alternative scene ready in case of weather problems.
- Wrap
- End of shooting and packing equipment.
- Big to small
- Lighting main sources first, then details.
- Previsualization
- Planning shots and lighting in advance, often in 3D.
Practice problems
Work each problem on paper first, then reveal the answer to check.
What should a lighting concept describe?
Show answer
Mood, motivating sources, contrast and color.
Name four scout questions for lighting.
Show answer
Windows and sun, ceiling, practicals, power, generator, access, restrictions.
What does a lighting plot show?
Show answer
Fixtures, positions, gels, diffusion and grip.
Why pre-rig?
Show answer
To save shooting-day time.
What does the best boy electric manage?
Show answer
Crew, equipment, paperwork and load records.
What does lighting big to small mean?
Show answer
Main sources first, then keys, fill and details.
How can a short dusk window be extended?
Show answer
Simulate it with artificial light.
Name three departments lighting works with.
Show answer
Design, costume, makeup, effects, sound, ADs, DIT.
What is a cover set?
Show answer
An alternative scene in case weather prevents shooting.
Name three capstone components.
Show answer
Concept, scout report, plot, power plan, targets, scene, reflection.
Lesson quiz · 5 questions
Score 60% or more to complete this lesson.
Create a free account to save your progress, take quizzes and earn a certificate.