
CON-110 · Lesson 10 of 12 · 25 min
Placing, consolidating, finishing and curing concrete
A good mix and accurate formwork and reinforcement can still produce poor concrete if it is badly placed, consolidated, finished or cured. The hours from the arrival of the first truck to the end of finishing, and the days of curing that follow, determine much of the strength, durability and appearance of the finished work. Concrete placement is a time-critical operation that needs planning, the right crew and equipment, coordination with the supplier and testing agency, and contingency plans for breakdowns and weather. This lesson covers pre-placement planning, transporting and placing methods, consolidation, joints, finishing of slabs, curing, hot and cold weather concreting, the maturity method and common defects.
Planning a placement
A placement plan, sometimes called a pour plan, sets out the volume, sequence, start time, delivery rate, placing method, crew and equipment, and responsibilities. Before ordering concrete, the team confirms that formwork, reinforcement and embedded items have been inspected and accepted; that access for trucks and pumps is ready; that weather forecasts are acceptable or protection is prepared; that testing technicians are booked; and that tools, vibrators, finishing equipment, curing materials and lighting are on hand, with spares. The delivery rate must match the crew's ability to place and finish: too slow and cold joints form or trucks exceed time limits; too fast and trucks queue and concrete stiffens.
Worked problem
Planning a slab placement
A slab-on-grade measures 30 m by 20 m and is 150 mm thick (about 98 ft by 66 ft by 6 in). The crew can place and finish about 25 m³ per hour, and trucks carry 9 m³. Allow 4 % for waste and subgrade variation. How much concrete should be ordered, how many trucks are needed, and at what interval should they arrive?
Show solution
- Net volume: 30 × 20 × 0.15 = 90 m³ (about 118 yd³).
- With 4 % allowance: 90 × 1.04 = 93.6 m³; order about 94 m³, confirming the final quantity near the end of the pour.
- Trucks: 94 ÷ 9 = 10.4, so 11 truckloads, the last one a partial load.
- At 25 m³ per hour, one 9 m³ truck is used every 9 ÷ 25 × 60 ≈ 22 minutes; schedule trucks about every 20 minutes.
- Placement time: about 94 ÷ 25 ≈ 3.8 hours, plus finishing that can continue for several hours afterwards, so start early in the day.
Answer: Order about 94 m³ in 11 trucks arriving roughly every 20 minutes, for a placement of about 4 hours.
Transporting and placing
Ready-mixed concrete arrives in truck mixers and is moved into place by one of several methods:
- Direct chute from the truck: simplest and cheapest, where trucks can reach the forms.
- Pumps: boom pumps place concrete quickly at height or across large areas; line pumps push concrete through hoses for smaller jobs. Pump mixes need suitable aggregate grading and workability, and pump lines must be primed and cleaned.
- Crane and bucket: common for columns, walls and high-rise work.
- Conveyors, buggies and wheelbarrows for special situations.
- Tremie placement under water or in drilled shafts (Lesson 6).
Placing practices aim to avoid segregation and cold joints: deposit concrete as close as possible to its final position, do not move it horizontally with vibrators, limit free fall (many specifications limit free fall or require drop chutes or tremies in tall forms), place in horizontal layers of uniform thickness, commonly about 300 mm to 500 mm (12 to 20 in), and place each layer while the layer below is still plastic so the vibrator can knit them together.
Consolidation
Freshly placed concrete contains entrapped air pockets, which can amount to several percent of its volume and reduce strength and leave honeycombing and voids. Consolidation, usually with internal (immersion) vibrators, removes this entrapped air (not the beneficial entrained air) and helps concrete flow around bars and into corners. Good practice is to insert the vibrator vertically at regular spacing so that the zones of influence overlap, let it sink quickly through the layer and about 100 mm (4 in) into the layer below, hold it for several seconds until the surface becomes glossy and large bubbles stop rising, then withdraw it slowly. Over-vibration can cause segregation in very fluid mixes, but under-vibration is far more common. External form vibrators are used for precast and thin sections, vibrating screeds for slabs, and self-consolidating concrete needs little or no vibration.
Joints in concrete
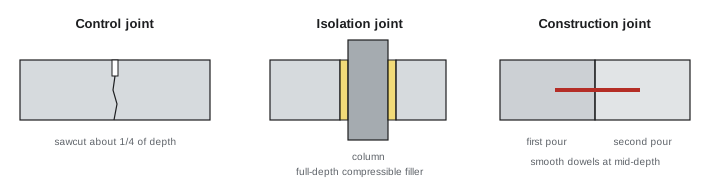
Concrete shrinks as it dries and moves with temperature, so it cracks unless joints are provided. The main types are:
- Control (contraction) joints: planned weakened planes, sawcut or tooled into slabs to a depth of about one quarter of the slab thickness, so cracks form along straight lines. Sawcutting must be done as soon as the concrete can be cut without ravelling, often within 4 to 12 hours, before random cracks form. Joint spacing in slabs-on-grade is commonly about 24 to 36 times the slab thickness.
- Isolation (expansion) joints: full-depth separations around columns, walls, drains and equipment bases so the slab can move independently, filled with compressible material.
- Construction joints: planned stopping points between placements, located where the designer allows, often with keyways, dowels or continuous reinforcement, waterstops in water-retaining walls, and surface preparation (cleaning and roughening) before the next placement.
An unplanned interruption that lets concrete set before the next layer is placed creates a cold joint, a weak plane that may leak or crack.
Finishing slabs
Finishing transforms the surface of a slab to the required flatness, texture and durability. A typical sequence is:
- Screeding (strikeoff): striking the concrete off to grade with a straightedge or laser screed.
- Bull floating or darbying: smoothing the surface and embedding coarse aggregate immediately after screeding.
- Waiting for bleed water: bleed water must evaporate before further finishing; working it into the surface weakens the top layer and causes scaling and dusting.
- Edging and jointing: rounding edges and tooling joints where required.
- Floating: hand or power floats (pans) to embed aggregate, remove imperfections and compact the surface.
- Troweling: steel trowels or power trowels produce a dense, smooth, hard surface for interior floors.
- Texturing: broom finishes for exterior slabs and ramps to provide slip resistance.
Air-entrained exterior concrete should not be hard-troweled, which can cause delamination and scaling. Industrial floors have flatness and levelness specifications measured with F-numbers or straightedges, and achieving them depends on the subgrade, forms, screeds, mix consistency and finishing crew. Finishing aids or water sprinkled on the surface are poor practice; evaporation retarders can be used in drying conditions.
Curing
Curing means maintaining adequate moisture and temperature in concrete for long enough after placement to allow hydration to develop strength and durability. Concrete that dries out early can lose a large part of its potential strength near the surface, which is exactly where durability matters most, and can crack from plastic and drying shrinkage. Curing methods include:
- Water curing: ponding, continuous sprinkling or wet burlap kept saturated.
- Covering: plastic sheets or curing blankets that retain moisture.
- Curing compounds: liquid membranes sprayed on the surface soon after finishing, which must be compatible with later floor coverings or coatings.
- Leaving forms in place, which protects formed surfaces.
- Internal curing with pre-wetted lightweight aggregate in special mixes.
ACI 301 and ACI 308.1 generally require curing for at least 7 days, or until 70 % of the specified compressive strength is reached as shown by field-cured cylinders or other methods, with longer periods for some cements and SCMs. ACI 308R gives guidance on curing methods.
Cold weather concreting
Fresh concrete must not freeze, and hydration slows dramatically at low temperatures; below about 5 °C (40 °F) strength gain is slow, and if concrete freezes before reaching about 3.5 MPa (500 psi) it can be permanently damaged.
ACI 306 defines cold weather as a period when the air temperature has fallen to, or is expected to fall below, 40 °F during the protection period. Its provisions include minimum concrete temperatures at placement depending on section size (for example 55 °F for sections less than 12 in thick), protection with insulating blankets or heated enclosures, and avoiding placement on frozen subgrade.
Cold weather techniques include heated aggregates and water, high early strength cement or accelerators (non-chloride in reinforced work), insulated blankets, heated enclosures with vented heaters (unvented combustion heaters cause carbonation of fresh surfaces and carbon monoxide hazards), and gradual cooling at the end of protection to avoid thermal cracking.
Hot weather concreting
High temperatures, low humidity, wind and sun accelerate setting, increase water demand, cause rapid slump loss and promote plastic shrinkage cracking, as surface water evaporates faster than bleed water rises. Specifications commonly limit the concrete temperature at placement, often to about 30 °C to 35 °C (85 °F to 95 °F). Measures include cooling aggregates with water spray, using chilled water or ice in the mix, retarding and water-reducing admixtures, scheduling placements early in the morning or at night, shading and windbreaks, fog spraying and evaporation retarders, and starting curing immediately. A common guideline is that when the evaporation rate approaches about 1.0 kg/m² per hour (0.2 lb/ft² per hour), precautions against plastic shrinkage cracking are needed.
The maturity method
Because strength gain depends on both time and temperature, the maturity method estimates in-place strength from the temperature history of the concrete. Sensors are embedded in the concrete and record temperatures; the maturity index is calculated and compared with a strength-maturity relationship developed in the laboratory for that mix (ASTM C1074 describes the method, which CSA A23.1 permits). A common form is the temperature-time factor:
where \(T_a\) is the average concrete temperature in each interval, \(T_0\) a datum temperature (often −10 °C) and \(\Delta t\) the time interval. For example, 24 hours at 15 °C followed by 24 hours at 5 °C gives (15 + 10) × 24 + (5 + 10) × 24 = 600 + 360 = 960 °C·h. If the laboratory curve shows that 960 °C·h corresponds to 18 MPa, and the stripping criterion is 20 MPa, the slab soffits must stay in place longer. Maturity helps decide when to strip forms, stress tendons, open pavements or remove cold weather protection, and wireless sensors now make it common on building sites.
Common defects and their causes
| Defect | Appearance | Typical causes |
|---|---|---|
| Honeycombing | Voids between coarse aggregate | Poor consolidation, congested bars, paste leaks |
| Cold joint | Visible seam, possible leak | Delays between layers |
| Plastic shrinkage cracks | Short random cracks soon after placing | Rapid evaporation, no protection |
| Scaling | Flaking surface | Finishing bleed water, poor air, early de-icing salts |
| Dusting | Powdery surface | Water added to surface, poor curing |
| Curling | Slab edges lift | Differential drying, poor joint layout |
| Delamination | Hollow-sounding surface layer | Sealing surface too early, troweling air-entrained concrete |
Most defects are prevented by planning, by adequate crews and equipment, by not adding water, by proper consolidation and timing of finishing, and by prompt and continuous curing.
Communication during the pour
A successful placement depends on clear communication. Before the first truck arrives, the supervisor holds a short meeting with the placing crew, finishers, pump operator, testing technician and any inspectors to review the sequence, the location of construction joints, the delivery schedule, safety around the pump and trucks, and what will happen if a truck is rejected or equipment breaks down. During the pour, one person is usually responsible for calling the ready-mix dispatcher to speed up, slow down or stop deliveries and to order the final load, based on measurements of the volume remaining. Getting the final order right avoids both short loads, which can leave a cold joint while more concrete is batched, and wasted concrete that must be returned and disposed of.
After the pour, the supervisor records the actual volume placed, the start and finish times, the weather, the number of trucks, any rejected loads, the test results reported in the field, and any problems such as delays or equipment breakdowns. This pour record becomes part of the quality documentation and is invaluable if questions arise later about a particular area of the slab.
Common mistakes
MistakeMoving concrete sideways with vibrators.
InsteadPlace concrete near its final position.
MistakeFinishing while bleed water is on the surface.
InsteadWait for bleed water to evaporate.
MistakeSawcutting control joints the next day.
InsteadCut as soon as the surface can be cut cleanly.
MistakeUsing unvented heaters in cold weather enclosures.
InsteadUse vented heaters and monitor carbon monoxide.
MistakeSkipping curing because the slab looks hard.
InsteadCure for the specified time and conditions.
Summary and key terms
- Plan placements: volume, delivery rate, crew, equipment, testing and weather.
- Place concrete near its final position in layers, avoiding segregation and cold joints.
- Internal vibration removes entrapped air and fills forms.
- Control, isolation and construction joints manage cracking and movement.
- Finishing follows screeding, floating and troweling, without working bleed water in.
- Curing keeps concrete moist and warm; cold and hot weather need special measures.
- The maturity method estimates in-place strength from temperature history.
- Pour plan
- Plan for a concrete placement.
- Consolidation
- Removing entrapped air, usually by vibration.
- Cold joint
- Unplanned joint from delay between layers.
- Control joint
- Weakened plane that controls crack location.
- Isolation joint
- Full-depth joint separating a slab from other elements.
- Screeding
- Striking off concrete to grade.
- Bleed water
- Water rising to the surface of fresh concrete.
- Curing
- Maintaining moisture and temperature for hydration.
- Plastic shrinkage cracking
- Cracking from rapid surface evaporation.
- Maturity method
- Estimating strength from temperature history.
Practice problems
Work each problem on paper first, then reveal the answer to check.
Volume of a slab 20 m × 15 m × 0.125 m?
Show answer
37.5 m³.
Truck interval for 9 m³ trucks at 18 m³ per hour?
Show answer
Every 30 minutes.
Why limit free fall of concrete?
Show answer
To prevent segregation.
How deep should a vibrator penetrate the previous layer?
Show answer
About 100 mm (4 in).
Typical depth of a control joint?
Show answer
About one quarter of the slab thickness.
Why wait for bleed water to evaporate?
Show answer
Working it in weakens the surface.
Name two curing methods.
Show answer
Wet burlap, plastic sheets, curing compound, ponding.
Maturity for 48 h at 20 °C with datum −10 °C?
Show answer
1,440 °C·h.
Name two hot weather measures.
Show answer
Chilled water or ice, retarders, early placement, fog spray.
What causes honeycombing?
Show answer
Poor consolidation or paste leaks.
Lesson quiz · 5 questions
Score 60% or more to complete this lesson.
Create a free account to save your progress, take quizzes and earn a certificate.