
CRE-130 · Lesson 2 of 12 · 26 min
Camera apps, settings and formats
The camera app on a phone is designed to produce good results with a single tap, and for casual photos that is exactly what most people need. Creators who want consistent, high-quality content benefit from going a step further: setting up the app deliberately, understanding the formats it records, and taking control of focus, exposure and white balance when the automatic choices are wrong. This lesson covers the settings worth changing before you start, photo formats including HEIF and raw, video resolutions, frame rates and codecs, controlling focus and exposure, white balance, HDR video, and the professional and third-party apps that unlock manual control. Menu names differ between phone makers and change with software updates, so the principles matter more than the exact location of each setting.
Settings to change before you shoot
A few minutes in the camera settings, done once, improves everything you shoot afterward:
- Turn on the grid. A rule-of-thirds grid helps keep horizons level and place subjects deliberately (Lesson 3). Some apps also offer a level indicator for shooting straight down on flat lays.
- Choose photo and video formats deliberately, as discussed below, instead of leaving defaults you have not examined.
- Set the default video resolution and frame rate you use most, for example 4K at 30 fps, so that you do not have to change it before every clip.
- Decide whether to keep settings such as exposure adjustment, the last mode used or creative styles between sessions, an option some apps call "preserve settings".
- Turn on mirroring for the front camera if you want selfies to match what you see on screen, or off if you need text in the background to read correctly.
- Consider turning off automatic macro switching if the camera jumps unexpectedly to the ultra-wide when you get close to a subject, and turn it on manually when you want it.
- Turn on location tagging only if you want it; remember that location data embedded in images can reveal where you live if you share originals (Lesson 12).
Photo formats: JPEG, HEIF and raw
Phones save photos in one of several formats. JPEG is universal and compatible with every app and website, but it stores only 8 bits per channel with lossy compression. HEIF (often with the extension .heic), the default on iPhones and many Android phones, stores 10-bit images at about half the size of a JPEG of similar quality, and supports HDR display; most apps and platforms now accept it, and phones convert to JPEG automatically when sharing to services that do not. Raw formats record far more of the sensor data and leave white balance, tone and sharpening to be decided during editing. Phone raw files are usually saved as DNG (Digital Negative). Some phones offer computational raw formats, such as Apple ProRAW or similar modes on Android flagships, that combine the multi-frame noise reduction and dynamic range of the phone's processing with the editing flexibility of raw. These files are large, often 25 to 75 MB each, but they give much more room to recover highlights, adjust color and avoid the overprocessed look of standard images.
| Format | Bit depth | Typical size (12 MP) | Best for |
|---|---|---|---|
| JPEG | 8-bit | 2–5 MB | Maximum compatibility, quick sharing |
| HEIF / HEIC | 10-bit | 1–3 MB | Default everyday shooting, HDR display |
| DNG raw | 10–14-bit | 15–30 MB | Careful editing, difficult light |
| Computational raw (e.g. ProRAW) | 10–12-bit | 25–75 MB | Raw flexibility with multi-frame processing |
A sensible approach for most creators is to shoot HEIF or JPEG for everyday content and switch to raw for important images, difficult lighting such as sunsets or mixed indoor light, or images you plan to edit carefully. Raw files must be edited before they look their best, so they suit deliberate work rather than quick stories.
Video resolution and frame rate
Video settings combine resolution and frame rate. Common resolutions are 1080p (Full HD, 1920 × 1080 pixels) and 4K (3840 × 2160 pixels); some phones also record 8K. Platforms typically display short-form video at 1080 × 1920 pixels, so 1080p is sufficient for many vertical videos, but recording in 4K offers advantages: you can crop or reframe in editing, for example extracting a vertical frame from horizontal footage, stabilize in software without losing too much detail, and deliver higher quality to platforms such as YouTube that support 4K. The costs are larger files, more heat and shorter battery life.
Frame rate determines how motion looks. 24 fps gives the slight motion blur associated with films; 25 fps is standard in regions with 50 Hz power, and 30 fps in North America and other 60 Hz regions; 60 fps gives smoother motion and allows half-speed slow motion in a 30 fps timeline; and 120 or 240 fps slow-motion modes stretch fast action dramatically. Lesson 7 discusses how to choose. For general content in Canada and the United States, 30 fps is a safe default, 24 fps suits a cinematic look, and 60 fps suits sport, action and anything you may want to slow down. Keep frame rates consistent within a project, because mixing them can cause stutter.
Worked problem
Estimating storage for a shoot
A creator plans to record 40 minutes of footage for a YouTube video in 4K at 30 fps. Their phone records about 170 MB per minute in this mode using HEVC, or about 6 GB per minute in a professional ProRes mode. How much storage is needed for each option?
Show solution
- HEVC: 40 × 170 MB = 6,800 MB, about 6.8 GB.
- ProRes: 40 × 6 GB = 240 GB.
- The ProRes recording would fill a 256 GB phone almost completely, so it would need external storage.
Answer: About 7 GB in HEVC versus about 240 GB in ProRes; professional formats usually require recording to an external SSD.
Video codecs and professional formats
A codec compresses video so that it fits in a reasonable amount of storage. Phones usually offer H.264, often labeled "most compatible", and H.265 (HEVC), labeled "high efficiency", which produces files about half the size for similar quality. HEVC is the better default if your editing app and computer support it, which most current ones do. Some phones offer professional codecs such as Apple ProRes, which compresses much less, preserves more detail and color for grading, and is easier for computers to edit, at the cost of enormous files; recording ProRes at 4K usually requires an external SSD connected by USB-C. Log recording, available on several flagship phones, captures a flat, low-contrast image that preserves highlight and shadow detail for color grading in editing; it looks dull straight out of the camera and must be graded, usually starting with a LUT (look-up table) supplied by the phone maker. Log and professional codecs suit creators who edit on a computer and want the most control; for quick social content, standard modes are usually better.
Focus and exposure control
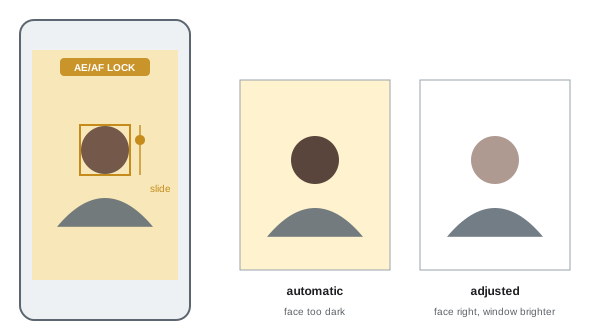
Tapping the screen tells the phone where to focus and what to expose for. Pressing and holding usually locks focus and exposure, often labeled AE/AF lock, so that they do not change when you move the phone or the subject moves. Exposure lock is essential for video, where automatic changes in brightness as you pan or as someone walks through the frame look amateurish, and for photographs where the phone keeps choosing the wrong brightness. After tapping, a sun icon or slider lets you brighten or darken the image; this is exposure compensation, and it is one of the most useful controls on the phone.
The phone's metering, like any camera's, tries to make scenes average in brightness. It overexposes dark scenes, washing out a black product on a dark table, and underexposes bright scenes, turning white snow gray or a bright window into a silhouette. With HDR processing, phones handle many such scenes automatically, but you will often get better results by tapping on the most important area and adjusting the slider. A good habit is to slightly reduce exposure in bright scenes to protect highlights such as skies and white clothing, since detail lost to overexposure cannot be recovered, while shadows can usually be lifted in editing.
White balance
White balance makes neutral objects appear neutral under different light sources. Phones adjust it automatically and usually do well outdoors, but warm indoor light, mixed lighting from windows and lamps, colored LED lights and scenes dominated by one color can confuse them. Inconsistent white balance is especially noticeable in video, where color may shift during a shot, and in a series of photos for a carousel or product listing, where each image may have a slightly different tint. Most phone apps do not offer manual white balance in the default mode, but pro modes and third-party apps let you set it in kelvin or lock it. Shooting raw allows you to set white balance accurately later. Lessons 4 and 5 explain color temperature and how to manage mixed light.
HDR video and color on screens
Many phones record HDR (high dynamic range) video by default, often in formats such as Dolby Vision or HLG. On an HDR-capable screen, highlights such as sunlight and lamps appear much brighter than ordinary white, giving vivid, lifelike footage. Problems arise when HDR footage is edited in software or posted to platforms that do not handle it correctly: it may appear washed out, overly bright, or inconsistent with other clips. Some platforms display HDR well on supported phones, while others convert it to standard dynamic range (SDR), sometimes poorly. If your footage looks wrong after editing or uploading, try turning off HDR video recording, or set your editing app to export in SDR. Mixing HDR and SDR clips in one edit also causes jarring differences in brightness.
Pro modes and third-party apps
Most phones include a pro or manual mode, sometimes separate for photo and video, that exposes controls such as ISO, shutter speed, manual focus, white balance and, in video, audio levels, microphone selection and bitrate. Third-party apps, such as Blackmagic Camera, Halide, Moment, ProCamera, Filmic-style video apps or open camera apps on Android, offer similar or greater control, plus features borrowed from professional cameras: histograms, zebras for exposure, focus peaking, shutter angle control, log recording and frame guides. Manual control is useful for:
- Locking ISO and shutter speed so that exposure stays constant in video.
- Choosing a shutter speed of about double the frame rate for natural motion blur, such as 1/60 s at 30 fps (Lesson 7).
- Avoiding flicker under artificial lights by matching shutter speed to the mains frequency.
- Setting focus manually for products, macro shots and controlled pulls.
- Setting white balance in kelvin for consistent color.
The trade-off is that some third-party and manual modes bypass parts of the phone's computational processing, producing images with more noise or less dynamic range in difficult light than the automatic mode. Try both and compare.
Useful extras
Phone camera apps include many other modes worth knowing. Burst mode, usually activated by holding or sliding the shutter button, captures a rapid series of photos for action and expressions. Live or motion photos record a short clip around each still, from which you can choose a better frame or create a loop. Timers and remote shutters, including voice commands, smartwatch apps and Bluetooth remotes, help with self-portraits and avoid shake. Portrait mode and cinematic video modes simulate background blur, sometimes with adjustable focus after shooting. Time-lapse and hyperlapse compress long events, while slow motion stretches short ones. Document scanning, panorama and night modes have their own uses. Spend time trying each mode in low-stakes situations so that you know which to choose when it matters.
Building a settings checklist
Because settings are easy to change accidentally and hard to notice on a small screen, many creators use a quick checklist before important shoots: lens clean; storage space and battery sufficient; airplane or do-not-disturb mode on, so that calls and notifications do not interrupt recording; video resolution, frame rate and format correct; HDR on or off as required; grid on; exposure and focus locked where appropriate; external microphone connected and tested (Lesson 8). A thirty-second check prevents the frustration of discovering, after filming, that a whole interview was recorded at the wrong frame rate, interrupted by a call, or shot in a mode that the editing app cannot read.
Common mistakes
MistakeLetting exposure change during a video clip.
InsteadLock exposure and focus before recording.
MistakeShooting raw for quick stories.
InsteadUse HEIF or JPEG for fast content and raw for careful work.
MistakeRecording ProRes without enough storage.
InsteadEstimate file sizes and use an external SSD.
MistakePosting HDR footage that looks washed out.
InsteadTurn off HDR or export in SDR when platforms mishandle it.
MistakeMixing frame rates in one project.
InsteadChoose a frame rate and keep it consistent.
Summary and key terms
- Set up the grid, formats, defaults and front camera behavior before shooting.
- HEIF is efficient for everyday photos; raw gives editing flexibility.
- 4K allows cropping and stabilization; 30 fps is a safe default in North America.
- HEVC halves file sizes; ProRes and log suit careful grading on a computer.
- Tap, hold to lock, and adjust exposure with the slider.
- Inconsistent white balance can be fixed with pro modes or raw.
- Pro modes and third-party apps add manual control at some cost to processing.
- HEIF
- Efficient 10-bit image format, often .heic.
- DNG
- Open raw image format used by many phones.
- Computational raw
- Raw format combining multi-frame processing with raw flexibility.
- Resolution
- Number of pixels in a frame, such as 1080p or 4K.
- Frame rate
- Frames recorded per second.
- Codec
- Method of compressing video.
- HEVC
- High-efficiency video codec, also called H.265.
- Log recording
- Flat recording that preserves range for grading.
- AE/AF lock
- Locking exposure and focus.
- Exposure compensation
- Brightening or darkening the automatic exposure.
Practice problems
Work each problem on paper first, then reveal the answer to check.
Name three settings to change before shooting.
Show answer
Grid, formats, default resolution and frame rate, mirroring, macro switching, location.
What is an advantage of HEIF over JPEG?
Show answer
10-bit quality at about half the file size.
When is raw worth using?
Show answer
Important images, difficult light, careful editing.
Name two reasons to record 4K for vertical content.
Show answer
Reframing, cropping and stabilization room.
A safe default frame rate in Canada and the US?
Show answer
30 fps.
Storage for 20 minutes at 170 MB per minute?
Show answer
About 3.4 GB.
Why does log footage look flat?
Show answer
It preserves range and needs grading.
How do you lock exposure on most phones?
Show answer
Press and hold on the subject.
What can make HDR video look washed out?
Show answer
Apps or platforms that do not handle HDR correctly.
Name two features of third-party camera apps.
Show answer
Manual ISO and shutter, histograms, zebras, focus peaking, log.
Lesson quiz · 5 questions
Score 60% or more to complete this lesson.
Create a free account to save your progress, take quizzes and earn a certificate.