
CRE-130 · Lesson 8 of 12 · 25 min
Microphones and clean audio
Viewers forgive imperfect video far more readily than bad sound. Footage that is slightly soft or noisy can still be engaging, but audio that is echoey, muffled, distorted, too quiet or drowned in wind and traffic makes people scroll away within seconds. Phones have good built-in microphones for casual use, but they are designed to capture everything around them, often from a distance, and they pick up room echo and background noise. This lesson covers how sound behaves, the built-in microphones and their limits, types of external microphones and how to connect them, placing microphones, recording levels, controlling rooms and echo, dealing with wind and noise outdoors, recording separate audio and room tone, and checking sound before and after recording.
How sound behaves
Understanding a few basics helps you make better recordings:
- Distance matters most. The level of sound from a source falls rapidly with distance, roughly by 6 decibels (dB), or to half the pressure, each time the distance doubles. A microphone 30 cm from your mouth receives much more of your voice relative to background noise than one 2 m away. Getting the microphone close is the single most effective way to improve audio.
- Rooms reflect sound. Hard, flat surfaces such as walls, floors, windows and tables reflect sound, creating echo and reverberation that make voices sound distant and hollow. Soft, irregular surfaces such as curtains, carpets, sofas, bookshelves and clothing absorb or scatter sound.
- Noise is everywhere. Fridges, fans, air conditioning, traffic, neighbors, computers and lights produce background noise that the ear tunes out but the microphone records faithfully.
- The decibel scale is logarithmic. In digital recording, levels are measured in dBFS (decibels relative to full scale), where 0 dBFS is the maximum before clipping; normal speech usually sits around −12 to −6 dBFS at its peaks.
Built-in microphones
Phones contain several microphones, used for calls, noise reduction and stereo or spatial video recording. In video mode, the phone may record from multiple microphones and use processing to reduce wind and background noise, and some phones offer modes such as voice isolation or audio zoom that focus on sound from the direction the camera points. Built-in microphones work well for ambient sound, events, casual vlogs and recording close to the phone, such as talking to the front camera at arm's length in a quiet room. They struggle when the subject is farther than about a meter away, in echoey rooms, in wind, and in noisy environments, and their processing can make voices sound thin or watery. Covering the microphone holes with fingers or a case also muffles sound; learn where the microphones are on your phone.
Types of external microphones
External microphones fall into a few main categories:
- Wireless lavalier systems: a small transmitter with a built-in or clip-on microphone attaches to the speaker's clothing near the chest, sending audio to a receiver plugged into the phone. They have become the most popular choice for creators because they place the microphone close to the mouth while allowing freedom of movement. Many record a backup copy internally in case of interference. Two-transmitter kits allow recording two people.
- Wired lavalier microphones: small clip-on microphones connected by a cable; inexpensive and reliable, but the cable limits movement.
- On-camera shotgun or compact microphones: mounted on the phone or a rig, pointing at the subject. They are directional, picking up sound mainly from the front and rejecting some sound from the sides and rear, but because they are still at the camera position, they work best within about a meter of the subject.
- Handheld and podcast microphones: dynamic or condenser microphones held close to the mouth or mounted on an arm, ideal for interviews, voiceovers and podcasts. Dynamic microphones reject background noise well when used close up.
- USB microphones and audio interfaces: desk microphones and interfaces that connect to a phone or computer, often used for voiceovers and live streams.
| Microphone type | Typical distance to mouth | Strengths | Limitations |
|---|---|---|---|
| Built-in | 0.3–2 m or more | Always available, ambient sound | Echo, noise, distance |
| Wireless lavalier | 15–25 cm | Close, discreet, freedom to move | Clothing rustle, batteries, interference |
| Wired lavalier | 15–25 cm | Reliable, inexpensive | Cable limits movement |
| On-camera shotgun | 0.5–1 m | Directional, quick to set up | Must stay close to the subject |
| Handheld or podcast dynamic | 5–15 cm | Rich voice, rejects noise | Visible in shot, must stay close |
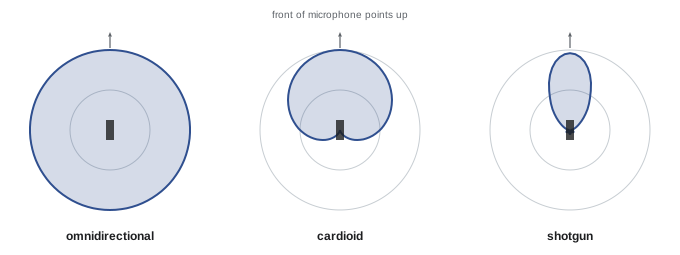
Connecting microphones to a phone
Microphones connect to phones through the USB-C port (or Lightning on older iPhones), through a 3.5 mm headphone jack on phones that still have one, often via an adapter, or wirelessly with a receiver plugged into the port. Many wireless systems designed for creators include receivers with USB-C and Lightning connectors that plug directly into the phone. Bluetooth microphones and earbuds can also be used, but Bluetooth adds compression and delay, and some camera apps do not support Bluetooth audio in video, so dedicated wireless systems are usually better. When you connect a microphone, check that the camera app is actually using it: the default camera app usually switches automatically, while third-party apps let you choose the input and display audio meters. Record a test clip and listen back. Some phones charge and record at the same time through adapters with passthrough charging, useful for long sessions.
Placing microphones
Placement makes a bigger difference than price. For lavalier microphones, clip the microphone on the center of the chest, about a hand's width below the chin, on a shirt placket, collar or neckline, pointing toward the mouth. Keep it away from jewelry, lanyards, hair and fabric that may rub against it, and route the cable inside clothing if wired. Hidden placements under clothing need careful taping to avoid rustle. If the speaker turns their head to one side, for example toward an interviewer, clip the microphone on that side. For on-camera microphones, get the phone as close to the speaker as the framing allows; using a wider camera from closer often gives better sound than a telephoto from farther away. For handheld microphones, keep a consistent distance of a few fingers' width to a hand span from the mouth, slightly off-axis to reduce popping sounds from plosive letters such as p and b. A pop filter or foam windscreen also helps.
Worked problem
Choosing a microphone setup for an interview
A creator interviews a guest in a café for a vertical video. They film the guest with the phone on a small tripod about 1.5 m away. The built-in microphone records clattering cups and music. What setup would improve the sound?
Show solution
- Use a two-transmitter wireless lavalier kit, clipping one microphone on the guest and one on the creator, each about a hand's width below the chin.
- Plug the receiver into the phone and set levels so that the guest's voice peaks around −12 dBFS.
- Turn on internal backup recording on the transmitters if available.
- Choose a quieter corner away from the espresso machine and speakers, and ask staff if the music can be turned down briefly.
- Record 30 seconds of the café's background sound for editing.
Answer: Wireless lavaliers on both people, sensible levels with backup recording, a quieter spot and recorded room tone.
Recording levels
Recording level, or gain, determines how loud the recorded signal is. If it is too low, the voice is quiet and raising it in editing also raises background noise and hiss. If it is too high, loud moments clip, producing harsh distortion that cannot be repaired. Aim for speech peaks around −12 dBFS, with the loudest moments, such as laughter, staying below about −6 dBFS. Default camera apps set levels automatically, which works reasonably but may pump background noise up during pauses. Third-party camera apps and many wireless receivers allow manual gain and show meters; some wireless systems also offer a safety track recorded at a lower level, providing a backup if the main track clips. Some microphones offer 32-bit float internal recording, which captures an enormous dynamic range so that levels can be adjusted afterward without clipping.
Rooms and echo
Echo is the most common audio problem in home-recorded content. Empty rooms with hard floors and bare walls sound hollow, while furnished rooms with soft surfaces sound warmer and closer. To improve a room:
- Choose the most furnished room available; bedrooms and living rooms with carpets, sofas, curtains and full bookshelves usually sound better than kitchens, bathrooms and empty offices.
- Add soft materials: rugs, heavy curtains, blankets hung on stands or doors, cushions and clothing racks.
- Avoid recording near reflective surfaces such as bare walls, windows and large tables; sit a little away from the wall.
- Place soft material out of frame where it does the most good, behind the camera and on the walls facing the speaker.
- Get the microphone closer; the closer the microphone, the less the room matters.
Acoustic foam panels look professional but are less effective against low frequencies and echo than many people expect; thick soft furnishings work well. Recording voiceovers in a closet full of clothes, or under a blanket, is a well-known trick that produces surprisingly clean, dry sound.
Wind and noise outdoors
Wind blowing across a microphone causes loud low-frequency rumbles and pops that are very difficult to remove. Foam windscreens help in light breezes; furry windscreens, often called dead cats, are far more effective and are essential outdoors for lavaliers and on-camera microphones. Lavalier microphones can be shielded under clothing, with small furry covers. Positioning the speaker with their back to the wind and using buildings or vehicles as shelter also helps. Phones often apply wind noise reduction automatically, which can make voices sound processed; with good windscreens, you can turn it off in apps that allow it. Traffic, construction, aircraft and crowds are harder to avoid: choose quieter locations and times, keep the microphone close, pause when loud noises pass, and record several takes.
Separate audio, room tone and syncing
For important recordings, many creators record audio separately as well as on the phone, using a wireless system with internal recording, a portable recorder or a second phone placed near the speaker. Separate recordings provide a backup and often higher quality. To sync separate audio with video, clap your hands once in view of the camera at the start of each take; the sharp spike in the audio waveform aligns easily with the frame where the hands meet. Many editing apps can also sync automatically by comparing waveforms with the phone's own audio.
Room tone is a recording of the silence in a location, typically 20 to 30 seconds with everyone quiet and still. Every space has its own background sound, and editors use room tone to fill gaps between edited lines, so that the background does not drop out abruptly. Record it at every location, with the same microphone and settings.
Listening and checking
Always listen to audio with headphones before and during recording, as phone speakers hide problems such as hum, rustle and distortion. Wired headphones or the monitoring outputs on wireless receivers give the most accurate, delay-free monitoring; Bluetooth earbuds may introduce delay. Record a short test clip at the start of each session, listen for echo, noise, rustle and level, and fix problems before the real take. After recording, listen again before leaving the location, while it is still possible to re-record. In editing, tools such as noise reduction, equalization and AI voice enhancement can improve audio (Lesson 11), but they work best on recordings that are already reasonably clean; it is always easier to record good sound than to repair bad sound.
Common mistakes
MistakeRecording from far away with the built-in microphone.
InsteadGet a microphone close to the speaker.
MistakeFilming in an empty, echoey room.
InsteadChoose furnished rooms and add soft materials.
MistakeGoing outdoors without a furry windscreen.
InsteadUse windscreens and shelter from wind.
MistakeSetting levels so high that peaks clip.
InsteadAim for peaks around −12 dBFS.
MistakeNot listening with headphones.
InsteadMonitor and check test clips before recording.
Summary and key terms
- Audio quality matters more to viewers than small image flaws.
- Distance is the biggest factor; get the microphone close.
- Built-in microphones suit ambient and close recording only.
- Wireless lavaliers are the most versatile creator microphones.
- Place lavaliers a hand's width below the chin and avoid rustle.
- Peaks around −12 dBFS avoid clipping and noise.
- Control echo with soft furnishings and wind with furry windscreens; record room tone.
- dBFS
- Decibels relative to digital full scale.
- Clipping
- Distortion when a signal exceeds the maximum level.
- Reverberation
- Persistence of sound reflections in a room.
- Lavalier
- Small clip-on microphone.
- Shotgun microphone
- Highly directional microphone.
- Cardioid
- Heart-shaped pickup pattern rejecting the rear.
- Gain
- Amplification setting for recording level.
- Plosive
- Burst of air from p and b sounds.
- Dead cat
- Furry windscreen for microphones.
- Room tone
- Recording of a location's background sound.
Practice problems
Work each problem on paper first, then reveal the answer to check.
How much does sound level fall when distance doubles?
Show answer
About 6 dB.
Name two surfaces that absorb sound.
Show answer
Curtains, carpets, sofas, clothing, bookshelves.
When do built-in microphones work well?
Show answer
Close up in quiet rooms and for ambient sound.
Why are wireless lavaliers popular?
Show answer
Close placement with freedom to move.
Where do you clip a lavalier?
Show answer
Center of the chest about a hand's width below the chin.
Target peak level for speech?
Show answer
About −12 dBFS.
What does 32-bit float recording offer?
Show answer
Huge dynamic range so levels can be fixed later.
Name a quick voiceover trick for clean sound.
Show answer
Record in a closet full of clothes or under a blanket.
How do you sync separate audio?
Show answer
Clap at the start or use waveform syncing.
What is room tone used for?
Show answer
Filling gaps between edited lines.
Lesson quiz · 5 questions
Score 60% or more to complete this lesson.
Create a free account to save your progress, take quizzes and earn a certificate.