
CRE-130 · Lesson 9 of 12 · 26 min
Setups for talking heads, products and food
Much creator content falls into a few recurring formats: talking directly to camera, showing products, filming food and drink, and demonstrating something on a desk or table. Each benefits from a repeatable setup that combines the framing, lighting, support and sound covered in earlier lessons. A good setup can be assembled quickly, produces consistent results from one video to the next, and leaves the creator free to focus on performance and content rather than technical problems. This lesson describes practical setups for talking heads, product photography and video, food and drink, flat lays and overhead demonstrations, and selfie-style vlogging, along with backgrounds, props and the use of teleprompters.
The talking-head setup
Talking-head videos, in which a creator speaks directly to the viewer, are the backbone of tutorials, commentary, education, reviews and many short-form formats. A reliable setup includes:
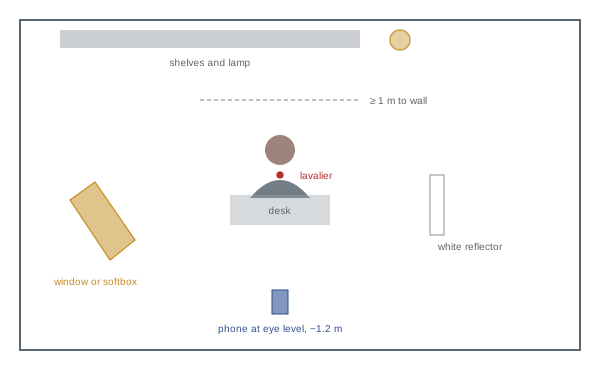
- Camera: the rear main camera on a tripod at eye level, about one to two meters from the creator, framing a medium shot or medium close-up. Use the rear camera for quality and a monitor app, a flip-screen accessory or a second device to see yourself, or use the front camera if its quality is adequate and convenience matters more.
- Lighting: a large soft key light or window to one side at about 30 to 45 degrees, slightly above eye level; fill from a reflector or dim light on the other side; and a practical lamp or accent light in the background.
- Sound: a wireless or wired lavalier, or a dynamic microphone on an arm just out of frame, with the room softened by furnishings.
- Background: a tidy, intentional space with depth, a few objects that suit your brand, and a distance of at least a meter between you and the wall.
- Exposure and focus locked on your face; video settings consistent with previous episodes.
Mark the positions of the chair, tripod and lights with tape so that the setup can be rebuilt identically. Consistency builds a recognizable look for a series.
Performing to camera
Setup is only half the challenge. Speaking naturally to a phone takes practice. Look into the lens, not at your image on the screen; placing a small sticker or arrow beside the lens can remind you. Imagine you are talking to one specific person, rather than an audience. Speak with slightly more energy than in normal conversation, because the camera flattens energy. Use bullet-point notes or a short script rather than reading word for word, unless you use a teleprompter. Record in short sections and edit them together, pausing between sections so that you can cut cleanly. CRE-220 covers on-camera presence in depth.
Teleprompters
A teleprompter displays your script so that you can read it while looking at the camera. Teleprompter apps scroll text on the phone screen near the front camera, or on a second device, and some apps scroll at the speed of your voice using speech recognition. Hardware teleprompters use a beam-splitter glass in front of the lens, reflecting text from a tablet or phone below, so that you look straight into the lens while reading. Teleprompters help with long, precise scripts, but reading can sound flat; practice the script beforehand, keep the text large and close to the lens to minimize eye movement, and adjust scroll speed to your natural pace.
Product photography setups
Product images sell, persuade and inform, and they appear everywhere from online shops to sponsored posts. Phones are capable of excellent product photography with the right setup:
- Background: a seamless sweep of white or colored paper, card or vinyl, curving from the table up a wall, eliminates a visible horizon line. For lifestyle shots, choose textured surfaces such as wood, marble, linen or concrete that suit the product.
- Light: soft, large light from a window or softbox to one side or behind, with white cards to fill shadows and black cards to add definition to edges. A light tent, a translucent box lit from outside, gives very even, shadowless light for small items.
- Camera: the main or telephoto camera on a tripod, avoiding the ultra-wide, which distorts product shapes. Shooting from slightly farther with the 2× or telephoto view keeps proportions natural.
- Settings: lock focus and exposure, shoot raw for color accuracy if possible, and use a timer or remote to avoid shake.
- Styling: clean the product carefully, remove dust and fingerprints, straighten labels and use props that support rather than distract.
For e-commerce, marketplaces often require plain white or light backgrounds, multiple angles and accurate color; check each platform's requirements. For social media, lifestyle images showing the product in use, with people and context, usually perform better than plain catalog shots.
| Product type | Lighting approach | Notes |
|---|---|---|
| Matte items (clothing, books) | Large soft light from the side | Fill shadows with white card |
| Shiny items (jewelry, electronics) | Very large diffused light, light tent | Control reflections with white and black cards |
| Glass and bottles | Backlight through diffusion | Black card edges define the shape |
| Cosmetics and textures | Raking side light | Reveals texture of creams and powders |
| Small items | Light tent or close soft light | Use macro mode or telephoto close focus |
Shiny and transparent products
Shiny products reflect their surroundings, including you, the phone and the room, so the lighting technique is to control what they reflect. Large, even light sources create clean, smooth highlights; white cards placed around the product create bright reflections, while black cards create dark lines that define edges and shape. A light tent surrounds the product with white, reducing unwanted reflections. Shoot through a hole in the tent or a gap in the cards to keep the phone out of the reflection. For glass, bottles and liquids, backlighting through diffusion makes the glass glow and reveals the liquid's color, while black cards placed just outside the frame on each side create dark outlines that define the shape.
Food and drink
Food content is one of the most popular categories on social media. Food looks best in soft, directional light from the side or slightly behind, which reveals texture, makes sauces glisten and creates gentle shadows that show shape. Window light is ideal; avoid overhead room lights and on-camera flash, which flatten food and create harsh reflections. Use white cards in front of the dish to fill shadows. Choose angles to suit the dish: overhead for flat dishes, pizzas, bowls and table spreads; about 45 degrees for most plated food, the angle at which diners see it; and straight on, at table level, for tall items such as burgers, layered cakes and drinks. Work quickly, because food wilts, melts, dries and loses steam; prepare props, background and lighting with a stand-in plate before the real dish arrives. Action shots, such as pouring, cutting, sprinkling and lifting a forkful, bring food to life in video.
Worked problem
Photographing a latte for a café's social media
A creator photographs a latte with latte art on a café table beside a window. The overhead lights make the foam look yellow, and the phone's automatic exposure blows out the white foam. What should they do?
Show solution
- Turn off or avoid the overhead lights and use the window as a side light from behind and to one side.
- Shoot from overhead to show the latte art, with the main camera or 2× crop, keeping the phone parallel to the table.
- Tap on the foam and lower exposure until the foam shows texture rather than pure white.
- Add a white napkin or menu as a reflector opposite the window to fill shadows.
- Style with a spoon, a pastry and a hand entering the frame, and shoot quickly before the art fades.
Answer: Use side window light only, shoot overhead, lower exposure to protect the foam, fill with a white card and style quickly.
Flat lays and overhead demonstrations
Overhead content, from recipes and crafts to unboxings, makeup, desk setups and handwriting, requires the phone to be held parallel to the table, directly above the subject. Overhead arms, tripods with horizontal extensions and phone mounts attached to shelves or ceilings make this possible; check that the setup is stable, since a falling phone can damage the subject or the table. Use the level indicator in the camera app to keep the phone parallel, which prevents distorted rectangles. Light from one side, with a reflector on the other, creates gentle shadows that give depth; avoid placing lights where your hands or the arm cast shadows on the working area. Compose flat lays with a clear focal point, a balanced arrangement of props, consistent colors and some negative space for text. In demonstration videos, keep hands within the frame and move deliberately; viewers follow the hands.
Selfie vlogging and on-the-go setups
Vlogs filmed at arm's length with the front camera or on a small grip give an intimate, spontaneous feel. To improve them, hold the phone slightly above eye level and at arm's length, or use a small extension grip or selfie stick to show more background; use the front camera's widest setting; face the light rather than having it behind you; use a small wireless lavalier or a compact microphone that mounts on the phone; turn on stabilization; and keep the phone steady while walking. Many phones now allow filming with the rear camera while previewing on a small screen on the back or a clip-on monitor, giving better quality. For travel, a compact kit might include a small tripod that doubles as a grip, a wireless microphone, a small LED light, a power bank and spare storage.
Backgrounds and props
Backgrounds and props communicate brand and context. A consistent background, such as the same shelves, color scheme or textured wall, becomes part of a creator's visual identity (CRE-110). Props should support the story without competing with the subject: a plant, a book, a mug or a lamp can make a space feel lived-in, while clutter distracts. Use color deliberately: complementary or analogous colors between subject and background help the subject stand out. For product and food work, build a small collection of surfaces and props, such as boards, fabrics, plates, cutlery and textured papers, that can be combined in different ways. Inexpensive vinyl backdrops that imitate wood, marble or concrete are popular and easy to store.
Building a portable creator kit
Once you know your formats, assemble a kit that lets you set up quickly anywhere. A typical phone creator kit might include:
- A tripod with a phone clamp and a small tabletop tripod or grip.
- A wireless lavalier system with spare batteries or charging cable.
- One or two small bi-color LED panels and a compact softbox or diffusion.
- A collapsible reflector or white and black foam boards.
- A power bank and charging cables, and external storage or cloud backup.
- A microfiber cloth, gaffer tape and clips.
Keep the kit packed and charged so that setting up takes minutes rather than an hour. As your work grows, add tools to solve specific problems rather than buying equipment in anticipation.
Screen recordings and app demonstrations
Many creators demonstrate apps, games, websites and software. Phones include built-in screen recording, which captures exactly what appears on the screen along with optional microphone audio. Before recording, turn on do-not-disturb mode to hide notifications, tidy the home screen, increase text size if needed for legibility, hide personal information such as email addresses, messages and account details, and set the screen to full brightness. Combining a screen recording with a talking-head clip in a picture-in-picture layout, or filming the phone in your hand with a second phone for a more personal feel, makes demonstrations easier to follow. Zooming in on important parts of the screen during editing helps viewers on small screens see details.
Working with a second phone
An older phone makes a useful second camera, monitor or remote. Second angles add variety to talking heads, interviews and demonstrations, and allow vertical and horizontal versions to be recorded simultaneously. Match settings such as resolution, frame rate and white balance on both phones, and clap at the start to sync clips in editing.
Common mistakes
MistakeLooking at yourself on screen instead of the lens.
InsteadLook into the lens, with a sticker as a reminder.
MistakePhotographing products with the ultra-wide.
InsteadUse the main or telephoto camera from farther back.
MistakeLighting food from overhead room lights.
InsteadUse side or back window light with fill cards.
MistakeTilting the phone for flat lays.
InsteadUse the level indicator to keep it parallel.
MistakeRebuilding setups differently each time.
InsteadMark positions for consistent results.
Summary and key terms
- Repeatable setups save time and create a consistent look.
- Talking heads need eye-level framing, soft key light, close microphones and tidy backgrounds.
- Teleprompters help with precise scripts if text is close to the lens.
- Products need soft light, controlled reflections and natural focal lengths.
- Food looks best in side or back light at angles that suit the dish.
- Overhead setups need stable mounts and a level phone.
- Backgrounds, props and a packed kit support brand and efficiency.
- Talking head
- Video of a person speaking to camera.
- Teleprompter
- Device or app displaying a script near the lens.
- Beam splitter
- Glass that reflects text while letting the camera see through.
- Seamless sweep
- Curved background without a visible horizon.
- Light tent
- Translucent enclosure for even product lighting.
- White card
- Reflector that fills shadows or creates highlights.
- Black card
- Material that adds dark edges or blocks light.
- Flat lay
- Arrangement photographed from directly above.
- Hero shot
- The main, most important image of a subject.
- Lifestyle shot
- Product shown in use and in context.
Practice problems
Work each problem on paper first, then reveal the answer to check.
Where should the phone be for a talking head?
Show answer
On a tripod at eye level, about 1–2 m away.
Why mark positions with tape?
Show answer
To rebuild the setup consistently.
How do hardware teleprompters work?
Show answer
A beam-splitter reflects text in front of the lens.
What is a seamless sweep?
Show answer
A curved background with no horizon line.
Why avoid the ultra-wide for products?
Show answer
It distorts shapes.
How do black cards help with glass?
Show answer
They create dark edges defining the shape.
Best angle for a burger?
Show answer
Straight on at table level.
Best light direction for food?
Show answer
Side or slightly behind.
How do you keep a flat lay square?
Show answer
Keep the phone parallel using the level indicator.
Name three items in a creator kit.
Show answer
Tripod, wireless mic, LED panel, reflector, power bank, cloth.
Lesson quiz · 5 questions
Score 60% or more to complete this lesson.
Create a free account to save your progress, take quizzes and earn a certificate.