
PHOT-102 · Lesson 4 of 12 · 25 min
Window light and available light indoors
Indoors, the most beautiful light is often already there: a window. Painters have used window light for centuries; Johannes Vermeer's interiors, lit by a tall window on the left, remain a model for portrait and still-life photographers. A window is a large, soft, directional source that costs nothing and needs no setup, and learning to use it well teaches the principles of studio lighting in their simplest form. Indoors there is also artificial light: room lamps, ceiling fixtures, shop and office lighting, and the glow of screens. This lesson covers how window light behaves, how to position subjects and camera in relation to a window, how to control it with curtains, reflectors and flags, how to deal with mixed and artificial light, flicker, and practical strategies for photographing interiors and events by available light.
The window as a light source
A window behaves like a large softbox whose size and brightness depend on what it sees. A window facing an open sky without direct sun gives soft, even, slightly cool light; north-facing windows in the northern hemisphere (south-facing in the southern) never receive direct sun, so their light stays soft and fairly constant through the day, which is why artists traditionally preferred them for studios. A window receiving direct sun throws a hard patch of sunlight onto the floor or walls, which can be dramatic, or can be softened with a sheer curtain or diffusion material stretched over the glass, turning the whole window into a bright, soft source.
The softness of window light depends on the window's apparent size from the subject (Lesson 2): a subject close to a large window is lit by very soft, wrapping light; the same subject several meters away receives harder, more directional light from what is now a relatively small source. The color depends on what the window sees: open sky (cool), a sunlit garden (green tint), a red brick building opposite (warm), or the sun (neutral to warm).
Falloff into the room
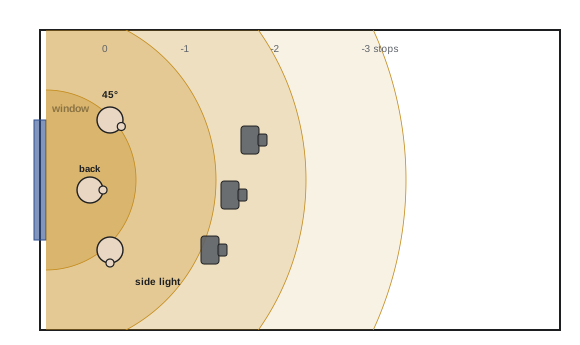
Window light falls off rapidly with distance from the window. Close to a large window, the light falls off more slowly than the inverse square law predicts for a point source, but a few meters into the room the window behaves more like a point source and the light drops quickly. In practice, a subject moved from 1 m to 3 m from a window may receive two to three stops less light. This has two consequences. First, exposures drop quickly as you move into the room, so place subjects near the window for good light and manageable ISO. Second, the falloff across a single subject can be significant: in a portrait close to a window, the side of the face nearer the window is noticeably brighter, and the far side of the room behind the subject is much darker, which naturally isolates the subject against a dark background.
Worked problem
Window light falloff
A portrait subject sits 1 m from a window, and an incident meter reads f/2.8 at 1/125 s at ISO 400. The photographer moves the subject to 2.5 m from the window. Estimate the new exposure, assuming the window behaves approximately as a point source beyond 1 m.
Show solution
- Light change ≈ 2 × log₂(2.5 ÷ 1) = 2 × 1.32 = 2.6 stops less light.
- Compensate with 2.6 stops: for example, ISO 400 to ISO 1600 (2 stops) and 1/125 s to 1/80 s (about 0.6 stop).
- Measure again: a large window close by often falls off somewhat less than this estimate, so the meter reading is the final authority.
Answer: About 2.5 stops less light, needing roughly f/2.8 at 1/80 s at ISO 1600. Moving back toward the window is usually better than raising ISO, both for exposure and for softer light.
Positioning subject and camera
The same window gives very different light depending on where the subject and camera are:
- Subject facing the window, camera between them (back to the window): flat, soft, frontal light with large catchlights. Flattering and simple, but with little modeling. The photographer must avoid blocking the light.
- Subject at about 45° to the window: the classic window portrait. The light models the face, with soft shadows on the far side, giving shape and depth. Turning the subject's face toward or away from the window adjusts how much of the face is lit.
- Subject parallel to the window, camera facing them from inside the room: side light, lighting one half of the face and leaving the other in shadow, a dramatic split effect unless the shadows are filled.
- Subject with their back to the window: a silhouette if exposed for the window, or a soft, backlit portrait with a glowing rim if exposed for the face, often with a reflector to light the face from the front.
- Camera at the window looking in: rarely used for people, but useful for still life lit from behind the camera.
For still life and food, a classic arrangement is the window to the side or slightly behind the subject, with the camera opposite or at 90°, so that light skims across the surfaces and creates highlights on glossy food and drink; a white card opposite the window fills the shadows.
Controlling window light
Window light can be modified with the same tools used for any light:
- Diffusion: sheer white curtains, tracing paper, shower curtains or professional diffusion fabric over the window soften direct sun and even out the light. Partially covering the window with diffusion can soften only part of it.
- Blocking: closing curtains or blinds, or covering parts of the window with black card or fabric, reduces the window's size, making the light harder and more directional, and controls where it falls. Lowering a blind from the top removes top light from high windows.
- Fill: a white card, foam board or reflector on the shadow side bounces window light back into the shadows (Lesson 5). The closer the reflector, the more fill.
- Negative fill: black card or fabric on the shadow side absorbs light that would otherwise bounce from white walls, deepening the shadows for a more dramatic look.
- Direction: moving furniture or the subject, or using a different window, may be simpler than modifying the light.
A white-walled room fills shadows a great deal; a room with dark walls gives contrasty window light. Many photographers carry a large piece of black fabric and a large white reflector precisely to control these effects in any room.
Mixed light
Indoors, window daylight (5,500 to 7,000 K) often mixes with warm tungsten or warm-white LED room lighting (2,700 to 3,000 K) and sometimes with cool fluorescent or LED office lighting. When different colors fall on different parts of a scene, any single white balance setting leaves some areas tinted: set for daylight, the lamp-lit areas glow orange; set for tungsten, the window side turns blue. Options include:
- Turn off the artificial lights and use the window only, or draw the curtains and use only the artificial light.
- Choose the dominant source for the subject and set white balance for it, accepting a color shift elsewhere, which often looks natural. A warm lamp glowing in the background of a daylight portrait adds atmosphere.
- Match the sources: in professional interiors photography, gels are placed over windows or lights to make all sources the same color (Lesson 9).
- Correct locally in raw processing with masks, for moderate mixtures (PHOT-101, Lesson 10).
Colored surfaces add their own casts: a room with orange walls warms all the light bouncing from them, and green-painted walls can give skin an unhealthy look. A gray card or color checker photographed in the subject's position under the actual light gives a reliable reference.
Artificial lights and flicker
Many artificial lights flicker at twice the mains frequency, 120 Hz on the 60 Hz systems of North America, because their output varies with the alternating current. Incandescent bulbs smooth this out with their glowing filament, but many fluorescent and some LED lamps vary strongly. At fast shutter speeds, frames can vary in exposure and color from one shot to the next, and with electronic shutters, bands may run across the frame. Remedies include using shutter speeds that are multiples of the flicker period (1/60 s or 1/120 s at 60 Hz), enabling the camera's anti-flicker mode, which times the exposure to the peak of the flicker cycle, and shooting a burst to choose consistent frames.
Artificial lights also vary in color quality. Inexpensive LEDs and fluorescent lamps may have a low color rendering index (CRI), rendering some colors, particularly skin and reds, poorly, and often have a green or magenta tint that a simple color temperature setting will not correct; adjusting the tint or a custom white balance helps (PHOT-101, Lesson 8). Sodium vapor and some mercury street lights emit narrow spectra that cannot be corrected to natural color at all.
Using practicals
Lights that appear in the picture, such as table lamps, candles, string lights, neon signs and screens, are called practicals, a term from film lighting. They add atmosphere, show where light in the scene seems to come from, and give the eye bright points of interest. Their exposure needs care: a bare bulb in frame is usually far brighter than the rest of the room, so photographers dim them, use lower-wattage bulbs, or balance them against the overall exposure so they glow without blowing out completely. Practicals can also serve as motivation for added light: a portrait lit by a lamp may be lit mostly by a hidden flash or LED placed to look as if it comes from the lamp.
Available light at events and interiors
Photographing events, concerts, interiors and documentary situations by available light requires techniques that make the most of limited light without disturbing the scene:
- Fast lenses: apertures of f/1.4 to f/2 gather two to three stops more light than kit zooms at f/4 to f/5.6, and their shallow depth of field isolates subjects.
- High ISO with modern sensors: ISO 3200 to 12800 is usable on many cameras, especially with noise reduction in processing. A correctly exposed high-ISO image is cleaner than an underexposed low-ISO image brightened later.
- Stabilization and technique: image stabilization allows slow shutter speeds for still subjects; brace against walls and time the shutter between movements.
- Exposure strategy: meter for the faces or the main subject and accept that highlights in lamps or windows may clip; in spotlit stage lighting, use spot metering or manual exposure for the lit performer.
- Position: move to where the light falls well on your subjects, and watch for moments when people turn toward a light source.
For interiors and architecture, where nothing moves, a tripod allows long exposures at low ISO and small apertures, and multiple bracketed exposures can be blended to show both the interior and the view through the windows (PHOT-101, Lesson 6).
Common mistakes
MistakePlacing the subject far from the window and raising ISO.
InsteadBring the subject close to the window for softer, brighter light.
MistakeStanding between the window and the subject unintentionally.
InsteadCheck that you are not blocking the light; move to the side.
MistakeSetting one white balance for mixed sources without thought.
InsteadChoose the dominant source, remove one, or gel to match.
MistakeIgnoring flicker under fluorescent or LED lighting.
InsteadUse flicker-safe shutter speeds or anti-flicker mode.
MistakeLetting practical lamps blow out.
InsteadDim or balance practicals so they glow with detail.
Summary and key terms
- A window is a large, soft, directional source whose quality depends on what it sees.
- Window light falls off rapidly into the room, darkening backgrounds naturally.
- Subject position relative to the window sets direction: flat, 45°, side or back light.
- Diffusion, blocking, fill and negative fill control window light.
- Mixed daylight and artificial light need a strategy for white balance.
- Many artificial lights flicker at 120 Hz on 60 Hz systems; use flicker-safe settings.
- Practicals add atmosphere; fast lenses, high ISO and good positioning enable available-light work.
- Window light
- Daylight entering through a window, used as a soft source.
- North light
- Soft, constant light from a window that never receives direct sun.
- Negative fill
- Black material that absorbs light to deepen shadows.
- Mixed lighting
- Light from sources of different color temperatures in one scene.
- Flicker
- Periodic variation in light output from AC-powered lamps.
- Anti-flicker mode
- A camera mode that times exposures to the flicker peak.
- Practical
- A light source visible in the frame.
- CRI
- Color rendering index, a measure of a source's color fidelity.
- Silhouette
- A subject rendered dark against a bright background.
- Available light
- Light already present in a scene, without added sources.
Practice problems
Work each problem on paper first, then reveal the answer to check.
Why do artists prefer north-facing windows in the northern hemisphere?
Show answer
They never receive direct sun, so the light is soft and constant.
What happens to window light softness as the subject moves away from the window?
Show answer
It becomes harder because the window's apparent size shrinks.
A subject moves from 1.5 m to 3 m from a window. Estimate the light change.
Show answer
About 2 stops less.
What is the classic window portrait position?
Show answer
Subject at about 45° to the window.
How do you make window light harder and more directional?
Show answer
Block part of the window to make it smaller, or move the subject away.
What does negative fill do?
Show answer
Absorbs bounce light to deepen shadows.
Set for daylight, how do tungsten-lit areas appear?
Show answer
Orange.
At what frequency do lamps flicker on a 60 Hz supply?
Show answer
120 Hz.
What are practicals?
Show answer
Light sources visible in the frame.
How many stops more light does f/1.4 gather than f/4?
Show answer
About 3 stops.
Lesson quiz · 5 questions
Score 60% or more to complete this lesson.
Create a free account to save your progress, take quizzes and earn a certificate.