
PHOT-102 · Lesson 7 of 12 · 27 min
On-camera flash: bounce, fill and balance
A flash mounted on the camera is the most convenient light a photographer can carry, and the one most often used badly. Pointed straight at the subject, it gives flat, harsh light with a dark shadow behind the subject, shiny skin, red eyes, and a background that falls into blackness. Used with skill, the same flash produces soft, natural-looking light indoors by bouncing off walls and ceilings, fills shadows invisibly outdoors, and balances with existing light so that viewers barely notice flash was used. This lesson covers the problems of direct flash, bounce flash and how to calculate its effect, bounce cards and diffusers, fill flash in daylight, balancing flash with ambient light at events and at night, motion effects with slow sync, and color correction gels.
Why direct flash looks harsh
Direct on-camera flash has several built-in problems, all of which follow from the principles in Lessons 1 and 2:
- It is a small source, so the light is hard, with crisp shadows and bright, small specular highlights on skin.
- It is front light from almost the camera position, so it flattens shape and texture.
- Its shadow falls directly behind the subject, slightly offset, appearing as a dark outline on a nearby wall.
- It falls off quickly, so nearby subjects are bright and distant ones dark; backgrounds go black indoors and at night.
- Being close to the lens axis, it reflects from the retina back into the lens, causing red eye (and similar effects in animals' eyes).
Direct flash is still sometimes the right choice: as low-power fill outdoors, when there is nothing to bounce from, or for a deliberate, raw snapshot aesthetic popular in fashion and documentary work. But in most situations, photographers change the direction and size of the light, which on-camera means bouncing it.
Bounce flash
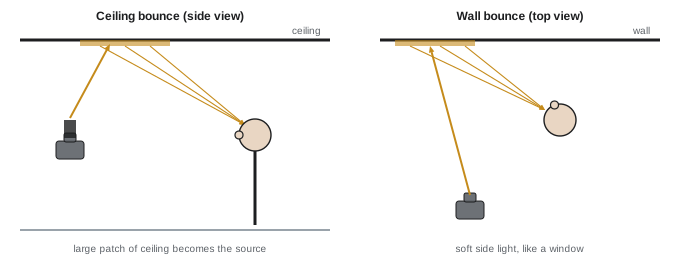
Bounce flash means pointing the flash head at a wall, ceiling or other surface so that the surface becomes the light source. Because a patch of wall or ceiling a meter or more across is far larger than the flash head, the light becomes soft; because it comes from a different direction, it gains shape. Bounce flash is the single most useful technique for on-camera flash indoors.
- Ceiling bounce: aiming up at a white ceiling gives soft, even light from above, good for groups and general coverage, but on its own it can leave shadows in eye sockets and under the chin, like midday sun.
- Wall bounce: swivelling the head to bounce off a wall to one side gives directional, side-lit light like a large window, the most flattering option for portraits.
- Bounce behind the photographer: turning the head to a wall or corner behind and to the side of the camera creates a large, soft source in front of the subject, slightly off-axis, with good catchlights.
The surface matters. White and neutral surfaces give clean light; colored walls give colored light, which white balance can only partly correct, since the flash direct light and the bounced light may differ. Dark surfaces absorb most of the light. High ceilings and large rooms need much more power, and outdoors there is usually nothing to bounce from at all.
Worked problem
Estimating bounce flash exposure
A subject is 3 m from the camera. With direct flash, f/8 gives correct exposure at ISO 400. The photographer bounces the flash from a white ceiling 1.5 m above the flash, so that the light travels about 1.5 m up and about 3.4 m down to the subject, and the ceiling absorbs about one stop. Estimate the aperture needed.
Show solution
- Path length: 1.5 + 3.4 = 4.9 m instead of 3 m. Distance loss: 2 × log₂(4.9 ÷ 3) = 2 × 0.71 = 1.4 stops.
- Absorption and scattering at the ceiling: about 1 stop (often more, since light spreads widely).
- Total loss: about 2.4 stops; from f/8, open to about f/3.5 (f/8 → f/5.6 → f/4 is 2 stops, plus a little more).
- In practice, TTL flash calculates this automatically, or check with a test shot.
Answer: Roughly f/3.5 at ISO 400, or keep f/5.6 and raise ISO by one and a half stops. Bounce flash needs much more power than direct flash, so raise ISO to keep recycle times short at events.
Bounce cards, diffusers and flags on the flash
Accessories modify on-camera flash:
- Built-in bounce cards slide out of many flash heads; with the head pointed up, the card throws a little direct light forward to add catchlights and fill the eye sockets, while most of the light goes to the ceiling.
- Clip-on diffusers (domes and translucent boxes) scatter light in all directions. Indoors this bounces light from all the room's surfaces, giving a softer overall look; outdoors, with nothing nearby to bounce from, they mainly waste power, since the diffuser is only slightly larger than the bare head.
- Flags on the flash: a piece of black foam or card attached to the head so that, when bouncing, no direct light reaches the subject. This makes bounced light look more like window light, without the flat fill from the front.
- Small softboxes and mini beauty dishes on the flash slightly enlarge the source, softening direct flash a little at close range.
Flash brackets move the flash higher above the lens, so that shadows fall lower behind the subject and red eye is reduced, especially useful when shooting vertical frames.
Fill flash outdoors
Outdoors in bright sun, the problem is usually too much contrast rather than too little light. Fill flash adds a small amount of light to the shadows: under the eyes and hats, on a backlit face, or in the dark side of a subject. The aim is to reduce contrast without the flash being obvious. With TTL, set flash exposure compensation to about −1 to −2 stops so that the flash adds fill below the ambient level; set ambient exposure for the scene as usual. With manual flash, set flash power so that the flash alone would give one to two stops less than the ambient exposure.
Fill flash outdoors must work within the sync speed: in bright sun at ISO 100, the ambient exposure might be f/16 at 1/125 s or f/8 at 1/500 s. At 1/200 s sync speed, the widest usable aperture may be f/11 to f/16, and the flash needs to reach the subject at that aperture, which limits distance. High-speed sync or an ND filter allows wider apertures with fill flash at the cost of power.
Worked problem
Setting fill flash in sun
A backlit portrait in bright sun: the sunlit background and rim meter f/11 at 1/200 s, ISO 100. The shaded face meters f/4 at 1/200 s, three stops darker. The photographer wants the face about one stop darker than the background, keeping the sky and rim as they are. How should the flash be set?
Show solution
- Keep f/11 at 1/200 s for the background and rim.
- The face receives f/4 worth of ambient light, three stops under f/11. Target is one stop under: f/8 total on the face.
- Flash must provide most of the face exposure: set manual power so that the flash alone gives about f/7.1 to f/8 at the subject distance; combined with the weak ambient light, the face then meters close to f/8.
- With TTL: f/11 at 1/200 s, FEC about −1 stop, and check the result.
Answer: The flash becomes the main light on the face at about one stop under the background, while sun provides the rim and background. Check the histogram and adjust flash power in third stops.
Balancing flash and ambient indoors and at night
At events, receptions and night scenes, the challenge is the opposite: flash lights nearby subjects well, but the background goes dark, destroying the atmosphere of the place. The remedy is dragging the shutter: using a slower shutter speed so that the ambient light records the room, while the flash freezes and lights the subject (Lesson 6). A common approach for events:
- Set ISO high enough (for example 1,600 to 3,200) that the ambient exposure needs a shutter speed around 1/30 to 1/60 s at a moderate aperture.
- Set the ambient exposure about one stop below the meter's reading, so the room is visible but the flash lights the subject a little brighter.
- Bounce the flash with TTL, so it lights the subject softly.
The result keeps the warmth and character of the room while the subject is cleanly lit. At night outdoors, the same technique records city lights, sunsets or a lit building behind a flash-lit person.
Slow sync, rear curtain and motion
When shutter speeds are slow and subjects move, a flash picture records both a sharp flash image and a blurred ambient image. With front-curtain sync, the flash fires at the start, so the sharp image appears at the start of the motion and the blurred trail extends ahead of it, which looks as if the subject is moving backwards. Rear-curtain (second-curtain) sync fires the flash at the end, so the trail lies behind the sharp image, giving a natural sense of motion. Photographers use slow sync deliberately to convey energy at dance floors, concerts and sports, sometimes moving the camera during the exposure for swirling light trails around a sharp subject. Where blur is not wanted, keep ambient light on the subject low relative to the flash, or raise the shutter speed.
Color gels
Flash is close to daylight in color, while many indoor scenes are lit by warm tungsten or warm-white LEDs at about 2,700 to 3,200 K. If you set the camera for the room's light, the flash-lit subject turns blue; if you set it for flash, the room turns orange. The solution is to place a color correction gel over the flash so its light matches the room: a CTO (color temperature orange) gel converts flash toward tungsten. Converting 5,500 K to 3,200 K requires a shift of:
which a full CTO gel provides approximately (manufacturers rate full CTO at roughly +130 to +160 mireds). Half and quarter CTO gels give smaller shifts, for warm-white LEDs at around 3,500 to 4,000 K or for a gentle warming effect. With the flash gelled to match, set the camera's white balance to tungsten or to the room's measured temperature, and both the room and the subject look natural. Under fluorescent or some LED lights with a green tint, a plus-green gel on the flash matches it, and the camera's tint correction removes the green from both. Creative colored gels on flash can color backgrounds or add dramatic effects (Lesson 8).
Red eye and catchlights
Red eye occurs when light from a flash close to the lens axis enters the pupil, reflects from the blood-rich retina and returns to the lens. It is worst in dim light, when pupils are wide, and with small cameras whose flashes are very close to the lens. Red-eye reduction modes fire preflashes to make pupils contract, but they delay the picture and cause people to blink. More effective solutions are bouncing the flash, raising it on a bracket, taking it off the camera (Lesson 8), turning up the room lights, or correcting the eyes in processing. Bounced and off-camera flash also produce more pleasing catchlights: larger, softer and positioned in the upper part of the eye, as with natural light.
Common mistakes
MistakeFiring direct flash at subjects indoors by default.
InsteadBounce from a wall or ceiling, or add a flag to the head.
MistakeBouncing from colored walls without thinking.
InsteadChoose neutral surfaces or expect a color cast.
MistakeUsing full-strength fill flash in sun.
InsteadSet fill one to two stops below ambient.
MistakeLeaving event backgrounds black.
InsteadDrag the shutter and raise ISO to record ambient light.
MistakeMixing ungelled flash with warm room light.
InsteadGel the flash with CTO and set white balance for the room.
Summary and key terms
- Direct on-camera flash is small, frontal and close to the lens: hard, flat, with red eye and dark backgrounds.
- Bounce flash makes a wall or ceiling the source, softer and more directional, at a cost of several stops.
- Bounce cards, flags, diffusers and brackets modify on-camera flash.
- Fill flash at one to two stops below ambient reduces contrast in sun within sync limits.
- Dragging the shutter records ambient light at events while flash lights the subject.
- Rear-curtain sync puts motion trails behind subjects.
- CTO and green gels match flash to tungsten and fluorescent light.
- Bounce flash
- Flash reflected from a surface to create a larger, redirected source.
- Bounce card
- A small card on the flash head that throws some light forward.
- Fill flash
- Flash used at low level to lighten shadows.
- Dragging the shutter
- Using a slow shutter speed to record ambient light with flash.
- Slow sync
- Flash with a slow shutter speed to show background or motion.
- CTO gel
- An orange gel that converts daylight-balanced flash toward tungsten.
- Plus-green gel
- A gel that matches flash to green-tinted fluorescent light.
- Mired
- One million divided by color temperature in kelvins.
- Red eye
- Red pupils caused by flash reflecting from the retina.
- Flash bracket
- A mount that raises the flash above the lens.
Practice problems
Work each problem on paper first, then reveal the answer to check.
Name four problems of direct on-camera flash.
Show answer
Hard light, flat front light, shadow behind the subject, rapid falloff, red eye.
Why does bounce flash give softer light?
Show answer
The illuminated patch of wall or ceiling is a much larger source.
Which bounce direction is usually most flattering for portraits?
Show answer
A wall to the side, or behind and to the side of the photographer.
Why are clip-on diffusers of little use outdoors?
Show answer
They barely enlarge the source and there is nothing nearby to bounce from.
What FEC is typical for fill flash with TTL?
Show answer
About −1 to −2 stops.
Ambient is f/8 at 1/200 s. How can you darken the sky by one stop while keeping flash on the subject the same?
Show answer
Use f/8 at 1/400 s with HSS (adjusting flash power) or use f/11 and increase flash power by one stop.
What does dragging the shutter do at an event?
Show answer
Records the room's ambient light so the background is not black.
Why use rear-curtain sync for moving subjects?
Show answer
Motion trails then appear behind the subject.
What mired shift converts 5,500 K to 3,200 K?
Show answer
About +131 mireds.
What gel matches flash to green-tinted fluorescent light?
Show answer
A plus-green gel.
Lesson quiz · 5 questions
Score 60% or more to complete this lesson.
Create a free account to save your progress, take quizzes and earn a certificate.