
CINE-201 · Lesson 12 of 12 · 26 min
Building and testing a camera package
Everything in this course comes together when a cinematographer chooses a camera, assembles a package around it, and tests the whole system before shooting. A camera package is more than a body: it includes lenses, filters, monitoring, wireless video, focus control, support, power, media, data management tools and spares, all chosen to suit the project's creative goals, schedule, locations and budget. Camera tests confirm that the package works as expected and that its images will survive the post-production pipeline. This lesson explains how to define requirements, compare cameras, build a package list, plan data management, design and run camera tests, work with rental houses, and complete the course capstone.
Starting from the story and the conditions
Camera choice starts with the project, not the equipment. Questions to ask include: What look does the story call for: clean and precise, or textured and organic? Which sensor size and lenses suit the intended compositions and depth of field? Will scenes be lit with large units, or must the camera work in available light at night? Are there high-speed shots, aerial work, underwater sequences or tight spaces? How mobile must the camera be: on dollies and cranes, handheld, on gimbals, in cars or on drones? What are the delivery requirements of the distributor or platform, such as minimum resolution, approved cameras, codecs and HDR deliverables? How large is the crew, and what is the post-production pipeline? The answers define a set of requirements against which cameras and packages can be compared.
Comparing cameras
A structured comparison prevents decisions based on habit or marketing. List the requirements, weight them by importance, and score each candidate camera, using specifications, published independent tests and, ideally, your own tests. Consider not only image quality but also reliability, ergonomics, heat behaviour, fan noise, power draw, recording formats, workflow compatibility, rental availability and cost, and the crew's familiarity. Many productions also run a second, smaller camera for crash cams, tight spaces, drones or second unit, chosen to intercut well with the main camera.
| Requirement | Weight | Camera A | Camera B | Camera C |
|---|---|---|---|---|
| Dynamic range and highlight handling | 5 | 5 | 4 | 3 |
| Low-light performance | 4 | 4 | 5 | 3 |
| Size and weight for gimbal work | 3 | 3 | 4 | 5 |
| Raw and log codecs meeting delivery spec | 5 | 5 | 5 | 4 |
| High-speed capture to 120 fps at 4K | 2 | 3 | 4 | 5 |
| Rental cost and availability | 3 | 2 | 3 | 5 |
Worked problem
Scoring the comparison
Using the matrix above, calculate each camera's weighted total and identify the best fit.
Show solution
- Camera A: 5×5 + 4×4 + 3×3 + 5×5 + 2×3 + 3×2 = 25 + 16 + 9 + 25 + 6 + 6 = 87.
- Camera B: 5×4 + 4×5 + 3×4 + 5×5 + 2×4 + 3×3 = 20 + 20 + 12 + 25 + 8 + 9 = 94.
- Camera C: 5×3 + 4×3 + 3×5 + 5×4 + 2×5 + 3×5 = 15 + 12 + 15 + 20 + 10 + 15 = 87.
Answer: Camera B scores highest (94), balancing image quality, low light and practicality; tests should confirm the result before committing.
Building the package list
A package list itemizes everything the camera department needs. A typical list for a drama includes:
- Camera bodies with sensor modes and recording formats specified, and a backup body for critical shoots.
- Lenses: a set of primes or zooms, with focal lengths, mount, coverage and any specialty lenses.
- Filters: matte box, ND, polarizers, diffusion and any effect filters, in the correct sizes.
- Monitoring: viewfinder, on-board monitors, director's and DIT monitors, LUT boxes, wireless video transmitters and receivers.
- Focus and lens control: follow focus, wireless lens control with motors and hand units, distance measuring tools.
- Support: tripod heads and legs, baseplates, rods, top handles, shoulder rigs, and links to grip equipment such as dollies (CINE-230).
- Power: batteries, chargers, power distribution and AC supplies, calculated from run times (Lesson 11).
- Media and data: recording media in sufficient quantity, card readers, drives and the DIT's system (Lesson 10).
- Timecode and sync: timecode boxes, slate.
- Expendables and tools: lens cleaning supplies, tape, batteries for small devices, tools, rain covers and heat protection.
The list is reviewed with the 1st AC, who prepares the package at the rental house during the camera prep, and with the DIT, who plans the data workflow.
Planning data management
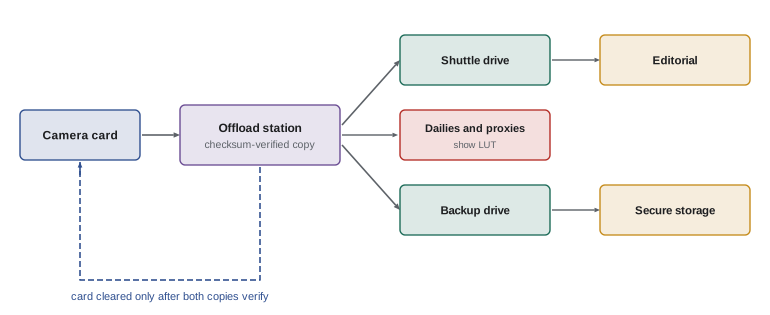
Data management deserves its own plan, agreed with post-production before shooting. It covers recording formats and resolutions; the number and capacity of media cards per camera per day; offloading procedures with checksum verification to at least two separate destinations; the transfer of drives to editorial and to secure long-term storage; the generation of dailies and proxies with the agreed LUT; naming conventions for cards, clips and drives; and reporting, including camera reports, data reports and incident logs. The calculation in Lesson 10 gives the storage needed; the schedule must allow time and people to offload, verify and transcode each day's footage before the cards are needed again.
Camera tests
Camera tests are carried out during pre-production to choose equipment, confirm settings and establish the look. Common tests include:
- Exposure and dynamic range: a scene or chart shot across a range of exposures, from several stops under to several stops over, to see how shadows and highlights behave and to choose the EI.
- Skin tone and colour: actors of different skin tones under the production's lighting, to check colour rendering and make-up.
- Lens tests: each lens on the actual camera, checking sharpness, coverage, flare, breathing, distortion and matching across the set (CINE-210).
- Resolution and moiré: charts and fine patterns, including costumes and sets.
- Low light and noise: scenes at night or in dim interiors at candidate EIs, graded as they will be in post.
- High-speed and specialty modes: sensor crops, flicker with the production's lights and screens, rolling shutter on fast moves.
- Workflow: footage taken through editorial, dailies, grading and delivery to confirm that everything works and looks as intended.
Tests should change one variable at a time, be logged carefully with slates showing the settings, and be evaluated on calibrated displays at the intended delivery format, ideally with the colourist who will grade the production.
Worked problem
Designing an exposure test
Design a simple exposure test to choose the EI for a camera that will shoot many night exteriors with bright practical lights.
Show solution
- Set up a scene with a grey card, a colour chart, a face, and a bright practical lamp in frame.
- Light for correct exposure at the native EI, then shoot a sequence from −3 to +3 stops in one-stop steps by changing shutter or ND, slating each.
- Repeat at the higher native ISO if the camera has one.
- In the grade, normalize each clip to the same brightness and compare noise in the shadows and detail in the lamp.
- Choose the EI that keeps the lamp from clipping while keeping shadow noise acceptable for the look.
Answer: A slated exposure ladder of a representative scene, normalized and compared in the grade, shows the best EI and how much latitude is available.
Working with rental houses
Most productions rent their camera packages from rental houses, which maintain the equipment, provide technical support and replace faulty items. The camera prep, typically one or more days at the rental house before shooting, lets the camera team assemble the package, check every item, test lenses on charts, confirm back focus, calibrate monitors, update firmware to agreed versions, and label everything. Insurance requirements, damage waivers and procedures for reporting problems should be clear before equipment leaves. Rental houses can also advise on which cameras and lenses suit a project and often host camera tests.
Professional responsibilities
Camera equipment is expensive and its footage irreplaceable, so camera teams take on serious responsibilities: protecting equipment from weather, heat, water, dust and impact; following safety procedures for batteries, rigging and electrical connections; ensuring footage is protected and verified before media is reused; documenting settings and issues; and communicating clearly with production about schedule implications of technical choices. Firmware should be fixed for the duration of a production unless an update is tested and agreed, because changes can alter colour, metadata or behaviour.
Capstone: a camera package proposal
The capstone asks you to prepare a camera package proposal for a short film or episodic project of your choice. It should include:
- A one-page description of the project, its look and its practical demands.
- A requirements list and a weighted comparison of at least three cameras, with your recommendation and reasoning.
- A sensor mode, resolution, frame rate, shutter and recording format plan, justified against delivery requirements.
- A complete package list, including lenses, filters, monitoring, power with run-time calculations, and media.
- A data management plan with storage calculations and offload times.
- A test plan describing at least four camera tests, what each will reveal, and how results will be evaluated.
If possible, carry out at least one of the tests, such as an exposure ladder or a flicker test, with any camera available to you, and include the results and what you learned.
Budgeting the camera department
The camera package is a significant budget line. Rental costs are usually quoted per day or week, with weekly rates often equal to three or four days. The budget should include the camera package itself, any specialty equipment such as high-speed cameras or drones, media and drives, insurance, the DIT system, shipping, and loss and damage. Labour for the camera crew, prep and wrap days, and overtime are separate lines. Negotiating package deals with a single rental house often reduces costs, and planning specialty equipment only for the days it is needed avoids paying for idle equipment.
Communicating technical choices
Cinematographers must explain technical choices to directors, producers and post-production teams who may not share their vocabulary. Useful practices include showing test footage rather than describing it, relating choices to the story and schedule, explaining trade-offs in time and money, and providing written summaries of key decisions, such as formats, frame rates and data plans, to everyone affected. Clear communication prevents misunderstandings that cost time on set and money in post-production.
Learning from each production
After each production, reviewing what worked and what did not improves future packages. Did any equipment fail? Were there enough batteries and media? Did the data workflow keep up? Did the look survive the grade? Keeping notes and sharing them with the crew and rental house builds knowledge that makes the next package more reliable and efficient.
Preparing for problems
Every package should include a plan for failures. Critical spares, such as an extra body or at least spare cables, power supplies, media, batteries and viewfinder, reduce downtime. The 1st AC keeps a kit of tools and replacement parts, knows the rental house's emergency contact, and records serial numbers. Backup plans for data, such as an extra drive and a second card reader, protect against the most damaging failures. Discussing what to do if the main camera fails, before it happens, lets the crew react calmly and keep shooting.
After the shoot
When shooting ends, the camera team wraps the package: equipment is cleaned, checked against the package list, and returned with notes on any faults, while final media are verified and handed to post-production with complete reports.
Common mistakes
MistakeChoosing a camera before defining requirements.
InsteadStart from the story, conditions and delivery needs.
MistakeForgetting accessories, power and media in budgets.
InsteadBuild a complete package list with quantities.
MistakeSkipping camera tests to save time.
InsteadTest exposure, colour, lenses and workflow before shooting.
MistakeChanging several variables in one test.
InsteadChange one variable at a time and slate settings.
MistakeUpdating firmware mid-production.
InsteadFreeze firmware unless an update is tested and agreed.
Summary and key terms
- Camera choice starts from story, conditions and delivery requirements.
- A weighted comparison matrix structures the decision.
- A package list covers bodies, lenses, filters, monitoring, focus, support, power, media and spares.
- Data management plans cover formats, offloads, copies, dailies and reports.
- Camera tests check exposure, colour, lenses, resolution, noise, specialty modes and workflow.
- Rental house preps check and label every item.
- The capstone integrates requirements, package, data and test planning.
- Camera package
- Complete set of camera equipment for a production.
- Requirements list
- Project needs used to compare equipment.
- Weighted matrix
- Comparison scoring options against weighted criteria.
- Package list
- Itemized list of camera equipment.
- Camera prep
- Assembly and testing of the package at the rental house.
- Data management plan
- Procedures for handling footage.
- Exposure ladder
- Series of shots at stepped exposures.
- Dailies
- Processed footage reviewed after each day.
- Shuttle drive
- Drive carrying footage to editorial.
- Firmware freeze
- Keeping camera software fixed during production.
Practice problems
Work each problem on paper first, then reveal the answer to check.
Name three questions that define camera requirements.
Show answer
Look, lighting conditions, mobility, high-speed needs, delivery specs.
Why use a weighted matrix?
Show answer
To compare cameras objectively against prioritized needs.
Weighted total for scores 4, 3, 5 with weights 5, 2, 3?
Show answer
20 + 6 + 15 = 41.
Name five categories on a package list.
Show answer
Bodies, lenses, filters, monitoring, power, media, support.
What must happen before a card is cleared?
Show answer
Two checksum-verified copies.
What does an exposure ladder reveal?
Show answer
Highlight and shadow behaviour and the best EI.
Why test skin tones?
Show answer
To check colour rendering and make-up under the lighting.
Why change one variable at a time?
Show answer
So results can be attributed to that variable.
What happens at a camera prep?
Show answer
The package is assembled, checked, tested and labelled.
Why freeze firmware?
Show answer
Updates can change colour, metadata or behaviour.
Lesson quiz · 5 questions
Score 60% or more to complete this lesson.
Create a free account to save your progress, take quizzes and earn a certificate.