
CINE-202 · Lesson 1 of 12 · 25 min
Exposure in cinematography
Exposure is the foundation on which every image is built. In stills photography, exposure is often described as getting a picture that is neither too dark nor too bright. In cinematography, the idea is richer: exposure determines where the tones of the scene fall within the camera's recording range, how much information is preserved in the highlights and shadows for colour grading, how much noise appears, and how consistent shots look when they are cut together. It is both a technical decision, protecting the integrity of the image, and a creative one, establishing mood. This course follows the image from the scene through measurement and exposure, into log encoding, LUTs and colour pipelines such as ACES, through HDR and SDR delivery, and onto set with the digital imaging technician. This first lesson sets out the concepts: what exposure means in a digital cinema workflow, stops and middle grey, the controls a cinematographer uses, and the difference between scene-referred and display-referred thinking.
What exposure means
Physically, exposure is the total amount of light that reaches the sensor during each frame: the illuminance on the sensor multiplied by the exposure time. It is controlled by the lens aperture, which sets how much light passes through the lens; the shutter, which sets how long each frame is exposed; and the light in the scene itself. Sensitivity settings such as ISO or exposure index do not change the amount of light collected; they change how the recorded signal is mapped to brightness values, as CINE-201 explained. Neutral density filters reduce the light entering the lens without changing colour.
In practice, cinematographers speak of exposure as the placement of tones: deciding how bright a face, a white wall or a dark corner should be in the recorded image relative to the camera's range. Correct exposure is the placement that best serves the story and the pipeline, usually keeping important highlights below clipping, keeping important shadows above the noise floor, and placing key tones such as skin where they can be graded easily.
Stops
Exposure is measured in stops. One stop represents a doubling or halving of light. Opening the lens by one stop doubles the light; halving the shutter time halves it. Stops are logarithmic, matching the way human vision perceives brightness: the difference between 100 and 200 units of light looks similar to the difference between 1,000 and 2,000. A scene's brightness range, a camera's dynamic range and a lighting ratio can all be expressed in stops. The number of stops between two light levels \(L_1\) and \(L_2\) is:
So a highlight 64 times brighter than a shadow is 6 stops above it, and a ratio of 1,000:1 is just under 10 stops. Exposure changes are often made in fractions of a stop, such as a third or a half, especially when matching shots.
| Ratio of light | Stops |
|---|---|
| 2:1 | 1 |
| 4:1 | 2 |
| 8:1 | 3 |
| 16:1 | 4 |
| 100:1 | About 6.6 |
| 1,000:1 | About 10 |
| 10,000:1 | About 13.3 |
Middle grey and the reference point
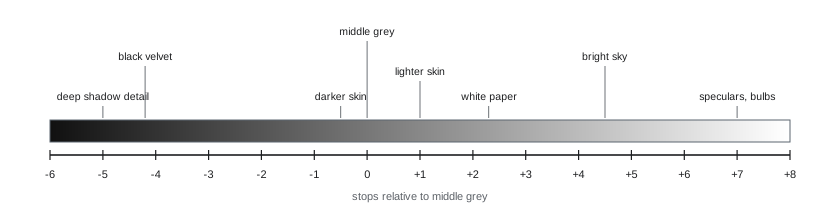
Cameras, meters and colour pipelines need a reference tone. By convention, this is middle grey: a surface reflecting about 18 % of the light falling on it, which appears roughly halfway between black and white to the human eye. Light meters are calibrated so that their readings place the metered subject at a tone close to middle grey, and grey cards provide a physical 18 % reference on set. Every camera's log curve specifies where middle grey is recorded, for example at a particular code value, and exposure is often described relative to it: a white shirt might sit about 2 to 2.5 stops above middle grey, a typical face around a stop above for lighter skin and around middle grey or below for darker skin, and deep shadows several stops below.
Because a perfect diffuse white surface reflects close to 90 to 100 % of light and a grey card 18 %, white sits about 2.3 to 2.5 stops above middle grey. Specular highlights, such as sun glints, light sources and reflections, can be many stops brighter still. Black velvet reflects only around 1 % of the light, more than 4 stops below middle grey. Thinking in stops relative to middle grey lets cinematographers predict how each element of the scene will be recorded.
The exposure controls in cinema
Cinematographers control exposure with several tools, each with side effects that make it more or less suitable in a given situation:
- Aperture, measured in T-stops on cinema lenses. A T-stop is an f-stop corrected for the light actually transmitted by the lens, so lenses at the same T-stop give the same exposure, which matters when switching lenses within a scene. Aperture also controls depth of field and can affect lens character, so cinematographers often choose the stop for its look and adjust light or ND to suit.
- Shutter angle or exposure time. In cinema, the shutter is usually kept at 180 degrees for natural motion blur (CINE-201), so it is rarely used as an exposure control except for specific effects or to fix flicker.
- Frame rate, which changes exposure time indirectly when shooting high-speed footage: doubling the frame rate at a constant shutter angle halves the exposure time and loses a stop.
- Neutral density filters, in the camera's internal ND system or in front of the lens, which reduce light in stop increments without changing colour, allowing a chosen aperture in bright light.
- Exposure index, ISO or gain, which change the placement of middle grey within the recorded range and the balance between highlight and shadow latitude.
- The lighting itself: adding, removing, diffusing or flagging light, changing practical lamp brightness, or waiting for the sun, which changes the scene rather than the camera.
Worked problem
Keeping the stop while the light changes
A cinematographer wants to shoot a day exterior at T2 for shallow depth of field, at 24 fps with a 180-degree shutter, EI 800. The meter suggests T11 for correct exposure. How much ND is needed?
Show solution
- Stops from T2 to T11: T2, T2.8, T4, T5.6, T8, T11, which is 5 stops.
- ND filters are rated in optical density, with 0.3 representing 1 stop.
- 5 stops require ND 1.5 (5 × 0.3).
- Use ND 1.5 internally, or a combination such as ND 0.9 plus ND 0.6.
Answer: About 5 stops of ND, an ND 1.5, allows T2 while maintaining exposure.
Exposure as a creative decision
Exposure shapes mood as much as lighting does. A high-key look, with most tones bright and soft shadows, suits comedies, commercials and optimistic scenes; a low-key look, with deep shadows and selective highlights, suits thrillers, horror and drama. Cinematographers decide how dark a night scene should feel, whether a window should glow or show the view outside, and whether a face should sit in light or shadow. In a digital workflow, these decisions are partly made on set, through lighting and exposure, and partly in grading. A crucial principle is that the camera should record enough information to allow the intended look, which is not always the same as recording the look itself: a dark, moody scene may be exposed brighter than it will appear, to keep shadows clean, and then graded down, while a scene that must hold detail in a bright window may be exposed darker and the faces lifted in grading with additional light on set.
Scene-referred and display-referred
Two ways of describing image values recur throughout this course. Scene-referred values describe the light in the scene: a scene-linear value of 0.18 represents middle grey, 0.36 a surface one stop brighter, and values above 1.0 represent highlights brighter than diffuse white. Camera log footage and formats such as ACES are scene-referred: they encode what the camera saw, not how it should look on a screen. Display-referred values describe what a display should show: brightness in nits, code values for a particular display standard such as Rec.709 at 100 nits, and the creative look after grading. Turning scene-referred data into display-referred images requires a transform, such as a LUT, an output transform in ACES or a colour-managed grading pipeline, that compresses the scene's dynamic range into what the display can reproduce and adds contrast and colour that look natural.
This separation is powerful. Exposure decisions are made in scene terms, by placing tones relative to middle grey; viewing decisions are made in display terms, with LUTs and transforms that can change without re-shooting. It allows the same footage to be delivered for a cinema, a television, an HDR display and a phone, each with its own display transform.
Exposure consistency
Films are cut from shots taken hours, days or weeks apart, often with different cameras, lenses and light. Viewers notice when a face changes brightness or colour between shots in the same scene. Consistent exposure makes editing and grading easier and protects the look. Cinematographers maintain consistency by metering and lighting to known values, using the same exposure tools across cameras, keeping key tones such as skin at consistent levels, documenting stops, filters and EI in camera reports, and reviewing shots against each other. Lessons 3 and 4 show how waveforms and false colour help.
Why exposure still matters with modern cameras
Modern cinema cameras offer dynamic ranges of 14 to 17 stops and powerful grading tools, which can encourage the idea that exposure can be fixed later. In reality, there are firm limits. Clipped highlights are lost permanently: no grading can recover detail in a sky, a lamp shade or a white shirt that has reached the sensor's saturation point. Underexposed shadows contain more noise, and lifting them in grading amplifies the noise and can reveal fixed pattern artefacts and colour shifts. Exposure that varies from shot to shot costs grading time and may never match perfectly. And compressed codecs, common on smaller productions, record less information per stop than raw or high-quality intermediate formats, leaving less room for correction. Good exposure on set gives the colourist and the director the most options.
The image pipeline
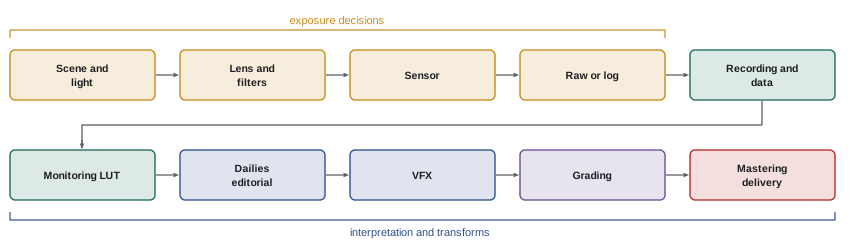
The image pipeline is the chain of processes that takes the light in a scene to the final display: the lens; the sensor and its analogue and digital processing; the camera's encoding into raw, log or display-referred formats; recording and data management; monitoring on set with LUTs; dailies; editorial; visual effects; colour grading; mastering; and delivery to cinemas, broadcasters and streaming services. Each stage must preserve the information the next stage needs and interpret it correctly. Many problems in post-production, such as washed-out images, crushed shadows, mismatched colours or unexpected clipping, are caused not by poor exposure but by incorrect interpretation somewhere in the pipeline, for example applying the wrong LUT or treating log footage as if it were Rec.709. The rest of this course works through each stage.
Exposure on film and on digital
Cinematographers who learned on film negative often note an important difference in how the two media respond to overexposure and underexposure. Colour negative film has enormous highlight latitude: overexposing it by two or three stops produces denser negatives that still print well, with highlights rolling off gently, while underexposure quickly produces thin, grainy negatives with weak blacks. Many film cinematographers therefore overexposed slightly as a safety margin. Digital sensors behave in the opposite way at the top: highlights clip abruptly at saturation, while shadows degrade gradually into noise. This is why digital exposure strategies emphasize protecting highlights, and why the old habit of generous overexposure can cause clipping on digital cameras. Modern digital cinema cameras have narrowed the gap considerably, with highlight latitude of seven stops or more above middle grey on the best sensors, but the principle remains: know where your camera clips, and keep important highlights below it.
Common mistakes
MistakeTreating exposure as something to fix in grading.
InsteadExpose to protect highlights and shadows on set.
MistakeChanging aperture to control exposure regardless of depth of field.
InsteadChoose the stop for the look and use ND or light to adjust.
MistakeConfusing f-stops and T-stops on cinema lenses.
InsteadUse T-stops to match exposure between lenses.
MistakeAssuming log footage should look right on a normal monitor.
InsteadUse the correct transform to view scene-referred footage.
MistakeLetting exposure vary between shots in a scene.
InsteadMeter, measure and document for consistency.
Summary and key terms
- Exposure places scene tones within the camera's recording range.
- Stops measure light logarithmically; one stop doubles or halves light.
- Middle grey, an 18 % reflectance, is the reference tone.
- T-stops, shutter, frame rate, ND, EI and lighting all control exposure.
- Exposure is a creative decision as well as a technical one.
- Scene-referred data is turned into display-referred images by transforms.
- The image pipeline must preserve and interpret information correctly at each stage.
- Exposure
- Total light reaching the sensor in each frame.
- Stop
- A doubling or halving of light.
- Middle grey
- An 18 % reflectance reference tone.
- T-stop
- Aperture value corrected for actual transmitted light.
- Neutral density filter
- Filter that reduces light without changing colour.
- Exposure index
- Sensitivity rating that places middle grey in the range.
- Scene-referred
- Values describing light in the scene.
- Display-referred
- Values describing what a display should show.
- Specular highlight
- A bright reflection of a light source.
- Image pipeline
- Chain of processes from scene to display.
Practice problems
Work each problem on paper first, then reveal the answer to check.
What is one stop?
Show answer
A doubling or halving of light.
How many stops is a 32:1 ratio?
Show answer
5 stops.
What reflectance is middle grey?
Show answer
About 18 %.
How far is diffuse white above middle grey?
Show answer
About 2.3 to 2.5 stops.
Why use T-stops?
Show answer
They account for transmission, giving consistent exposure between lenses.
What ND density gives 4 stops?
Show answer
ND 1.2.
What happens to exposure when doubling frame rate at a fixed shutter angle?
Show answer
It drops one stop.
What does a scene-linear value of 0.18 represent?
Show answer
Middle grey.
Why can clipped highlights not be recovered?
Show answer
The sensor recorded no detail above saturation.
Give an example of a pipeline interpretation error.
Show answer
Applying the wrong LUT or treating log as Rec.709.
Lesson quiz · 5 questions
Score 60% or more to complete this lesson.
Create a free account to save your progress, take quizzes and earn a certificate.