
CINE-202 · Lesson 7 of 12 · 25 min
Exposure strategies for log and raw
Knowing how to read meters, scopes and false colour is the start; deciding where to place exposure in each situation is the craft. Different scenes, cameras and looks call for different strategies, from protecting a bright sky in a day exterior to keeping noise low in a night scene. This lesson brings together the earlier lessons into practical approaches: exposing at the manufacturer's recommended level, rating the camera at a different exposure index, exposing to the right with care, exposing for skin, day exteriors, interiors with windows, night scenes, high-contrast and mixed scenes, exposure for visual effects, and keeping exposure consistent across cameras and days.
Starting from the manufacturer's reference
Each camera has a recommended base exposure index, often 800 for ARRI cameras and many others, at which its dynamic range is balanced around middle grey as the manufacturer intends. Exposing a grey card to the published middle grey value at this EI, or metering with an incident meter set to the same EI, gives a "normal" exposure that places skin, white and shadows where the camera's standard transform expects them. This is a sound default for most situations and the starting point for any strategy. Deviating from it should be deliberate, for a specific reason, such as protecting highlights or reducing noise, and should be tested.
Rating the camera at a different EI
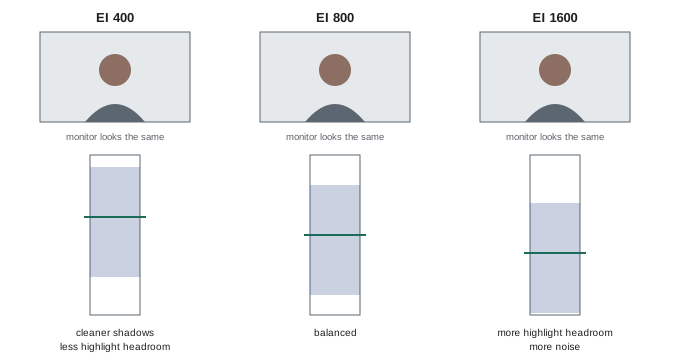
On cameras where EI is metadata, such as ARRI cameras recording raw or log, changing the EI does not change what the sensor records; it changes where middle grey is placed in the recorded range and how the image is displayed. If you set a lower EI, such as 400 instead of 800, the monitor image appears brighter for the same light, so you will give the scene more light or open up to make it look correct. The result is that the recorded data is effectively one stop "overexposed" relative to the base EI, giving cleaner shadows with less noise and one stop less highlight headroom. Setting a higher EI, such as 1600, does the opposite: you give less light, preserving an extra stop of highlights at the cost of more shadow noise. Many cinematographers rate cameras slightly below base, such as EI 640 or 500 on an EI 800 camera, for cleaner images, particularly for scenes without extreme highlights. On cameras where gain is applied in the analogue domain, such as those with dual native ISO, the relationship is different, and testing reveals the best settings.
Exposing to the right
Exposing to the right (ETTR) gives as much exposure as possible without clipping important highlights, placing the histogram or waveform as high as it can go, then bringing exposure down in grading. It maximizes the signal-to-noise ratio and is common in stills photography. In cinema, ETTR is used selectively: it suits controlled scenes with limited range, such as interviews, product shots and low-contrast interiors, where cleaner shadows are valuable. It is risky for scenes where light changes or actors move into brighter areas, and it causes inconsistency between shots if each is exposed to its own maximum. A more consistent approach is to choose a fixed exposure for the scene, perhaps a third to two-thirds of a stop above normal, and keep it across all shots, adjusting lighting rather than exposure to control highlights.
Exposing for skin
Faces are usually the most important element in the frame, and audiences are highly sensitive to skin rendering. Expose so that skin has good detail, texture and colour, with highlights on the forehead, nose and cheeks below clipping and shadows with detail. For lighter skin, this often means around one stop above middle grey on the key side; for darker skin, around middle grey or below, but with enough light to reveal texture and the warmth and variety of the skin's colour. Underexposing dark skin produces muddy, grey, noisy results, while overexposing it to match lighter skin flattens it. Lighting is the solution: add fill or bounce to reveal detail, use warm or neutral sources that complement the skin, and consider reflective highlights from larger sources, which give dark skin a pleasing sheen. When several people with different skin tones share a frame, light each individually so that all are well exposed within the same camera exposure.
Worked problem
Lighting two actors with different skin tones
Two actors sit side by side in a two-shot, one with very light skin and one with dark skin. At the chosen stop, the lighter actor's face reads one stop above middle grey and shows good detail, while the darker actor's face reads 2.5 stops below middle grey and looks muddy. What should be done?
Show solution
- Do not change the overall exposure, which would clip the lighter actor's face.
- Add light to the darker actor: a soft key from the same direction, about 1 to 1.5 stops brighter on them, flagged off the lighter actor.
- Add a subtle bounce or fill to reveal texture and colour, and consider a larger source for pleasing specular highlights.
- Check both faces on the waveform or false colour, aiming for good detail on each rather than identical values.
Answer: Light the darker actor individually by about 1 to 1.5 stops more, flagged from the other actor, keeping the overall exposure, so both faces show good detail.
Day exteriors
Day exteriors present bright light and large ranges, particularly in direct sun. Strategies include using internal or external ND to hold the desired stop; protecting the sky and bright surfaces, which may mean exposing a little below normal for faces and adding fill with bounce boards, reflectors or lights; using silks or overheads to soften and reduce direct sun on actors; positioning actors backlit by the sun with fill from the front, a classic approach that gives attractive rim light and lower contrast on faces; and timing shots for the most suitable sun angle. Clouds cause rapid changes in light; operators must be ready to adjust ND or stop smoothly, sometimes during a take, or wait for consistent conditions. Exterior continuity, matching shots taken hours apart, depends on monitoring and documenting the light.
Interiors with windows
Windows are among the most common exposure challenges. The exterior can be several stops brighter than the interior, so a correct interior exposure clips the window. Choices include accepting the window as a bright, blown-out shape, which can feel natural and is common in drama; reducing the window with ND gel or a large ND frame outside, by two to four stops or more, so the view outside remains visible; adding light to the interior to bring it closer to the exterior; and positioning the camera to keep the window out of frame or behind the actors. Large ND gels on windows are standard on feature films and commercials. The decision depends on the story: whether the outside world matters, and what the window says about the time and mood.
Night scenes
Night scenes are about controlling what is seen, not lighting everything. The image should feel dark while holding detail where needed. Common approaches include lighting faces with motivated sources, such as practical lamps, street lights or moonlight, at levels well above the noise floor; leaving areas genuinely dark for mood; using practical lights and backlight to separate subjects from the background; and exposing a little brighter than the final look, then grading down, to keep shadows clean. Choosing an EI near or slightly below base usually gives cleaner results than rating high and underexposing. Moonlight is often represented by a cool, soft or hard source with lower intensity than the key, and wet-down streets reflect light, adding depth. Day-for-night, shooting night scenes during the day and darkening in grading, remains an option for wide landscapes but requires careful planning of sun angle and sky.
High-contrast and mixed scenes
Some scenes combine extremes: a dark club with bright stage lights, a car interior at night with bright headlights, a cave opening to daylight. Strategies include controlling the light sources themselves, for example dimming LED walls or practical lights; using cameras and EIs with the most highlight latitude; protecting the most important highlights and allowing others to clip; and using multiple exposures or HDR capture techniques for static visual effects shots. Mixed colour temperatures add another dimension, which Lesson 9 addresses in terms of colour management. In every case, the cinematographer must decide which parts of the image tell the story and expose for them.
Exposure for visual effects
Shots that will be composited or enhanced with visual effects have particular requirements. Green and blue screens should be lit evenly at a consistent level, typically around middle grey to a stop below, with actors lit separately to match the background plate; overexposing the screen spills colour onto actors, while underexposing adds noise that makes keying difficult. Plates and backgrounds should be exposed to preserve maximum information, avoiding clipping and crushing, since VFX artists need detail for integration. Reference passes, such as grey and chrome spheres, colour charts and high dynamic range bracketed photographs of the lighting, help artists match computer-generated elements. CINE-302 covers visual effects photography.
Consistency across cameras and days
Multi-camera shoots and long productions need consistent exposure. Match cameras by using the same model, settings and LUTs where possible, and test any mixed cameras against each other with a chart under the same light. Use a grey card and chart at the start of each setup. Keep the same EI and exposure philosophy throughout a scene. Document exposure, ND, filters and light levels in camera reports and lighting notes so that pickups and reshoots can match. When a scene is shot over several days, photographs and meter readings of the lighting setup help reproduce it. The DIT often helps monitor consistency across cameras and days (Lesson 12).
Exposure for practical lights and screens
Practical lights, such as lamps, candles, neon signs and computer or phone screens, appear in many scenes and often set the mood. They are frequently much brighter than the surrounding scene and may clip. Strategies include using dimmers or lower-wattage bulbs in practical lamps; adding diffusion or neutral density inside lampshades; adjusting screen brightness and replacing screen content with properly exposed graphics; and choosing whether a practical should glow softly or burn out deliberately. Screens can also produce flicker or scan lines, so frame rate, shutter and screen refresh must be tested. In HDR, practicals become even more prominent, so their exposure deserves particular attention.
Exposure and lens choice
Lens choice interacts with exposure. Fast lenses allow shooting in lower light, but at their widest apertures depth of field becomes very shallow, making focus difficult, and some lenses lose contrast or show more aberrations wide open. Many cinematographers prefer to work a stop or two down from the maximum aperture for sharper, more controllable images, and plan their lighting to achieve that stop. Zoom lenses may lose light at longer focal lengths (ramping), changing exposure during a zoom unless the lens has a constant aperture. Exposure decisions are therefore part of a wider plan that includes lenses, depth of field and lighting.
Common mistakes
MistakeRating the camera high and underexposing at night.
InsteadUse base or lower EI and expose shadows above the noise floor.
MistakeExposing each shot to its own maximum.
InsteadChoose a consistent exposure for the scene.
MistakeUnderexposing dark skin to protect lighter skin.
InsteadLight each person individually.
MistakeOpening up for interiors without managing windows.
InsteadUse ND gel on windows or add interior light.
MistakeOverexposing green screens.
InsteadLight screens evenly near middle grey.
Summary and key terms
- Start from the manufacturer's base EI and published middle grey.
- Lower EI gives cleaner shadows and less highlight room; higher EI the opposite.
- Use ETTR selectively and keep scene exposure consistent.
- Light and expose every person's skin for detail and colour.
- Use ND, silks and fill outdoors, and ND gel or fill with windows.
- Expose night scenes above the noise floor and grade down.
- Plan exposure for VFX and document for consistency.
- Base EI
- Manufacturer-recommended exposure index.
- Rating the camera
- Choosing an EI different from base.
- ETTR
- Exposing as high as possible without clipping.
- Day-for-night
- Shooting night scenes in daylight and grading dark.
- Overhead
- Large frame of silk or diffusion above a scene.
- ND gel
- Neutral density film applied to windows.
- Motivated light
- Light that appears to come from a source in the scene.
- Plate
- Background footage for compositing.
- Chrome sphere
- Reference showing reflections of lighting for VFX.
- Camera report
- Record of settings and exposure for each take.
Practice problems
Work each problem on paper first, then reveal the answer to check.
What does rating an EI 800 camera at 400 do?
Show answer
Cleaner shadows, one stop less highlight headroom.
When is ETTR suitable in cinema?
Show answer
Controlled, low-range scenes like interviews.
Typical light skin level relative to grey?
Show answer
About one stop above.
How should dark skin be exposed?
Show answer
With enough light for texture and colour, often near grey.
Name two tools for day exteriors.
Show answer
ND, silks, bounce boards, backlighting.
Name two options for windows.
Show answer
ND gel, add interior light, accept blown out, reframe.
Why expose night scenes brighter than the final look?
Show answer
To keep shadows clean when graded down.
What is day-for-night?
Show answer
Shooting in daylight and grading to night.
Typical green screen level?
Show answer
About middle grey to a stop below, evenly lit.
Name two ways to keep exposure consistent.
Show answer
Same EI and LUT, charts, camera reports, light readings.
Lesson quiz · 5 questions
Score 60% or more to complete this lesson.
Create a free account to save your progress, take quizzes and earn a certificate.