
CINE-202 · Lesson 4 of 12 · 25 min
False colour, zebras and exposure assists
Waveforms are precise but take practice to read quickly, and they can be hard to relate to specific parts of a busy frame. False colour and zebras overlay exposure information directly onto the image, so that a camera operator or cinematographer can see at a glance which areas are clipping, which are crushed, and whether faces sit at the intended level. Combined with waveforms, meters and a calibrated monitor, they form the everyday exposure toolkit on set. This lesson covers how false colour works, manufacturer and third-party false colour schemes, using false colour for skin and middle grey, zebras and their settings, traffic lights and other assists, exposure tools on monitors and recorders, and a practical exposure routine.
How false colour works
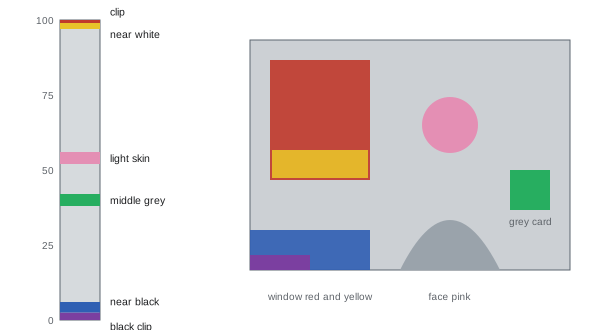
False colour replaces the normal image with a map of exposure levels: each range of signal values is shown in a particular colour, while values outside the defined ranges are shown in greyscale. A typical scheme marks values near clipping in red, values just below clipping in yellow, a narrow band around middle grey in green, a band suitable for skin tones in pink, values just above black in blue and values at or below black in purple. A glance at the false colour image shows whether the sky is red (clipping), whether the face is pink (at the intended level) and whether the shadows are purple (crushed). Because the overlay preserves the shape of the image, it is easy to see exactly which object falls in each range, something a waveform shows less directly.
False colour schemes
Different cameras, monitors and recorders use different false colour schemes, and their bands are defined relative to different signals. ARRI cameras apply false colour to the Rec.709 output of their standard display transform, with bands for black clipping, near black, 18 % grey, one stop over grey (often suitable for light skin), near white and white clipping. RED cameras offer modes that show exposure relative to the raw sensor data, highlighting areas at risk of clipping in the sensor itself, and video modes based on the output. Sony and Canon cameras, and monitors and recorders from companies such as Atomos, SmallHD and Blackmagic Design, offer their own schemes, often with options based on log or LUT signals. Some systems, such as the widely used Ed Lachman and other custom schemes on monitors, allow users to define their own bands. Because the bands differ, always check which scheme is active and what each colour represents on the specific device.
| Typical colour | Typical meaning |
|---|---|
| Red | Clipping or near clipping |
| Yellow / orange | Bright highlights just below clipping |
| Pink | A target range for skin (often around one stop over grey) |
| Green | Middle grey (18 %) |
| Blue | Near black, little detail |
| Purple | Black clipping, no detail |
| Grey | Values outside the marked ranges |
Using false colour for middle grey and skin
False colour makes it easy to place key tones. Placing a grey card in the subject's position and adjusting exposure until it turns green sets middle grey to the camera's intended level, a quick calibration of exposure for the light at that position. Skin tones can then be checked directly: on a typical scheme, light skin falling in the pink band sits around one stop above grey. Darker skin naturally falls lower, often in grey or around the green band, and that is correct if it shows good detail and colour; the pink band is not a target for everyone. Many cinematographers expose faces by eye on a calibrated monitor and use false colour mainly to check that highlights on the face, such as the forehead and cheekbones, are not approaching yellow or red, and that the background and windows sit where intended.
Worked problem
Setting exposure with false colour
An interior scene has an actor near a window. With the lens at T2.8, false colour shows the actor's face mostly grey, the grey card in blue and the window a mix of yellow and red. What does this indicate, and what options are available?
Show solution
- The grey card in blue means the scene at the actor's position is about two stops underexposed relative to the intended middle grey.
- The window in yellow and red shows the exterior is already near or at clipping.
- Opening the lens would brighten the actor but clip the window further.
- Better options: add light to the actor (a soft key from the window side), and reduce the window brightness with ND gel or a scrim on the window, then expose so the card reads green.
Answer: The actor is underexposed and the window is clipping; add light to the actor and reduce the window with ND gel rather than simply opening the lens.
Zebras
Zebras overlay diagonal stripes on areas of the image above a chosen signal level. They are a long-standing video tool, simple to read while operating and less visually disruptive than false colour, because the image remains visible beneath the stripes. Cameras typically offer one or two zebra settings, each defined as a threshold or a range. Common uses include:
- A high zebra set near clipping, for example 95 to 100 % on the display output or the camera's log clipping value, to warn of highlights at risk.
- A skin zebra set as a narrow band, for example 60 to 70 % in Rec.709, to check that a light-skinned face is at the intended level.
Like false colour, zebras may be based on the log signal or the display output, and the meaning of a percentage depends on which. When working in log, set the high zebra slightly below the camera's log clipping value, published in the manufacturer's documentation, rather than at 100 %.
Exposure assists and other tools
Cameras and monitors offer further exposure assists:
- Traffic lights, on some cameras such as ARRI models, show three small indicators for red, green and blue channels, warning when any channel is clipping in the sensor, useful because a saturated light can clip one channel before the luma waveform shows it.
- Goal posts, also on ARRI cameras, show bars indicating how much of the image is near clipping at the top and near black at the bottom, a compact summary of risk at each end of the range.
- Raw clipping indicators and histograms, on RED and other raw cameras, measure the sensor data directly.
- Exposure zoom or spot measurement tools on some monitors read the value at a chosen point, like a spot meter on the image.
- Waveform overlays and picture-in-picture scopes on monitors allow viewing the image and scopes together.
These tools are most useful when operators know what each represents and keep a consistent configuration across a production, so that everyone interprets them the same way.
Monitoring chains and where tools are measured
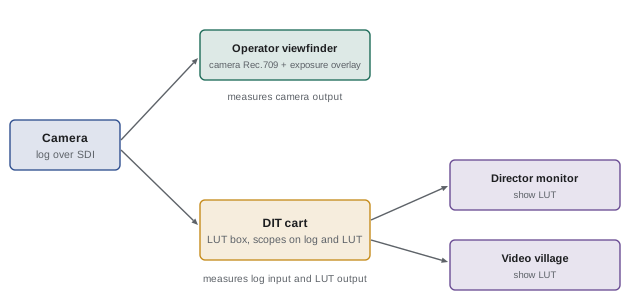
On a typical set, the camera sends signals to several monitors and recorders: the operator's viewfinder and on-board monitor, the focus puller's monitor, video village for the director and producers, and the DIT's cart. Each may display the log signal, the camera's built-in display transform, or a show LUT, and each may apply its own false colour or zebras. A cinematographer must know at which point in the chain each tool is measuring: false colour on a camera output with the LUT applied measures the LUT output; false colour on a monitor receiving a log feed and applying its own LUT may measure either log or LUT depending on settings. Mismatched configurations can lead to different departments seeing different exposure warnings for the same image. A well-run production documents the monitoring chain and sets tools consistently, with the DIT often managing configurations (Lesson 12).
A practical exposure routine
Many cinematographers develop a routine that combines tools:
- Light the scene, using a meter to set key, fill and background ratios.
- Place a grey card at the subject position and check it with false colour or the waveform, confirming that the camera's exposure matches the meter.
- Check faces for detail and colour on a calibrated monitor and confirm highlights are safe with false colour or zebras.
- Check windows, practicals, skies and other bright areas for clipping, deciding whether to protect them or accept clipping deliberately.
- Check the darkest important areas, ensuring they hold enough detail and are above the noise floor.
- View the image with the show LUT to judge the look.
- During takes, watch for changes in light, such as clouds or actors moving into brighter areas, and adjust.
- Record stops, filters and EI in the camera report.
Exposure tools for documentary and fast work
In documentary, events and run-and-gun shooting, there is often no time for meters or careful setup. Here, zebras and false colour on the camera or a small monitor are invaluable: a high zebra set near clipping warns of overexposure instantly, and a quick glance at false colour while framing confirms that faces are reasonable. Auto exposure is generally avoided because it causes visible changes during shots, but some cameras offer auto ND, which adjusts ND smoothly while keeping the aperture and shutter fixed, useful when moving between interior and exterior. Learning to read the tools without conscious effort lets operators focus on content.
Customizing false colour
Many monitors and some cameras allow users to customize false colour bands, choosing which ranges are marked and in which colours. A cinematographer might define a band for their preferred placement of skin on a particular production, a band marking the log values where the show LUT begins to compress highlights, or a band showing where the camera's noise becomes objectionable at the chosen EI. Custom bands are powerful but must be documented and shared, so that operators, focus pullers and the DIT know what the colours mean. Some productions create a laminated card or a page in the pipeline document showing the false colour key for each device in use.
Exposure tools in HDR monitoring
When monitoring HDR on set, exposure tools must be interpreted in nits. False colour schemes designed for HDR mark ranges such as below 100 nits for diffuse tones, 100 to 400 nits for bright highlights, 400 to 1,000 nits for specular highlights and above 1,000 nits for values beyond the mastering target. These schemes help cinematographers see which parts of the image will be particularly bright on HDR displays, such as practical lamps, windows and reflections, and decide whether to control them on set. Zebras can also be set in nits on some HDR monitors.
Building confidence with the tools
Exposure tools become second nature through practice. Useful exercises include lighting a simple scene and exposing it by meter, then checking the result with false colour and the waveform; deliberately overexposing and underexposing by known amounts and observing how each tool responds; comparing false colour on camera and on an external monitor to see how schemes differ; and photographing faces of different skin tones under the same light to learn how each reads on the tools. Recording the results with a grey card and chart, and grading them afterwards, connects what the tools showed on set with what the colourist can do with the footage.
Common mistakes
MistakeAssuming all false colour schemes match.
InsteadCheck the active scheme and band definitions.
MistakeForcing every face into the pink band.
InsteadExpose each person's skin for detail and colour.
MistakeSetting zebras at 100 % when monitoring log.
InsteadSet them relative to the camera's log clip value or the LUT output.
MistakeIgnoring channel clipping in saturated lights.
InsteadUse traffic lights or RGB parades.
MistakeDifferent departments using different configurations.
InsteadDocument and standardize the monitoring chain.
Summary and key terms
- False colour maps exposure ranges onto the image in colour.
- Schemes vary between cameras, monitors and recorders.
- A grey card turning green confirms middle grey exposure.
- Skin targets are guides; darker skin correctly sits lower.
- Zebras overlay stripes above or within chosen levels.
- Traffic lights and goal posts show channel and range clipping.
- Know where in the monitoring chain each tool measures.
- False colour
- Overlay mapping exposure ranges to colours.
- Zebras
- Stripes over areas above or within a set level.
- Traffic lights
- Indicators of channel clipping.
- Goal posts
- Bars showing how much image is near clip or black.
- Monitoring chain
- Path of signals to monitors and recorders.
- Show LUT
- Production's standard monitoring transform.
- Log clip value
- Signal level where the log recording clips.
- Auto ND
- Automatic adjustment of internal ND filters.
- Exposure routine
- Consistent sequence of exposure checks.
- Video village
- Monitoring area for the director and producers.
Practice problems
Work each problem on paper first, then reveal the answer to check.
What colour usually marks clipping?
Show answer
Red.
What does green usually represent?
Show answer
Middle grey.
How do you calibrate exposure with false colour?
Show answer
Expose until a grey card reads green.
Why is false colour easier to relate to the image than a waveform?
Show answer
It overlays levels on the image itself.
Name two typical zebra settings.
Show answer
High near clipping, skin band.
What do traffic lights indicate?
Show answer
Clipping in individual colour channels.
What do goal posts show?
Show answer
How much of the image is near clip or black.
Why document the monitoring chain?
Show answer
So all departments interpret tools consistently.
What does auto ND adjust?
Show answer
ND filtration while keeping aperture and shutter fixed.
List three steps of an exposure routine.
Show answer
Meter, grey card check, faces, highlights, shadows, LUT view, report.
Lesson quiz · 5 questions
Score 60% or more to complete this lesson.
Create a free account to save your progress, take quizzes and earn a certificate.